然后这是我的答案和题目涉及到的知识点,除了鼠标指针这个部分没通过单元测试之外,其他都都通过了,然后这个鼠标指针为什么没通过单元测试我也没弄明白,试了下其他人的也通过不了,好奇怪……
这里省去部分题目,主要写答案。
Vue.js 提供了一个内置组件,将其插槽内容渲染到另一个 DOM,成为该 DOM 的一部分。
vue
<script setup>const msg = 'Hello World'</script><template><teleport to="body"><span>{{ msg }}</span></teleport></template>
相关知识点 :Teleport | Vue.js
有时组件模板的一部分逻辑上属于该组件,而从技术角度来看,最好将模板的这一部分移动到 DOM 中 Vue app 之外的其他位置1。
Vue.js 提供了一个指令,以便只渲染一次元素和组件,并且跳过以后的更新。
vue
<script setup>import { ref } from 'vue'const count = ref(0)setInterval(() => {count.value++}, 1000)</script><template><span v-once>使它从不更新: {{ count }}</span></template>
相关知识点:Vue-事件修饰符
Vue 单文件组件 <style>
模块支持给 CSS 绑定动态值。
vue
<script setup>import { ref } from 'vue'const theme = ref('red')const colors = ['blue', 'yellow', 'red', 'green']setInterval(() => {theme.value = colors[Math.floor(Math.random() * 4)]}, 1000)</script><template><p>hello</p></template><style scoped>/* Modify the code to bind the dynamic color */p {color: v-bind(theme);}</style>
相关知识点:v-bind
Dynamic Styling动态绑定样式
给具有 CSS 作用域的 Vue 单文件组件设置全局 CSS 样式
vue
<template><p>Hello Vue.js</p></template><style scoped>p {font-size: 20px;color: red;text-align: center;line-height: 50px;}/* Make it work */:global(body) {width: 100vw;height: 100vh;background-color: burlywood;}</style>
或者
vue
<template><p>Hello Vue.js</p></template><style scoped>p {font-size: 20px;color: red;text-align: center;line-height: 50px;}</style><style>/* Make it work */body {width: 100vw;height: 100vh;background-color: burlywood;}</style>
相关知识点:单文件组件 CSS 功能 | Vue.js
见上面
验证 Button 组件的 Prop 类型 ,使它只接收: primary | ghost | dashed | link | text | default ,且默认值为 default
vue
<script setup>import Button from './Button.vue'defineProps({type: {type: String,default: 'default',validator: value => {;['primary', 'ghost', 'dashed', 'link', 'text', 'default'].includes(value)}}})</script><template><Button type="dashed" /></template>
相关知识点:Props | Vue.js
这题我不是很懂,翻了一下大家的解决方案,感觉这个比较能看懂:21 - functional component · Issue #322 · webfansplz/vuejs-challenges · GitHub
vue
<script setup lang="ts">import { ref, h } from 'vue'/*** Implement a functional component :* 1. Render the list elements (ul/li) with the list data* 2. Change the list item text color to red when clicked.*/const ListComponent = (props, { emit }) =>h(// 创建 ul'ul',// 根据传入的props创建liprops.list.map((item: { name: string }, index: number) =>h('li',{// 点击时处罚toggle。并将当前index作为参数传入toggleonClick: () => emit('toggle', index),// 将当前点击的li颜色设置为红色style: index === props.activeIndex ? { color: 'red' } : null},// li 默认值item.name)))ListComponent.props = ['list', 'activeIndex']ListComponent.emits = ['toggle']const list = [{name: 'John'},{name: 'Doe'},{name: 'Smith'}]const activeIndex = ref(0)function toggle(index: number) {activeIndex.value = index}</script><template><list-component :list="list" :active-index="activeIndex" @toggle="toggle" /></template>
相关知识点:
使用 h 渲染函数来实现一个组件。
vue
import { defineComponent, h } from 'vue'; export default defineComponent({ name: 'MyButton', props: { disabled: { type: Boolean,default: false, }, }, emits: ['custom-click'], setup(props, { emit, slots }) { return () => h( 'button', { disabled:props.disabled, onClick: () => emit('custom-click'), }, slots.default?.() ); }, });
实现一个树组件
vue
<script setup lang="ts">import { defineComponent } from 'vue'interface TreeData {key: stringtitle: stringchildren: TreeData[]}defineProps<{ data: TreeData[] }>()</script><template><ul v-for="node in data"><li>{{ node.title }}</li><template v-if="node.children && node.children.length">// 用递归的方法来实现<TreeComponent :data="node.children" /></template></ul></template>
参考:
<script setup>
| Vue.js本节相关知识点:组合式函数 | Vue.js
尝试编写可组合函数
vue
<script setup lang="ts">import { ref } from 'vue'/*** Implement a composable function that toggles the state* Make the function work correctly*/function useToggle(init: boolean) {const state = ref(init)const toggle = () => (state.value = !state.value)return [state, toggle]}const [state, toggle] = useToggle(false)</script><template><p>State: {{ state ? 'ON' : 'OFF' }}</p><p @click="toggle">Toggle state</p></template>
实现一个计数器
vue
<script setup lang="ts">import { ref } from 'vue'interface UseCounterOptions {min?: numbermax?: number}/*** Implement the composable function* Make sure the function works correctly*/function useCounter(initialValue = 0, options: UseCounterOptions = {}) {const count = ref(initialValue)const inc = () => {if (count.value < options.max) count.value++}const dec = () => {if (count.value > options.min) count.value--}const reset = () => (count.value = initialValue)return { count, inc, dec, reset }}const { count, inc, dec, reset } = useCounter(0, { min: 0, max: 10 })</script>
封装一个localStorage
API
vue
<script setup lang="ts">import { ref, watchEffect } from 'vue'/*** Implement the composable function* Make sure the function works correctly*/function useLocalStorage(key: string, initialValue: any) {const value = ref(localStorage.getItem(key) || initialValue)watchEffect(() => {localStorage.setItem(key, value.value)})return value}const counter = useLocalStorage('counter', 0)// We can get localStorage by triggering the getter:console.log(counter.value)// And we can also set localStorage by triggering the setter:const update = () => counter.value++</script><template><p>Counter: {{ counter }}</p><button @click="update">Update</button></template>
相关知识点:
这个没通过单元测试,不知道什么原因,试了下其他人的也没能通过……
vue
<script setup lang="ts">import { ref, onMounted, onUnmounted } from 'vue'// Implement ...function useEventListener(target, event, callback) {onMounted(() => target.addEventListener(event, callback))onUnmounted(() => target.removeEventListener(event, callback))}// Implement ...function useMouse() {const x = ref(0)const y = ref(0)useEventListener(window, 'mousemove', e => {x.value = e.pageXy.value = e.pageY})return { x, y }}const { x, y } = useMouse()</script><template>Mouse position is at: {{ x }}, {{ y }}</template>
vue
<script setup lang="ts">import { onMounted, inject, onUnmounted } from 'vue'const timer = inject('timer')const count = inject('count')onMounted(() => {timer.value = window.setInterval(() => {count.value++}, 1000)})// 计时器要清除onUnmounted(() => {window.clearInterval(timer.value)})</script><template><div><p>Child Component: {{ count }}</p></div></template>
vue
<script setup lang="ts">import { ref, Ref, reactive, isRef, unref, toRef } from 'vue'const initial = ref(10)const count = ref(0)// Challenge 1: Update reffunction update(value) {count.value = value}/*** Challenge 2: Check if the `count` is a ref object.* Make the output be 1*/console.log(isRef(count) ? 1 : 0)/*** Challenge 3: Unwrap ref* Make the output be true*/function initialCount(value: number | Ref<number>) {// Make the output be trueconsole.log(unref(value) === 10)}initialCount(initial)/*** Challenge 4:* create a ref for a property on a source reactive object.* The created ref is synced with its source property:* mutating the source property will update the ref, and vice-versa.* Make the output be true*/const state = reactive({foo: 1,bar: 2})const fooRef = toRef(state, 'foo') // change the impl...// mutating the ref updates the originalfooRef.value++console.log(state.foo === 2)// mutating the original also updates the refstate.foo++console.log(fooRef.value === 3)</script><template><div><p><span @click="update(count - 1)">-</span>{{ count }}<span @click="update(count + 1)">+</span></p></div></template>
相关知识点:
保证解构/扩展不丢失响应性
vue
<script setup lang="ts">import { reactive, toRefs } from 'vue'function useCount() {const state = reactive({count: 0})function update(value: number) {state.count = value}return {state: toRefs(state),update}}// Ensure the destructured properties don't lose their reactivityconst {state: { count },update} = useCount()</script><template><div><p><span @click="update(count - 1)">-</span>{{ count }}<span @click="update(count + 1)">+</span></p></div></template>
相关知识点:toRefs
vue
<script setup lang="ts">import { ref, computed } from 'vue'const count = ref(1)const plusOne = computed({get() {return count.value + 1},set(newValue) {count.value = newValue - 1}})/*** Make the `plusOne` writable.* So that we can get the result `plusOne` to be 3, and `count` to be 2.*/plusOne.value++</script><template><div><p>{{ count }}</p><p>{{ plusOne }}</p></div></template>
相关知识点:可写的计算属性
vue
<script setup lang="ts">import { ref, watch } from 'vue'const count = ref(0)/*** Challenge 1: Watch once* Make sure the watch callback only triggers once*/const watchOnce = watch(count, () => {console.log('Only triggered once')watchOnce()})count.value = 1setTimeout(() => (count.value = 2))/*** Challenge 2: Watch object* Make sure the watch callback is triggered*/const state = ref({count: 0})watch(state,() => {console.log('The state.count updated')},{ deep: true })state.value.count = 2/*** Challenge 3: Callback Flush Timing* Make sure visited the updated eleRef*/const eleRef = ref()const age = ref(2)watch(age,() => {console.log(eleRef.value)},{flush: 'post'})age.value = 18</script><template><div><p>{{ count }}</p><p ref="eleRef">{{ age }}</p></div></template>
相关知识点:侦听器 | Vue.js
响应式 API: shallowRef
vue
<script setup lang="ts">import { shallowRef, watch } from 'vue'const state = shallowRef({ count: 1 })// Does NOT triggerwatch(state,() => {console.log('State.count Updated')},{ deep: true })/*** Modify the code so that we can make the watch callback trigger.*/state.value = { count: 2 }</script><template><div><p>{{ state.count }}</p></div></template>
相关知识点:shallowRef()
child.vue
vue
<script setup lang="ts">import { inject } from 'vue'const count = inject('count')</script><template>{{ count }}</template>
相关知识点:组合式 API:依赖注入 | Vue.js
vue
<script setup lang="ts">import { ref, computed, watch, watchEffect, effectScope } from 'vue'const counter = ref(1)const doubled = computed(() => counter.value * 2)// use the `effectScope` API to make these effects stop together after being triggered onceconst scope = effectScope()scope.run(() => {watch(doubled, () => console.log(doubled.value))watchEffect(() => console.log(`Count: ${doubled.value}`))counter.value = 2})setTimeout(() => {counter.value = 4scope.stop()})</script><template><div><p>{{ doubled }}</p></div></template>
相关知识点:effectScope
vue
<script setup>import { watch, customRef } from 'vue'/*** Implement the function*/function useDebouncedRef(value, delay = 200) {let timeoutreturn customRef((track, trigger) => {return {get() {track()return value},set(newValue) {clearTimeout(timeout)timeout = setTimeout(() => {value = newValuetrigger()}, delay)}}})}const text = useDebouncedRef('hello')/*** Make sure the callback only gets triggered once when entered multiple times in a certain timeout*/watch(text, value => {console.log(value)})</script><template><input v-model="text" /></template>
相关知识点:customRef
创建一个自定义的修饰符 capitalize
,它会自动将 v-model
绑定输入的字符串值首字母转为大写:App.vue
vue
<script setup>import { ref } from 'vue'import Input from './Input.vue'const value = ref('')</script><template><Input type="text" v-model.capitalize="value" /></template>
Input.vue
vue
<script setup>import { defineProps, defineEmits } from 'vue'const props = defineProps({modelValue: String,modelModifiers: {default: () => ({})}})const emit = defineEmits(['update:modelValue'])function emitValue(e) {let value = e.target.valueif (props.modelModifiers.capitalize) {value = value.charAt(0).toUpperCase() + value.slice(1)}emit('update:modelValue', value)}</script><template><input type="text" :value="modelValue" @input="emitValue" /></template>
相关知识点:处理 v-model 修饰符
见上面。v-once
vue
<script setup lang="ts">import { ref } from 'vue'const state = ref(false)/*** Implement the custom directive* Make sure the input element focuses/blurs when the 'state' is toggled**/const VFocus = {updated: (el, state) => (state.value ? el.focus() : el.blur())}setInterval(() => {state.value = !state.value}, 2000)</script><template><input v-focus="state" type="text" /></template>
相关知识点:自定义指令 | Vue.js
尝试实现一个防抖点击指令
vue
<script setup lang="ts">/*** Implement the custom directive* Make sure the `onClick` method only gets triggered once when clicked many times quickly* And you also need to support the debounce delay time option. e.g `v-debounce-click:ms`**/function debounce(fn, delay) {let timeoutlet count = 0return (...args) => {if (count === 0) {count++fn(...args)}clearTimeout(timeout)timeout = setTimeout(() => {fn(...args)}, delay)}}const VDebounceClick = {mounted: (el, binding) => {const { value, arg } = bindingel.addEventListener('click', debounce(value, arg))}}function onClick() {console.log('Only triggered once when clicked many times quickly')}</script><template><button v-debounce-click:200="onClick">Click on it many times quickly</button></template>
相关知识点:指令钩子
vue
<script setup lang="ts">import { ref, watchEffect } from 'vue'/*** Implement the custom directive* Make sure the list item text color changes to red when the `toggleTab` is toggled**/const VActiveStyle = {mounted: (el, binding) => {const [styles, fn] = binding.valuewatchEffect(() => {Object.keys(styles).map(key => (el.style[key] = fn() ? styles[key] : ''))})}}const list = [1, 2, 3, 4, 5, 6, 7, 8]const activeTab = ref(0)function toggleTab(index: number) {activeTab.value = index}</script><template><ul><liv-for="(item, index) in list":key="index"v-active-style="[{ color: 'red' }, () => activeTab === index]"@click="toggleTab(index)">{{ item }}</li></ul></template>
v-model
指令vue
<script setup lang="ts">import { ref } from 'vue'/*** Implement a custom directive* Create a two-way binding on a form input element**/const VOhModel = {mounted: (el, binding) => {el.value = binding.valueel.addEventListener('input', () => {value.value = el.value})}}const value = ref('Hello Vue.js')</script><template><input v-oh-model="value" type="text" /><p>{{ value }}</p></template>
vue
<script setup lang="ts">const click1 = () => {console.log('click1')}const click2 = e => {console.log('click2')}</script><template><div @click="click1()"><div @click.stop="click2()">click me</div></div></template>
相关知识点:事件修饰符
vue
<template><!-- Add key modifiers made this will fire even if Alt or Shift is also pressed --><button @click.alt="onClick1" @click.shift="onClick1">A</button><!-- Add key modifiers made this will only fire when Shift and no other keys are pressed --><button @click.shift.exact="onCtrlClick">A</button><!-- Add key modifiers made this will only fire when no system modifiers are pressed --><button @click.exact="onClick2">A</button></template><script setup>function onClick1() {console.log('onClick1')}function onCtrlClick() {console.log('onCtrlClick')}function onClick2() {console.log('onClick2')}</script>
相关知识点:按键修饰符
在Vue.js
中改变响应式状态时,DOM 不会同步更新。 Vue.js
提供了一个用于等待下一次 DOM 更新的方法
vue
<script setup>import { ref, nextTick } from 'vue'const count = ref(0)const counter = ref(null)async function increment() {count.value++/*** DOM is not yet updated, how can we make sure that the DOM gets updated* Make the output be true*/await nextTick()console.log(+counter.value.textContent === 1)}</script><template><button ref="counter" @click="increment">{{ count }}</button></template>
相关知识点:nextTick()
vue
<script setup lang="ts">import { reactive, isReactive, toRaw, markRaw } from 'vue'const state = { count: 1 }const reactiveState = toRaw(reactive(state))/*** Modify the code so that we can make the output be true.*/console.log(reactiveState === state)/*** Modify the code so that we can make the output be false.*/const info = markRaw({ count: 1 })const reactiveInfo = reactive(info)console.log(isReactive(reactiveInfo))</script><template><div><p>{{ reactiveState.count }}</p></div></template>
相关知识点:
vue
<script setup lang="ts">import { ref } from 'vue'const count = ref(0)/*** Implement the until function*/function until(initial) {function toBe(value) {return new Promise(resolve => {initial.value = valueresolve(initial.value)})}return {toBe}}async function increase() {count.value = 0setInterval(() => {count.value++}, 1000)await until(count).toBe(3)console.log(count.value === 3) // Make sure the output is true}</script><template><p @click="increase">Increase</p></template>
vue
<script setup lang="ts">import { onMounted, defineCustomElement } from 'vue'/*** Implement the code to create a custom element.* Make the output of page show "Hello Vue.js".*/const VueJs = defineCustomElement({props: { message: String },template: '<span>{{message}}</span>'})customElements.define('vue-js', VueJs)onMounted(() => {document.getElementById('app')!.innerHTML = '<vue-js message="Hello Vue.js"></vue-js>'})</script><template><div id="app"></div></template>
并且 vite.config.js 里要做相关设置相关知识点:Vue 与 Web Components | Vue.js
]]>A Monkey patch is a way for a program to extend or modify supporting system software locally (affecting only the running instance of the program).”
也可以可以理解为基于原生功能(API)的一些自定义拓展?这个概念常在 Python 里面出现,也叫鸭子双关
Checking if a JavaScript native function is monkey patched
Monkey patching is a powerful but dangerous technique because the code you’re overriding is not in your control: future updates to the JavaScript engine may break some assumptions made in your patch and cause serious bugs.Additionally, by monkey patching code you don’t own, you might override some code that has already been monkey patched by another developer, introducing a potential conflict.
对于 JS 来说,Monkey patch 的问题在于:如果 JS 引擎更新了,可能会带来一些难以预计的 bug,这篇文章说了几种怎么检测是否存在 monkey patch 函数的方法,比如用 toString、iframe、proxy 等等,但都不是很完美,可以根据使用场景来决定用哪种方法
]]>关于类型数组 TypedArray
讲了 TypeScript 使用过程中经常犯的错误
25+ JavaScript Shorthand Coding Techniques
Math.floor
的简写是~~
eval
js
const evalAlter = fn => {const Fn = Functionreturn new Fn('return' + fn)()}
Vue 函数式组件
CSP 的实质就是白名单制度,开发者明确告诉客户端,哪些外部资源可以加载和执行,等同于提供白名单。它的实现和执行全部由浏览器完成,开发者只需提供配置
script-src
和object-src
是必设的,除非设置了default-src
。script-src
不能使用unsafe-inline
关键字(除非伴随一个nonce
值),也不能允许设置data:URL
。前端安全系列(一):如何防止 XSS 攻击? - 美团技术团队
严格的 CSP 在 XSS 的防范中可以起到以下的作用:
浏览器在渲染 JavaScript 伪协议地址的时候,会先进行 URL 解码,再执行 JavaScript。
因为浏览器在解析 URL 的时候会进行 URL 解码,那么用户的输入理应进行 URL 编码后再放进 URL 中。这就是我修复这个漏洞的方法,让用户的输入按照浏览器解析的顺序进行编码:先进行 unicode 编码再进行 url 编码。
Ladle vs. Storybook: Measuring performance across project sizes
这个博客的文章质量都很高
总结一下:413 错误是因为上传文件的大小超过了限制,需要调整 Nginx 设置,比如在 server 里面加
yaml
client_max_body_size 8M; #配置请求体缓存区大小client_body_buffer_size 128k; #设置客户端请求体最大值fastcgi_intercept_errors on;
今天在安装 WordPress 主题时遇到了这个问题,上次遇到好像是在 Mastodon 上传表情包的时候(不确定)
关于 WordPress 上传限制这回事:
Delightful lists are an effort to help bring change to this trend. To make freedom more discoverable again. This top-level project will allow navigation to all high-quality curated delightful lists created and maintained all over the web.Anyone that wishes to do so can create their own list, and thus create an entrypoint to freedom.
偶然进入的网站,没有入口也没有出口,比较有年代感了
A set of rules that provides a way of telling a computer what operations to perform is called a programming language. There is not, however, just one programming language; there are many. In this chapter you will learn about controlling a computer through the process of programming. You may even discover that you might want to become a programmer.
一点点鸡汤
原文:Open source and web3, simplified
“并非所有这些平台本身都开源,但重要的是,与服务模式绑定的收益会直接反馈在其原生代币的价值上。有了这样的设定,随着时间的推移将源代码开放出来的激励是巨大的,因为它让开发者更具活力,让基于服务的生态系统得以存续,并让人们相信,项目将会以最符合网络利益的方式持续运作(因为倘若不这样,它可以被"分叉",即容易被复制)”
“它也不仅仅是代码。想想维基百科、Facebook、Uber、Linux —— 所有这些项目都是由少数人定义平台的规则,然后大量的人参与价值构建。在这些社区中进行价值捕获和分配面临各种困境 ──Facebook 或 Uber 模式让少数人暴富,维基百科或 Linux 模式则几乎无利可图。我上面描述的结构能够让用户参与价值的创造和捕获,既适用于 Facebook 也可用于 Linux。”
How to lazy load images in Hugo
Create the file
layouts/_default/_markup/render-image.html
in your theme with this content:
html
<img src="{{ .Destination | safeURL }}" alt="{{ .Text }}" loading="lazy" />This makes the resulting HTML have the loading="lazy" attribute, which lazily loads images.
How Do Dolphins Choose Their Name?
Dolphins identify themselves with a unique whistle that scientists have likened to a human name. Here’s how they decide what to call themselves.
Intentionality
every idea matters
just collect very succinct quotes from biographies that i’ve read from books that i’ve read or from articles from of the internet that i’ve read and over time i ended up with this collection of very succinct sentences that but basically every one of these sentences they mean something every one of these words they mean something every expression that i put into this book they’re all very deeply personal for me and also the act of writing for me is very personal because writing for me and journaling for me is a form of calming the brain because my brain does not shut up so point one keeping a commonplacebook on a physical notebook is a lot more deliberate
better editing
writing on the paper at leastfor me liberates me from that uh illusion ofperfection illusion of cleanliness that i get on a computer screen because i cancross everything out i can cross things out straight away and i can spotmistakes and you know weak sentences straight away
Crossing Disciplines
在 ES6 之后的版本,在二进制数字前加0b
或者0B
来标识这是一个二进制数字,比如:
js
let number5 = ob101let number5 = oB101
]]>js
const number = '0101'Number.parseInt(number, 2)
介绍文章:
练习:
相关文章:
]]>D3 或 D3.js 表示数据驱动文档。它是一个用于在浏览器中创建动态和交互式数据视觉化的 JavaScript 库。1
select()
:selectAll()
append()
text()
js
const anchor = d3.select('a')
在 D3 中可以串联多个方法,连续执行一系列操作。->[[function chaining|链式调用]]
data()
:d[0]
,来访问数组中的值。enter()
:获取需要插入的选择集(数据个数大于元素个数)的占位符.当 enter() 和 data() 方法一起使用时,它把从页面中选择的元素和数据集中的元素作比较。 如果页面中选择的元素较少则创建缺少的元素。
可以理解为管理仓库的,选择的元素是货架,数据是货,如果货架不够了,就再补几个货架,如果多了就不管
html
<body><ul></ul><script>const dataset = ['a', 'b', 'c']d3.select('ul').selectAll('li').data(dataset).enter().append('li').text('New item')</script></body>
text 中设置回调处理数据如:
d3.json()
: 从指定的 input URL 获取 JSON 文件。如果指定了 init 则会将其传递给底层的 fetch 方法html
<body><script>const dataset = [12, 31, 22, 17, 25, 18, 29, 14, 9]d3.select('body').selectAll('h2').data(dataset).enter().append('h2').text(d => d + ' USD')</script></body>
style()
js
selection.style('color', 'blue')//用回调过滤selection.style('color', d => {return d < 20 ? 'red' : 'green'})// 动态设置样式selection.style('height', d => d + 'px') // 动态设置高度
attr()
d
),另一个是该数据点在数组中的下标 i, 这个参数是可选的js
selection.attr('class', 'container')// 回调selection.attr('property', (d, i) => {})// 比如改变间距svg.selectAll('rect').data(dataset).enter().append('rect').attr('x', (d, i) => {return i * 30 //改变间距}).attr('y', (d, i) => {return d * 3 //改变高度})//悬停效果.attr('class', 'bar')
fill
属性为 text 节点设置文本颜色style()
方法设置其它样式的 CSS 规则,例如 font-family 或 font-size。js
//添加标签svg.selectAll('text').data(dataset).enter().append('text').attr('x', (d, i) => i * 30).attr('y', (d, i) => h - 3 * d - 3) // 高三个单位是减.text(d => d)// 添加样式.attr('fill', 'red').style('font-size', '25px')//悬停效果.attr('class', 'bar')/** css中.bar:hover {fill: brown;}**/
js
svg.selectAll('rect').data(dataset).enter().append('rect').attr('x', (d, i) => i * 30).attr('y', (d, i) => h - 3 * d).attr('width', 25).attr('height', (d, i) => d * 3)// 每个 rect 节点下附加 title 元素。 然后用回调函数调用 text() 方法使它的文本显示数据值。.append('title').text(d => d)
js
//创建svgselection.append('svg')
SVG 区域的高度为 100。 如果在集合中一个数据点的值为 0,那么条形将从 SVG 区域的最底端开始(而不是顶端)。 为此,y 坐标的值应为 100。 如果数据点的值为 1,你将从 y 坐标为 100 开始来将这个条形设置在底端, 然后需要考虑该条形的高度为 1,所以最终的 y 坐标将是 99。
(高度从下面开始计算,坐标轴从上面开始)
y = heightOfSVG - heightOfBar
会将条形图向上放置。y = h - m * d
,其中 m 是缩放数据点的常数。fill
属性着色。 它支持十六进制代码、颜色名称、rgb 值以及更复杂的选项,比如渐变和透明。js
svg.selectAll('rect').data(dataset).enter().append('rect').attr('x', (d, i) => i * 30).attr('y', (d, i) => h - 3 * d).attr('width', 25).attr('height', (d, i) => 3 * d)//将所有条形图的 fill 设置为海军蓝。.attr('fill', 'navy')
SVG 的 rect 有四个属性。 x 和 y 坐标指定图形放在 svg 区域的位置, height 和 width 指定图形大小
js
const svg = d3.select('body').append('svg').attr('width', w).attr('height', h).append('rect') //rect矩形.attr('width', 25).attr('height', 100).attr('x', 0).attr('y', 0)
js
svg.selectAll('circle').data(dataset).enter().append('circle')//散点图.attr('cx', d => d[0]).attr('cy', d => h - d[1]).attr('r', '5')
条形图和散点图都直接在 SVG 画布上绘制数据。 但是,如果一组的高或者其中一个数据点比 SVG 的高或宽更大,它将跑到 SVG 区域外。
D3 中,比例尺可帮助布局数据。 scales 是函数,它告诉程序如何将一组原始数据点映射到 SVG 画布上。
js
const scale = d3.scaleLinear()
例子
js
const scale = d3.scaleLinear() // 在这里创建轴const output = scale(50) // 调用 scale,传入一个参数d3.select('body').append('h2').text(output)
domain()
和 range()
方法设置比例尺的值, 它们都接受一个至少有两个元素的数组作为参数。domain()
方法给比例尺传递关于散点图原数据值的信息range()
方法给出在页面上进行可视化的实际空间信息例子:
js
scale.domain([50, 480]); //域scale.range([10, 500]); //范围scale(50) //10scale(480) //500scale(325) //323.37scale(750)。// 807.。67d3.scaleLinear()
按顺序,将在控制台中显示以下值:10、500、323.37 和 807.67。
注意,比例尺使用了域和范围之间的线性关系来找出给定数字的输出值。 域中的最小值(50)映射为范围中的最小值(10)。
(也就是给定范围,用线性关系缩小,比如图片放大缩小,给了原图大小和缩小后的图片大小,根据线性关系比例来计算每个像素的位置,元素的大小)
d3.min
:最小值d3.max
: 最大值min()
和 max()
都可以使用回调函数,下面例子中回调函数的参数 d 是当前的内部数组。min()
和 max()
方法在设置比例尺时十分有用例子:找到二维数组的最大值和最小值
js
const locationData = [[1, 7],[6, 3],[8, 3]]const minX = d3.min(locationData, d => d[0]) //查找在d[0]位置上最小的值
min()
和 max()
来确定比例尺范围和域padding
将在散点图和 SVG 画布边缘之间添加空隙。js
const dataset = [[34, 78],[109, 280],[310, 120],[79, 411],[420, 220],[233, 145],[333, 96],[222, 333],[78, 320],[21, 123]]const w = 500const h = 500const padding = 30const xScale = d3.scaleLinear().domain([0, d3.max(dataset, d => d[0])]).range([padding, w - padding])
text()
方法。js
svg.selectAll('circle').data(dataset).enter().append('circle').attr('cx', d => xScale(d[0])).attr('cy', d => yScale(d[1])).attr('r', '5')
axisLeft()
和 axisBottom()
。例子:
js
// X轴const xAxis = d3.axisBottom(xScale)svg.append('g').attr('transform', 'translate(0, ' + (h - padding) + ')') // translate(0,x).call(xAxis) // x轴作为参数被传递给 call() 方法// Y轴const yAxis = d3.axisLeft(yScale)svg.append('g').attr('transform', 'translate(0,' + (h - padding) + ')').call(xAxis)svg.append('g').attr('transform', 'translate(' + padding + ',0)').call(yAxis)
圆圈来映射数据点,每个数据点有两个值。 这两个值和 x 和 y 轴相关联,在可视化中用来给圆圈定位。
]]>js
svg.selectAll('circle').data(dataset).enter().append('circle').attr('cx', d => d[0])//反转图像.attr('cy', d => h - d[1]).attr('r', '5')// 散点图加标签svg.selectAll('text').data(dataset).enter().append('text')// Add your code below this line.attr('x', d => d[0] + 5).attr('y', d => h - d[1]).text(d => d[0] + ', ' + d[1])
How To Create ANKI Flashcards From Your Kindle Vocabulary Builder
SCP 部分写得很清楚
哇哦,打游戏学编程
很喜欢的一个博客!设计很漂亮,博文图文结合读起来让人很愉悦,是我理想的博客样子
not like other girls can also be used as an insult
「在期刊的原文中,阿达玛斯基写道:“我们不应该期望快速地得到一个结果,尽管我们与猫和狗生活了几个世纪,但我们还没有破译它们的语言,而对真菌的电子通讯的研究还处于纯粹的婴儿阶段。”
这么一想也不无道理,你甚至连自己家的猫猫狗狗在说什么都没搞明白,为什么一定要期待先跟一颗蘑菇对话呢?」
Learn Debounce And Throttle In 16 Minutes
讲得挺好的一个视频。节流(debounce)和防抖(Throttle)是优化高频率执行代码的一种手段1 如果把执行代码比喻成下楼拿快递的话:
String.prototype.localeCompare()
localeCompare
可以做到按大小写排序、对带有重音符号的字符排序……localeCompare
接受三个参数:compareString、locales、options,其中 compareString(即用来比较的字符串)是必选的,其他为可选。localeCompare
的返回值有三种,负数、正数、0,其中如果引用字符存在于比较字符之前则为负数; 如果引用字符存在于比较字符之后则为正数; 相等的时候返回 0 。Pinia 和 Optional API 的结合使用
很多人认为 npm 是 node package manager 的缩写,其实不是,而且 npm 根本也不是任何短语的缩写。它的前身其实是名为 pm(pkgmakeinst) 的 bash 工具,它可以在各种平台上安装各种东西。硬要说缩写的话,也应该是 node pm 或者 new pm。
Vue 打包 chunk-vendors.js 文件过大解决方案(compression-webpack-plugin)
Who Actually Owns Your Device?
What it means to truly own your device is having the power and ability to modify it at a system level should you choose to – even if you don’t know what you’re doing, you should have the right.
在产品沉思录周刊看到的推荐
What should the browser of the 2020s be?
What will a browser built for research, analysis, rabbit-hole exploration, messy thinking, and collaboration look like? These features are listed in the order I thought of them in, not necessarily by importance.
- Graph visualization and mind mapping.
- Interactive history and version control.
- Predictive search paths.
- Super Command-F (Superf).
- Collaboration
- Automatic scraping and clusterin
- Built in word processing.
- Backlinks.
- An infinitely zoomable interface (ZUI)
相关阅读:Next Browser
sql
CREATE TABLE product(id Int NOT NULL,name STRING,price MONEY,PRIMARY KEY(id))
NOT NULL
当此值为 null 时,不创建列PRIMARY KEY(id)
主键必须包含唯一的值,这个不能有重复的值插入数值第一种形式无需指定要插入数据的列名,只需提供被插入的值即可
sql
INSERT INTO _table_name_VALUES (_value1_,_value2_,_value3_,...);
第二种形式需要指定列名及被插入的值:
sql
INSERT INTO _table_name_ (_column1_,_column2_,_column3_,...)VALUES (_value1_,_value2_,_value3_,...);
SELECT 语句用于从数据库中选取数据。
sql
SELECT _column_name_,_column_name_FROM _table_name_;
sql
SELECT * FROM _table_name_;
*
表示选择全部
可以用WHERE
筛选选择结果,如:
sql
SELECT _column_name_,_column_name_FROM _table_name_WHERE _column_name operator value_;
sql
UPDATE _tablse_name_SET _column1_=_value1_,_column2_=_value2_,...WHERE _some_column_=_some_value_;
ALTER TABLE 语句用于在已有的表中添加、删除或修改列。如需在表中添加列,请使用下面的语法:
sql
ALTER TABLE table_nameADD column_name datatype
如需删除表中的列,请使用下面的语法(请注意,某些数据库系统不允许这种在数据库表中删除列的方式):
sql
ALTER TABLE table_nameDROP COLUMN column_name
sql
DELETE FROM _table_name_WHERE _some_column_=_some_value_;
FOREIGN KEY
来和外部表单链接选择相应列并合并表,ON
后面写的是条件
sql
SELECT _column_name(s)_FROM _table1_INNER JOIN _table2_ON _table1.column_name_=_table2.column_name_;
或:
]]>sql
SELECT _column_name(s)_FROM _table1_JOIN _table2_ON _table1.column_name_=_table2.column_name_;
升级前升级后(面对年轻人重新设计
未完待续……(也不知道续不续)
]]>刚好最近朋友找电影资源很犯难,所以我决定拿排在 Media 第一的Jellyfin试试手。
Jellyfin 是一个在线的流媒体影音库,对电影、音乐、有声书都有比较好的支持。除了在 web 端观看之外,它还支持很多的客户端,几乎是随处可用,目前我只试过安卓端的,其功能与网页端无异,适配得很好,体验流畅。
可以在这里试一下 Demo:Jellyfin
(用户名 demo,密码留空)
下面是我的成果:-D
其实我也是搭完才知道它有什么功能的
Jellyfin 目前不支持 S3 存储,所以我需要一个网盘来存储和管理 VPS 上的媒体资源。看了塔塔的 音乐库搭建 文章后我决定试一下 Cloudreve ,具体的搭建过程这里按下不表,是完全照着塔塔的教程和 Cloudreve 文档 做的
需要注意的是,配置 Nginx 反代时,与往常不同,需要设置一下最大的文件大小,以免后期上传失败:
/etc/nginx/conf.d/jellyfin.confbash
location / {proxy_set_header X-Forwarded-For $proxy_add_x_forwarded_for;proxy_set_header Host $http_host;proxy_redirect off;proxy_pass http://127.0.0.1:5212;# 如果您要使用本地存储策略,请将下一行注释符删除,并更改大小为理论最大文件尺寸client_max_body_size 20000m;}
最大容量
在 管理面板-> 用户组
里可修改
配置离线下载
配置好离线下载就可以用它在后台下载种子资源了。如果用的是 docker-compose 来安装,下面的应该这样配置:
http://aria2:6800
your_aria_rpc_token
/data
最后在 cloudreve 面板里创建一个用来存放 jelly 用的文件夹,比如 jellyfin
jellyfin 的搭建非常简单,给了我做人的很大信心(没有),我这里依旧选择用 docker-compose 来搭建。
官方文档:Installing Jellyfin | Documentation - Jellyfin Project
首先创建一个配置文件夹并进入:
bash
sudo mkdir /opt/jellyfin && cd /opt/jellyfin
创建配置文件
bash
sudo nano docker-compose.yml
写入:
docker-compose.ymlyaml
version: '3.5'services:jellyfin:image: jellyfin/jellyfincontainer_name: jellyfinuser: rootnetwork_mode: 'host'volumes:- /path/to/config:/config- /path/to/cache:/cache- /path/to/media:/media #修改为cloudreve的文件夹- /path/to/media2:/media2:ro #修改为cloudreve的文件夹restart: 'unless-stopped'# Optional - alternative address used for autodiscoveryenvironment:- JELLYFIN_PublishedServerUrl=http://你的域名
其中需要修改 /path/to/media:/media
的前半部分为 cloudreve 中在 VPS 中的存储路径,比如改为/opt/drive/cloudreve/uploads/
,如果有多个 cloudreve 用户则可以在后面加用户 id,比如 /opt/drive/cloudreve/uploads/1
这样
然后/path/to/media2
也是同样的修改,改为 /opt/drive/cloudreve/uploads/
改完域名之后,执行 sudo docker-compose up -d
就可以在端口 你的ip:8096
看到界面了。
我用的是 Nginx 来进行反代,虽然每次都是一样的操作,但是直接写可以复制粘贴会比较简单,所以我现在准备说废话。
首先,创建配置文件:
bash
sudo nano /etc/nginx/conf.d/jellyfin.conf
写入:
/etc/nginx/conf.d/jellyfin.confbash
server {listen 80;server_name 你的域名;location / {proxy_pass http://127.0.0.1:8096;proxy_set_header HOST $host;proxy_set_header X-Forwarded-Proto $scheme;proxy_set_header X-Real-IP $remote_addr;proxy_set_header X-Forwarded-For $proxy_add_x_forwarded_for;}}
SSL/TLS 配置可以看我之前这篇:配置 Cloudflare 的免费 SSL 证书,或者用 certbot 配置
最后 sudo nginx -t
以及 sudo systemctl reload nginx
一下就可以在相应域名看到初始界面啦。
这个地方我摸了好一会才明白.
路径选择 media 或者 media2 下面的文件,然后后面的跟 cloudreve 里面的是一样的,比如在 cloudreve 中用户 1 创建的文件夹叫 jellyfin,则媒体库中路径为 /media/1/jellyfin
Jellyfin 有很多实用的插件可以爬电影/音乐等元数据,可以在 控制台-> 插件
安装,需要注意的是,安装完插件需要重启一下才可以生效,也就是先docker-compose down
再 docker-compose up -d
目前感觉比较好用的两个插件:
可以在display
里面更改界面语言和主题,我比较喜欢的主题是 Purple Haze, 感觉是有些克制的赛博朋克风格
参考:申请 CloudFlare 免费 SSL 证书并应用到 nginx – 65536.io | 自娱自乐
先设置加密方式为完全
,否则之后可能会出现 526 错误
首先将主域名绑定到 Cloudflare,然后在SSL/TLS
下的源服务器证书处,点击创建证书
然后选择私钥和 CSR 生成方式,以及证书的有效期(也可以不改),点击创建
将下面的证书和私钥暂时复制到某个安全的地方,点击确定
连接 VPS 之后,创建一个文件夹存入密钥,我将其存到/etc/nginx/cert/
路径下
bash
sudo mkdir /etc/nginx/cert && cd /etc/nginx/cert
写入证书,粘贴入刚刚保存的证书
栏里面的内容
bash
sudo nano public.pem
修改权限
bash
sudo chmod 644 public.pem
写入私钥,粘贴入刚刚保存的私钥
栏里面的内容
bash
sudo nano private.key
修改权限
bash
sudo chmod 600 private.key
参考:How to Redirect HTTP to HTTPS in Nginx
如果有用防火墙,请先打开 80 端口和 443 端口,不然可能会像我一样,卡在一个毫无意义的 522 Error 上 ^ ^
bash
sudo ufw allow 80sudo ufw allow 443
打开 Nginx 配置
bash
sudo nano /etc/nginx/nginx.conf
在 http 块里面配置一个默认 server,将 http 重定向到 https
bash
# 默认serverserver {listen 80 default_server;server_name _;return 301 https://$host$request_uri;}# ssl配置server {listen 443 ssl default_server;server_name *.example1.com;ssl_certificate /etc/nginx/cert/public.pem;ssl_certificate_key /etc/nginx/cert/private.key;}# 如果有多个域名,可以这样配置,证书也要按之前的添加一下server {listen 443 ssl;server_name *.example2.com;ssl_certificate /etc/nginx/cert/example2/public.pem;ssl_certificate_key /etc/nginx/cert/example2/private.key;}
然后sudo nginx -t
测试一下,没有问题的话就可以 Nginx 了:
bash
sudo systemctl reload nginx
之后如果有域名要配置 ssl ,如 example.conf 中,可以直接将 listen 80
改为listen 443 ssl
我常用的一个反代配置:
]]>server {listen 443 ssl;server_name 域名location / {proxy_pass http://127.0.0.1:反代端口;proxy_set_header HOST $host;proxy_set_header X-Forwarded-Proto $scheme;proxy_set_header X-Real-IP $remote_addr;proxy_set_header X-Forwarded-For $proxy_add_x_forwarded_for;}}
CSS 库:Bootstrap V5.2
v-show
而不是 v-if
来控制按钮可见性<transition>
组件实现状态之间的平滑过渡BackToTop.vuevue
<template><div class="position-sticky bottom-0 end-0 w-100 d-flex justify-content-end b-0 pb-3 pe-5"><transition><button class="btn btn-secondary btn-sm" v-show="isVisible" @click="scrollToTop" aria-label="scroll to top of the page"><img src="../assets/to-top.min.svg" alt="an arrow point to top" /></button></transition></div></template><script lang="ts">import { defineComponent, ref, onMounted, onBeforeUnmount } from 'vue'export default defineComponent({name: 'BackToTop',setup() {const isVisible = ref(false)const handleScroll = () => {isVisible.value = window.scrollY > 0}const scrollToTop = () => {window.scrollTo({top: 0,behavior: 'smooth'})}onMounted(() => {window.addEventListener('scroll', handleScroll)})onBeforeUnmount(() => {window.removeEventListener('scroll', handleScroll)})return {isVisible,handleScroll,scrollToTop}}})</script><style>.v-enter-active,.v-leave-active {transition: opacity 0.2s ease;}.v-enter-from,.v-leave-to {opacity: 0;}</style>
to-top.min.svghtml
<svg width="20" height="20" viewBox="0 0 48 48" fill="none" xmlns="http://www.w3.org/2000/svg"><pathd="M24.008 14.1V42M12 26l12-12 12 12M12 6h24"stroke="#fff"stroke-width="4"stroke-linecap="round"stroke-linejoin="round" /></svg>
其他参考/实现方式:
题外话:BootStrap 的文档写得好烂
]]>在官网购买 OSS 套餐,按月付费:Object Storage: S3-Compatible with Free Data Transfer
我没有修改设置,选的 250G 的容量,位于美国
进入控制面板:Contabo Object Storage Panel,然后点击Create Bucket
创建存储桶
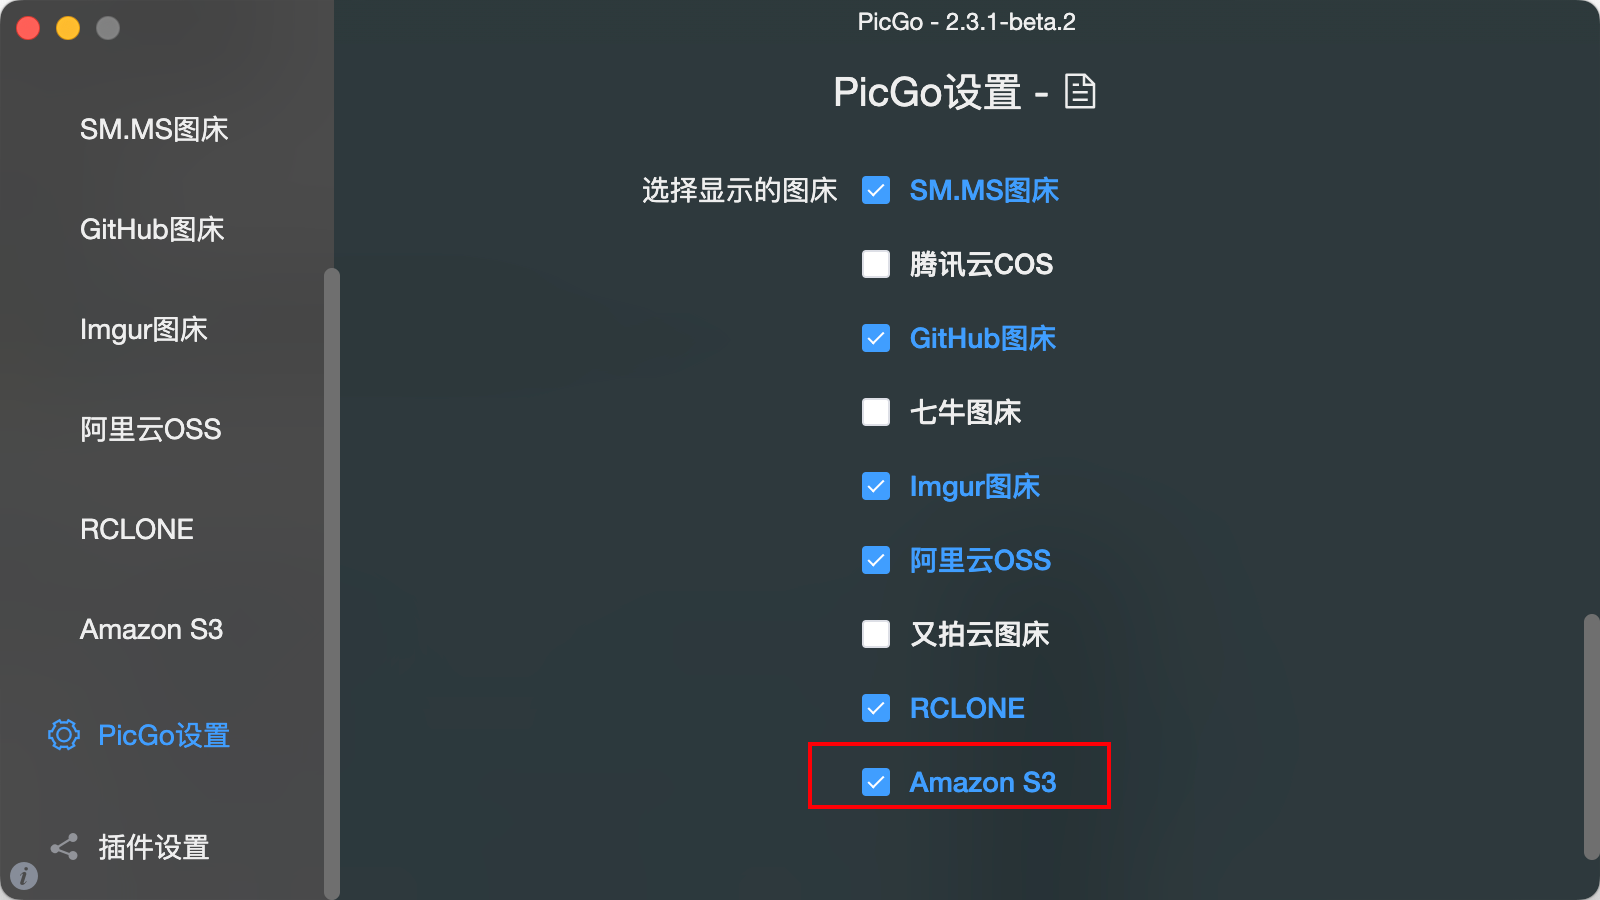
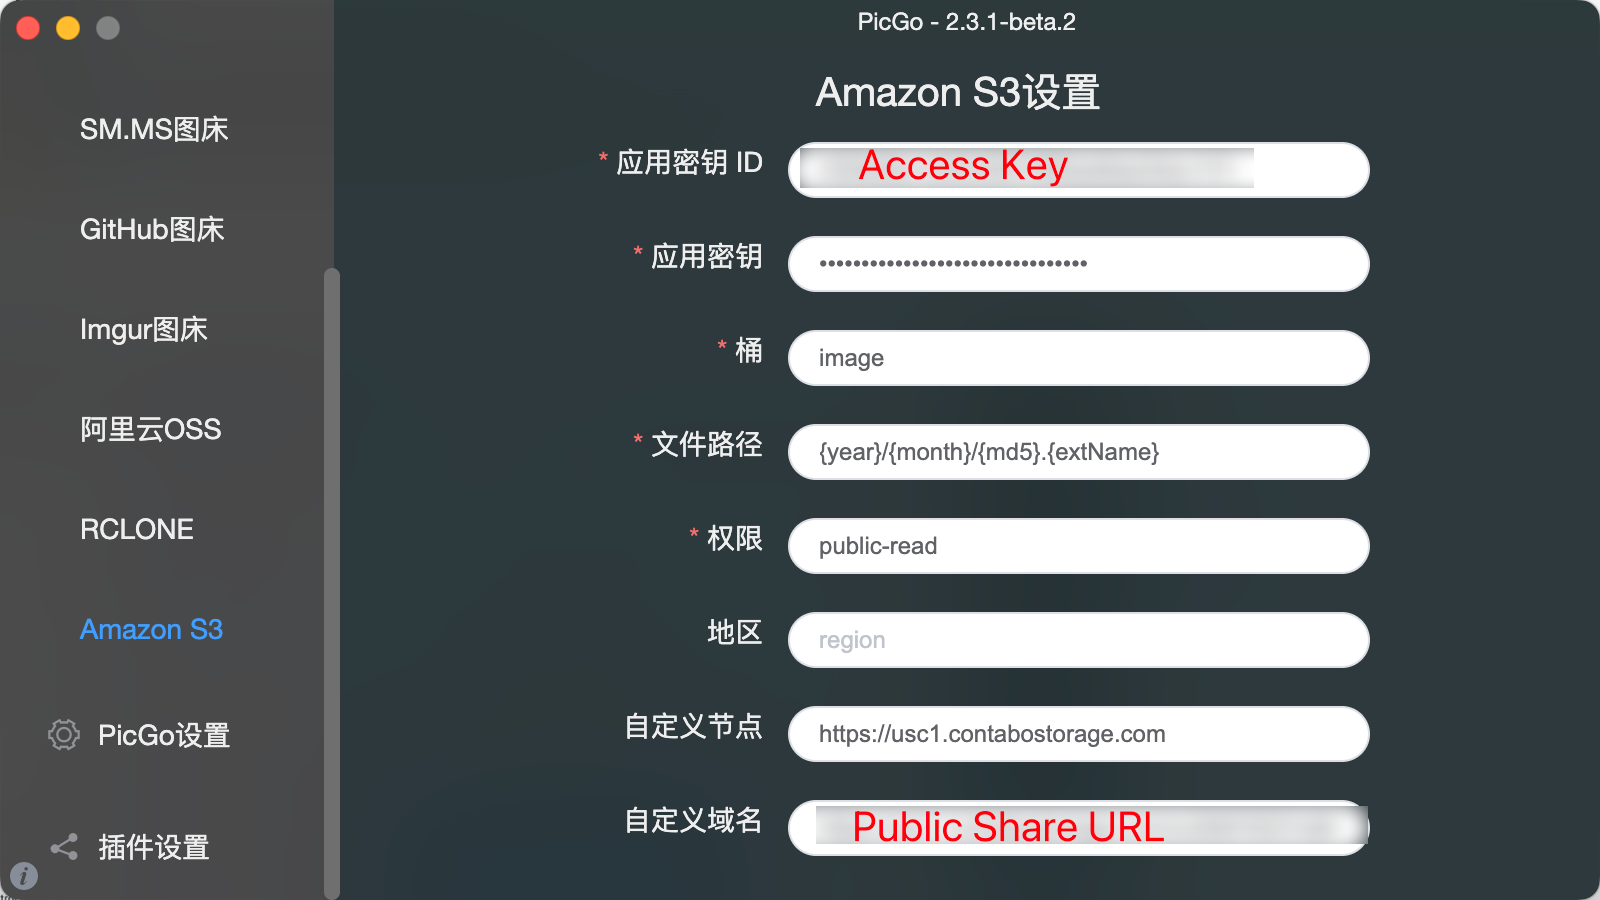
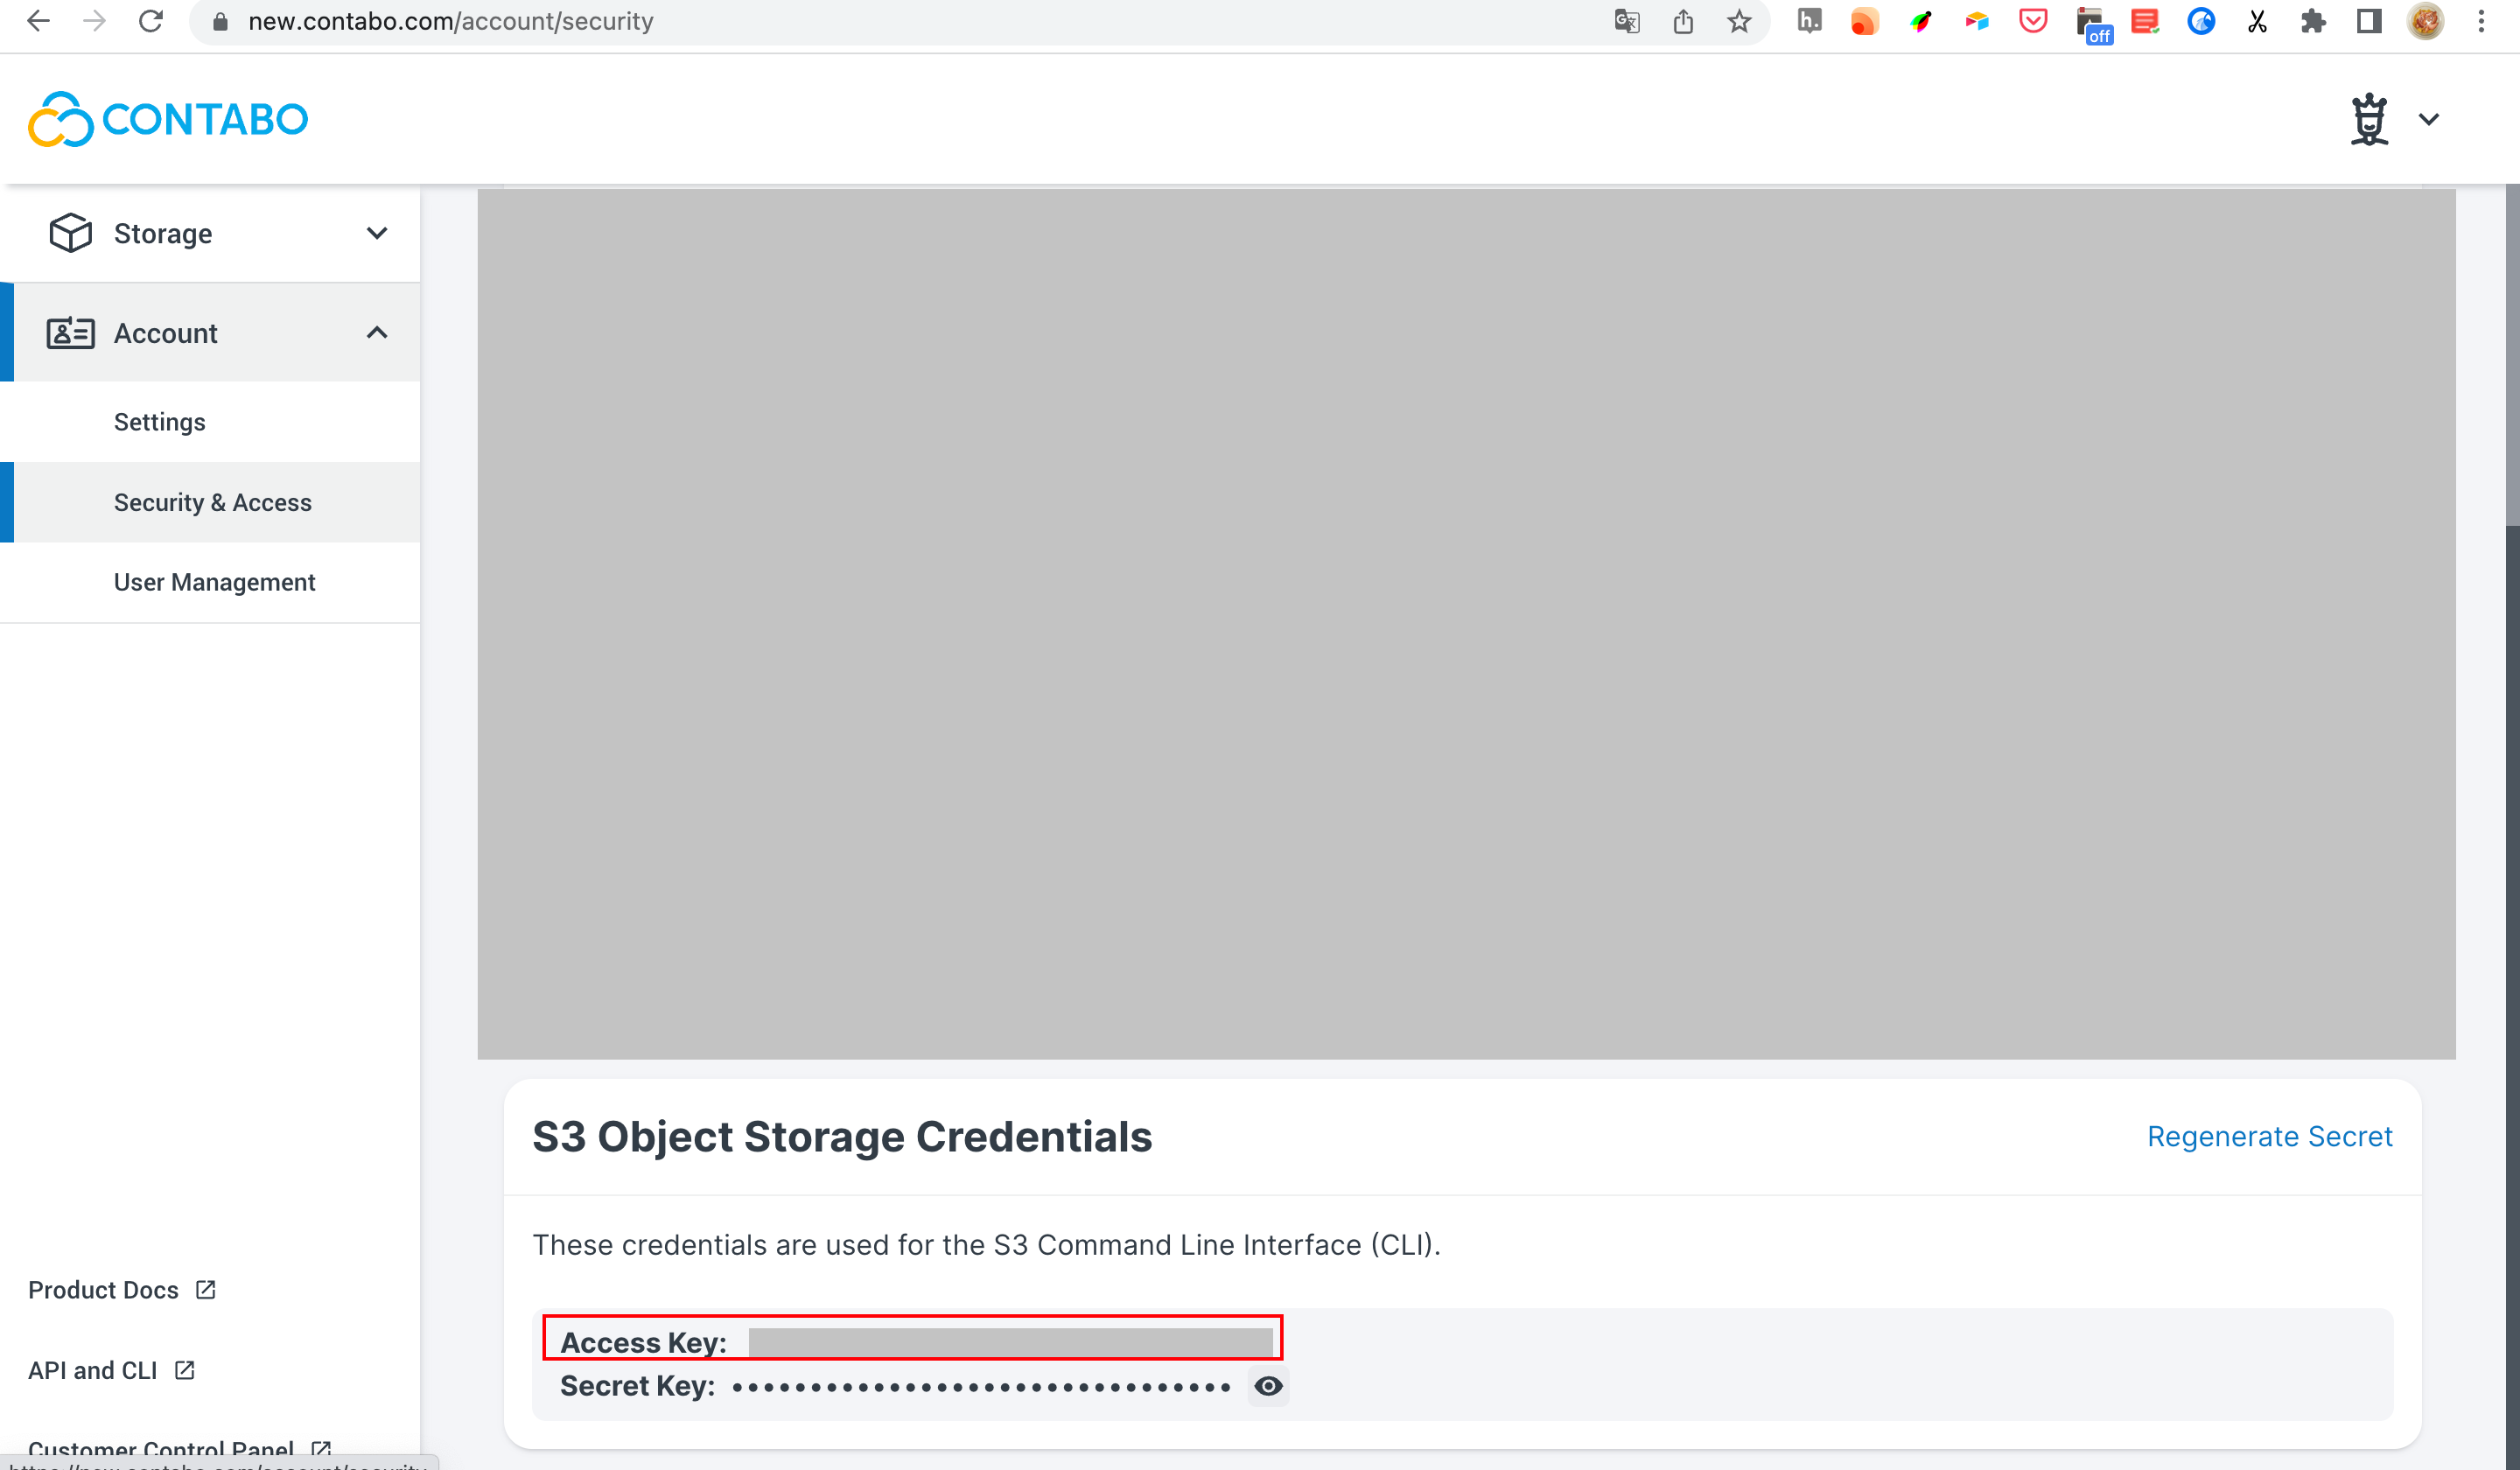
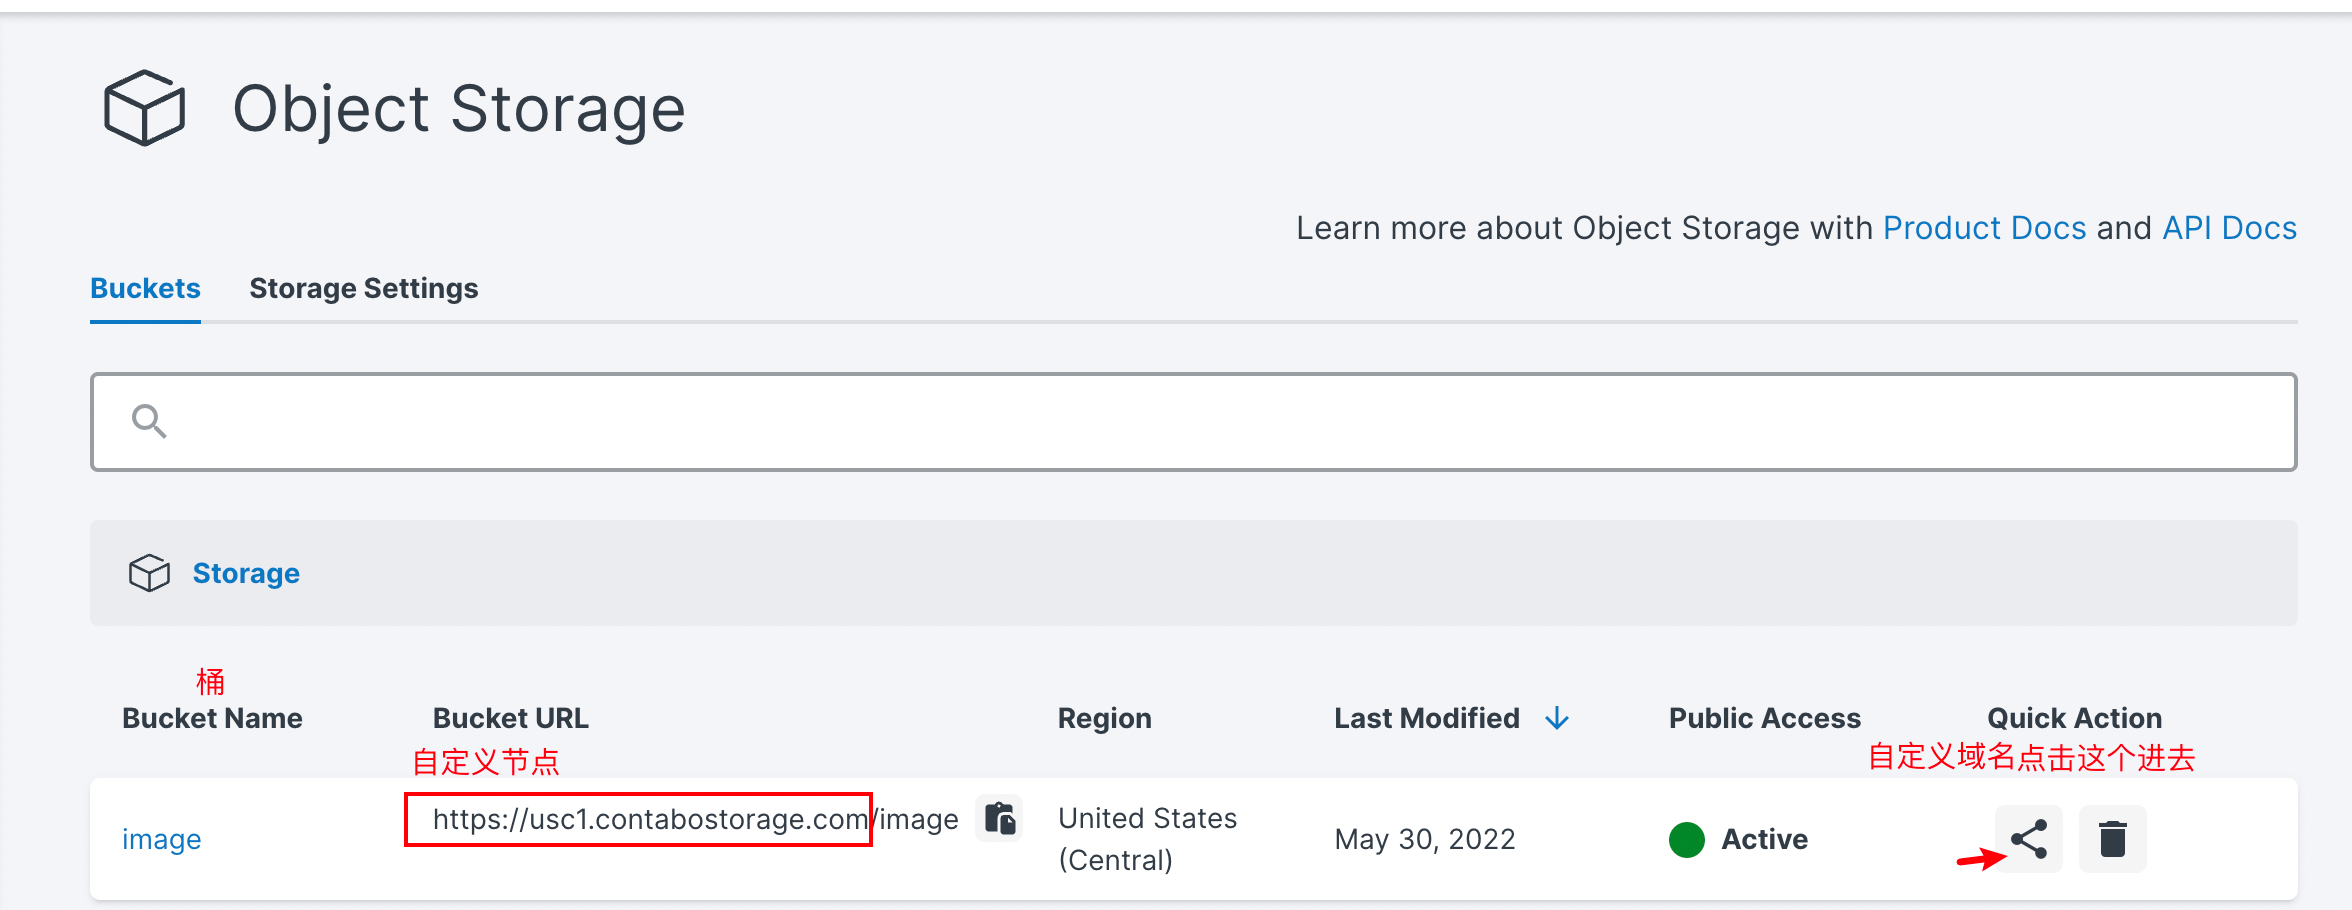
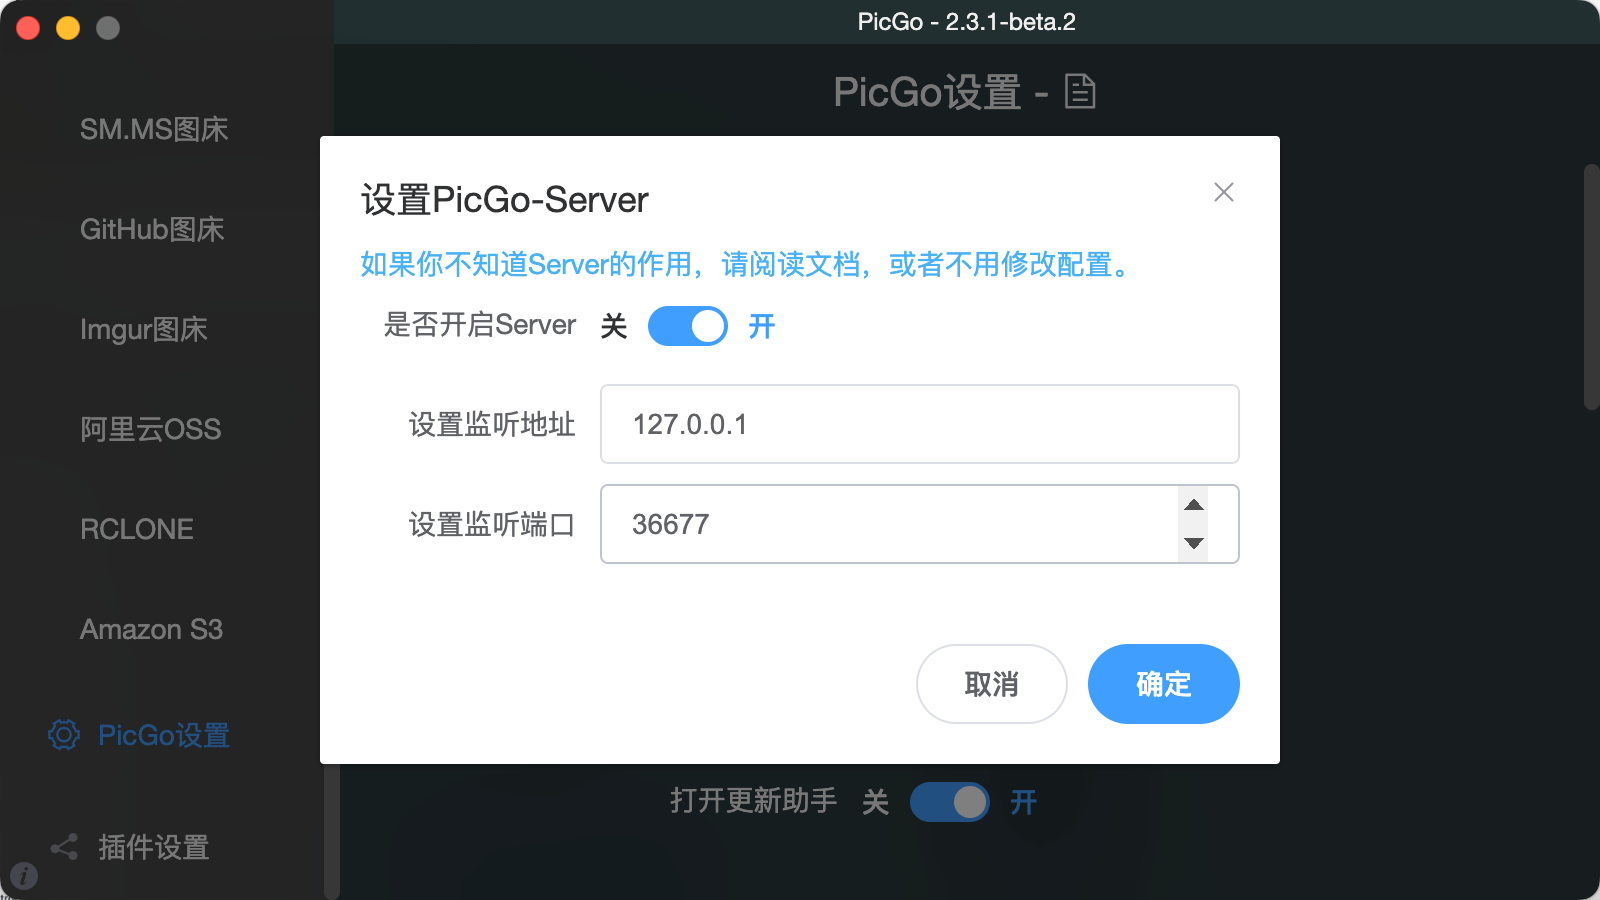
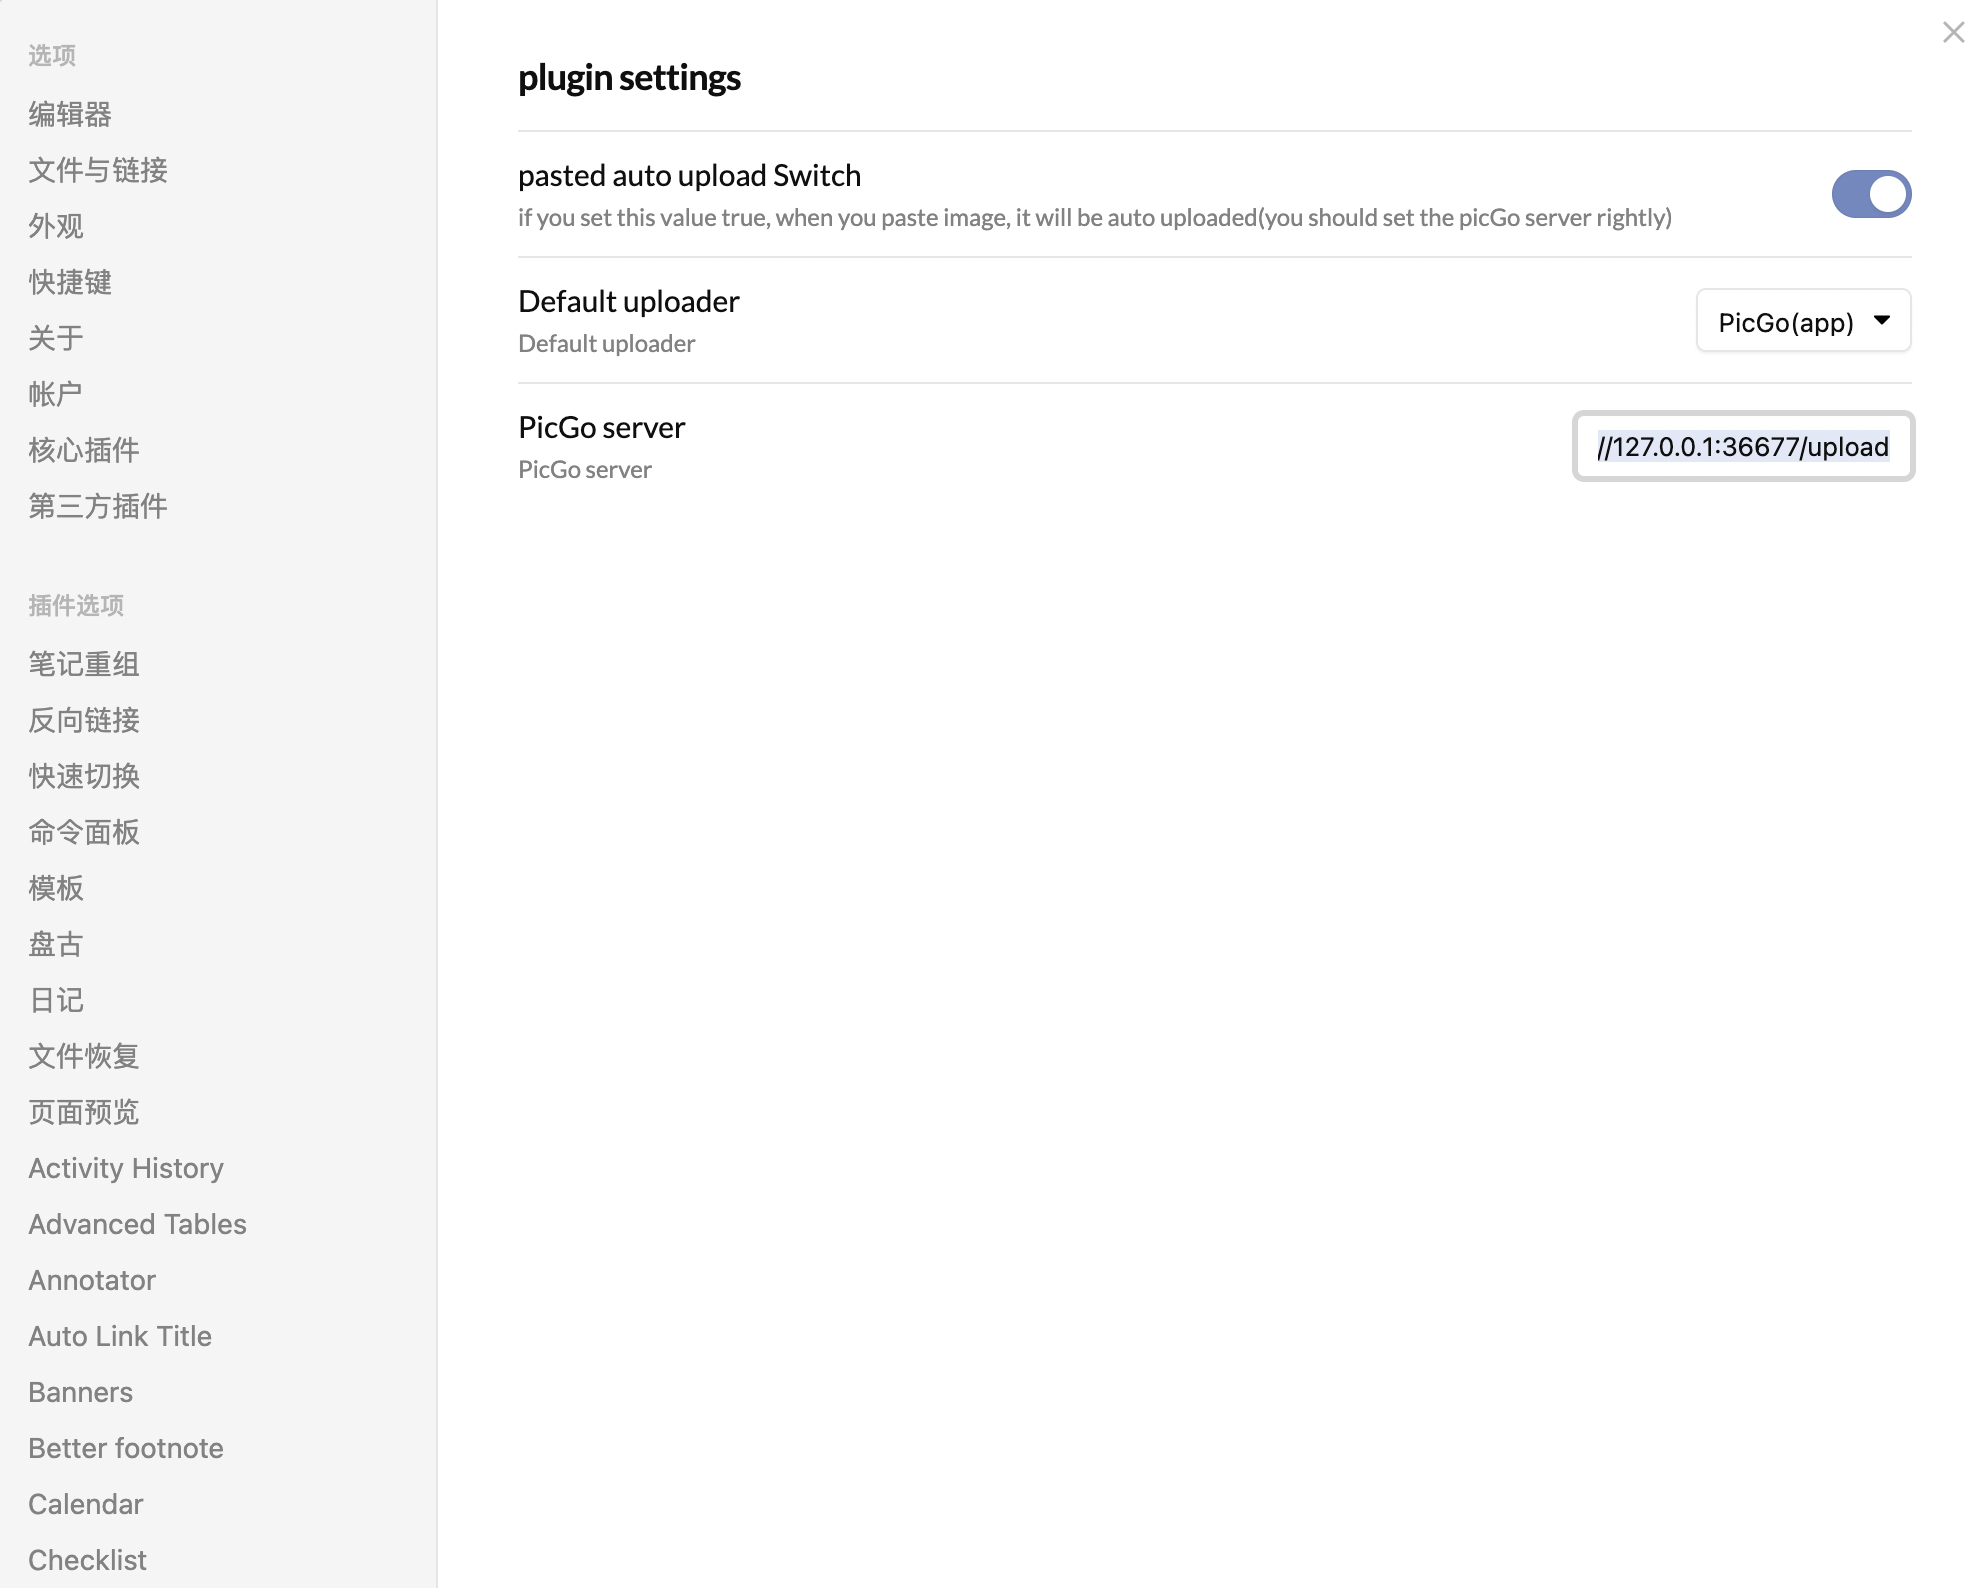
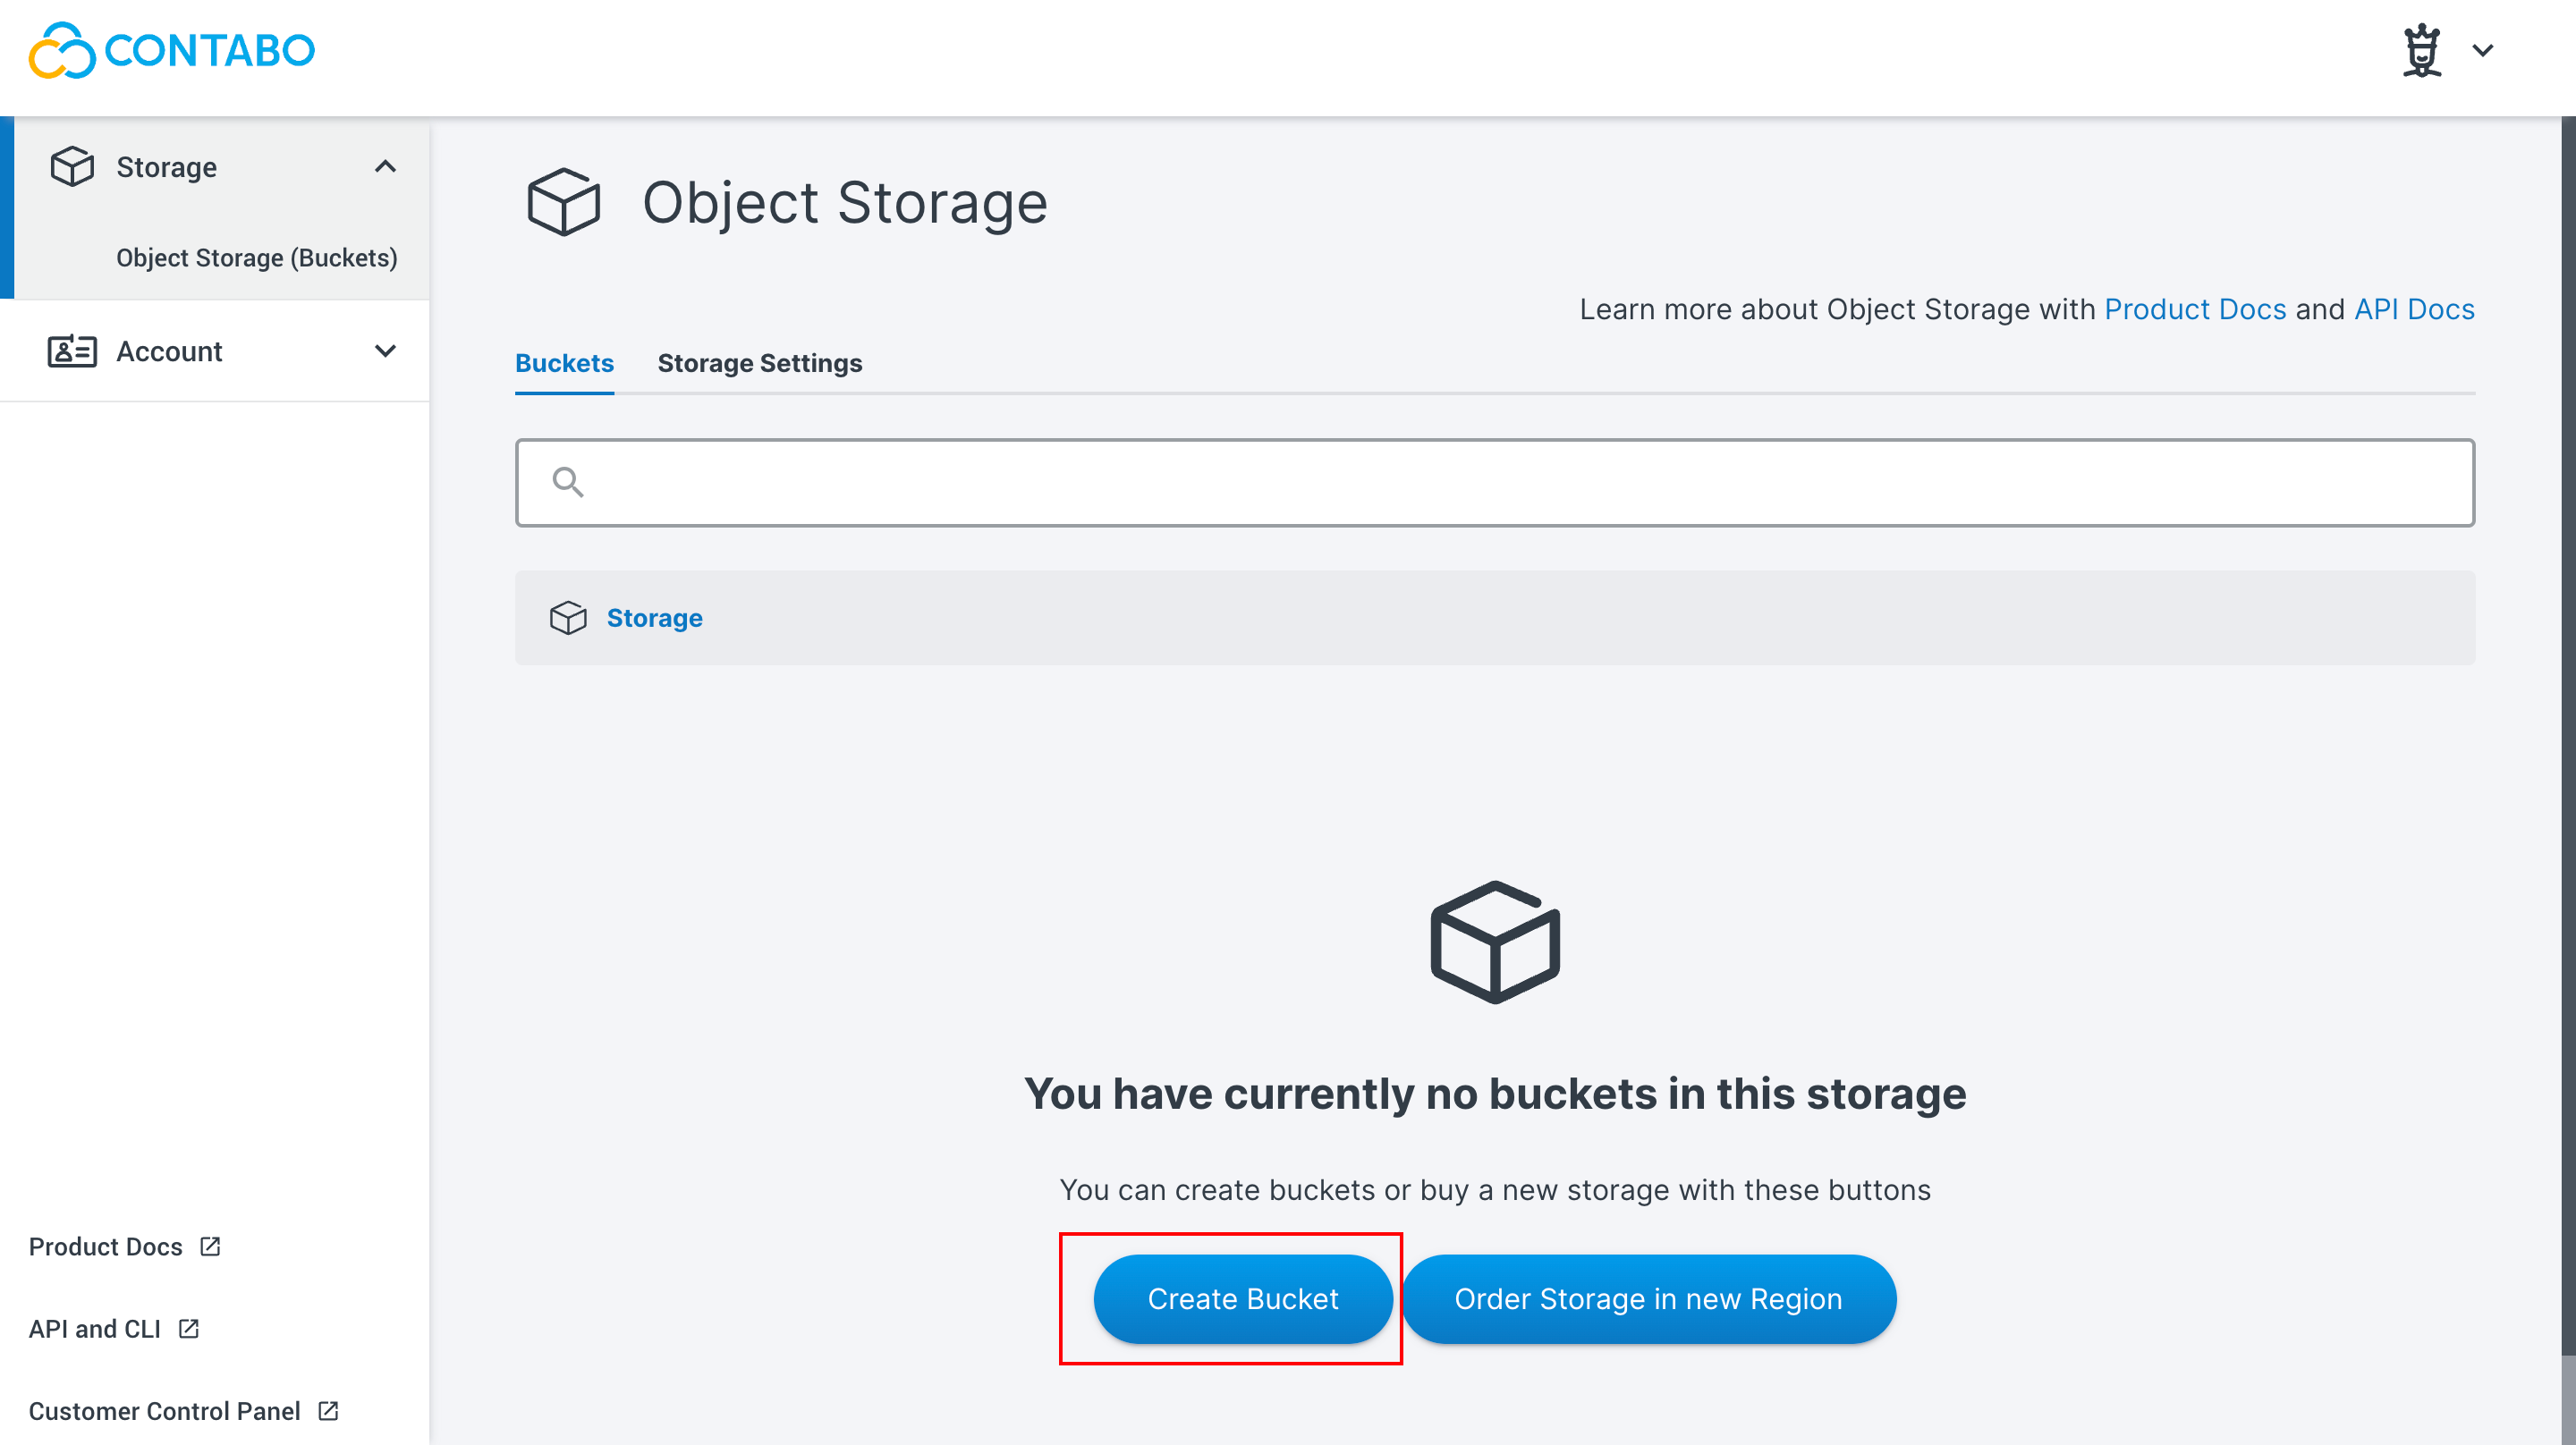
其中 Bucket Name 可以随便写,Select Region 不用选,默认是购买 OSS 时所选择的区域,如果换区域也可以另选
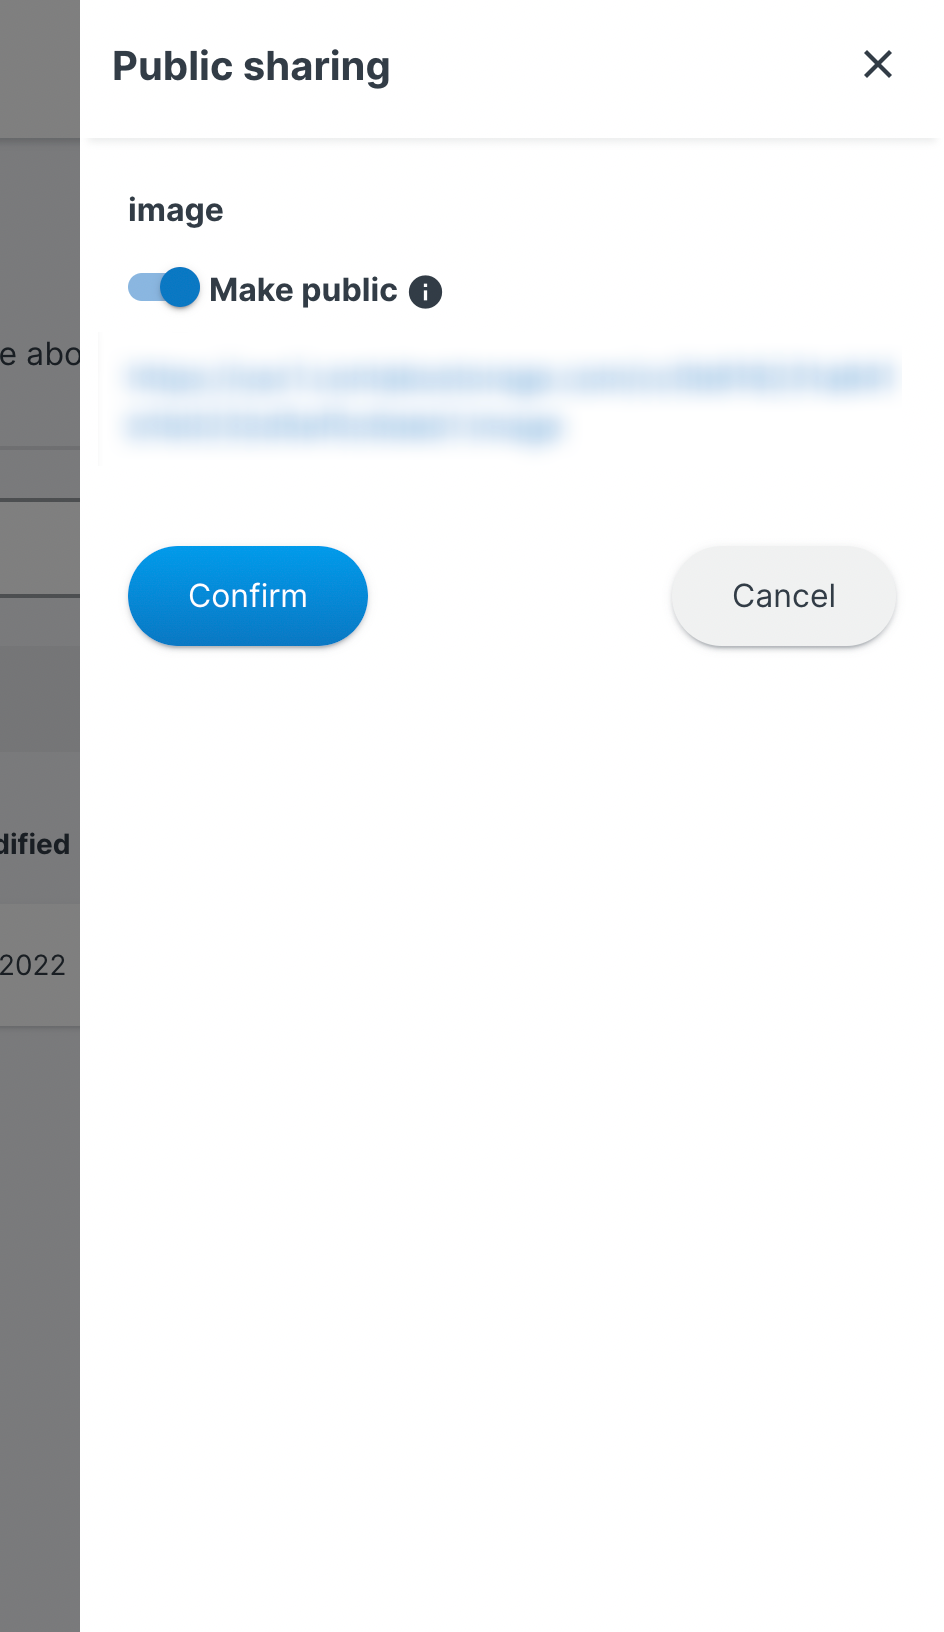
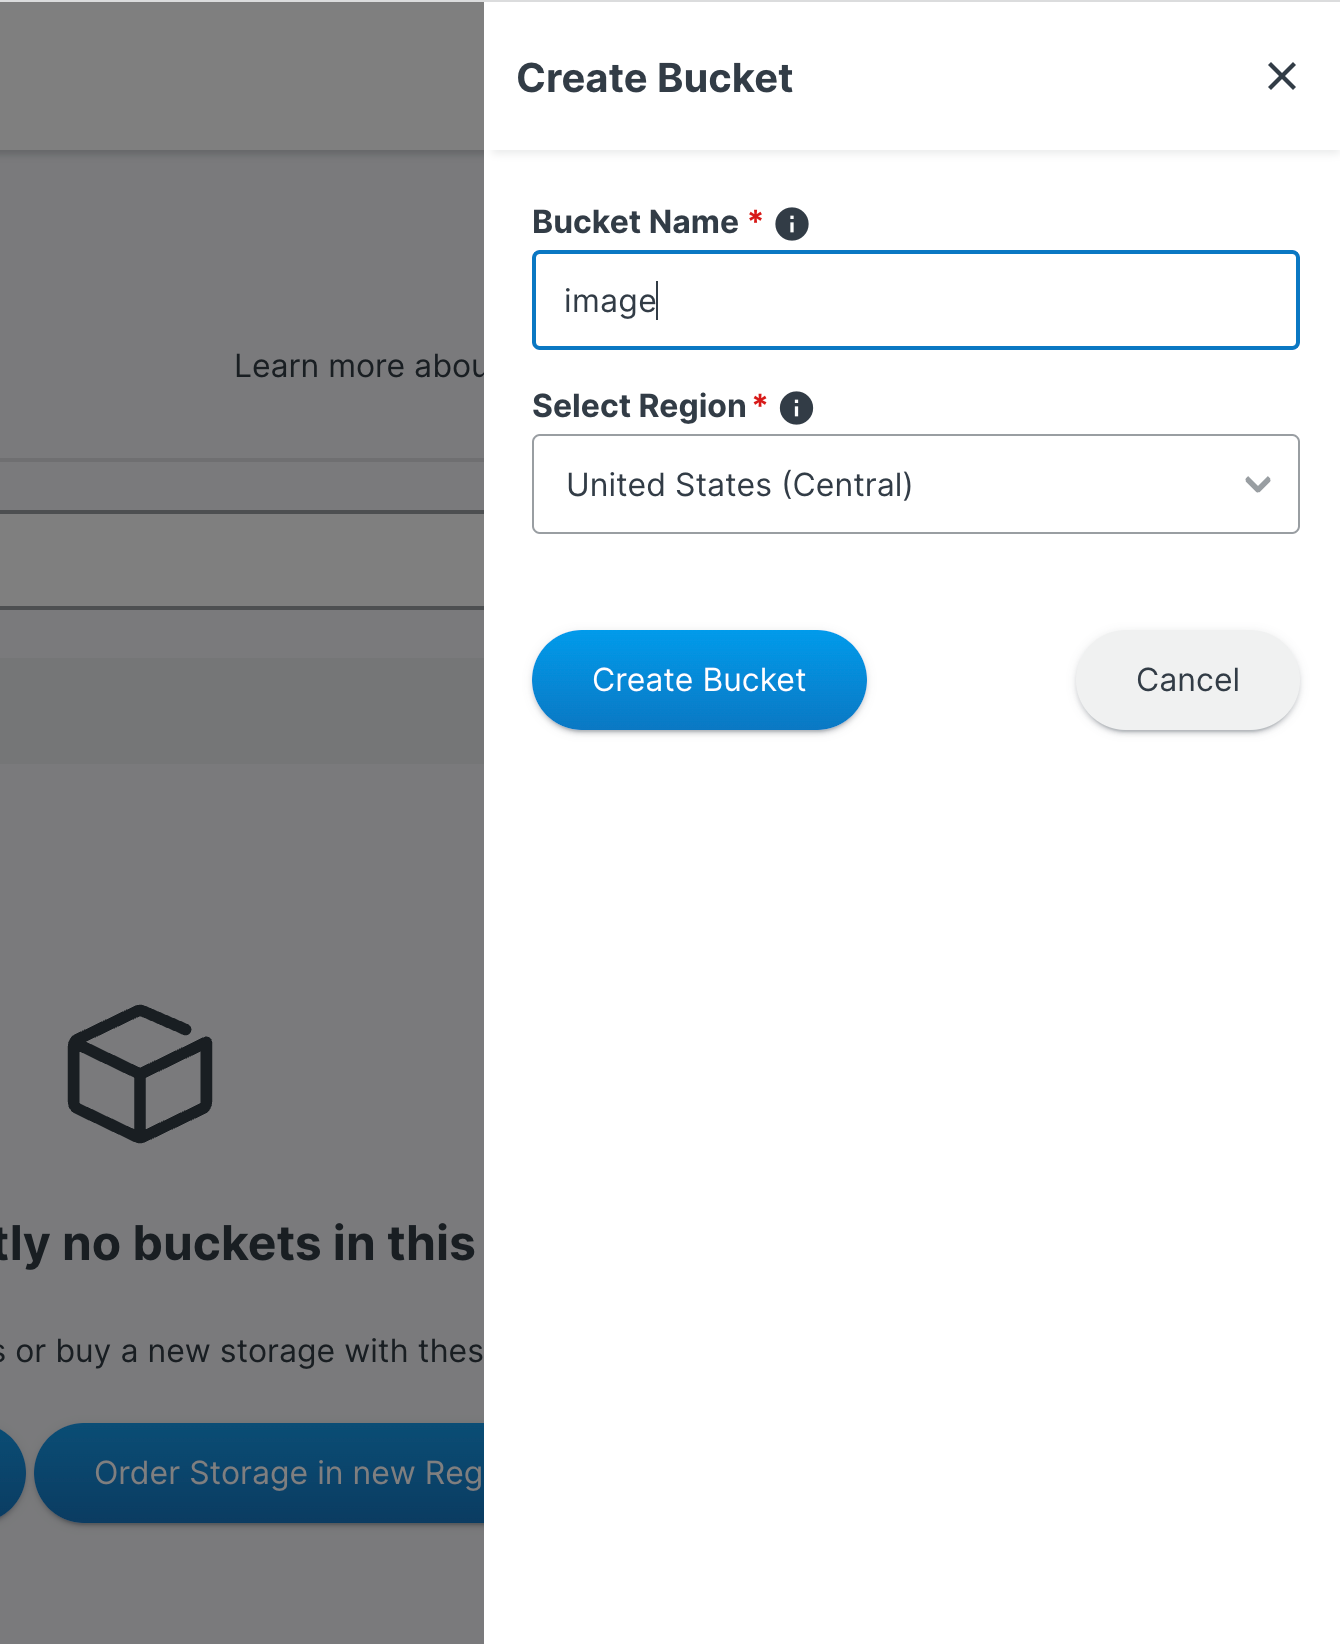
创建好后如图:(这个 Public Access 应该默认是红色的,也就是没有打开,我这里打开了)
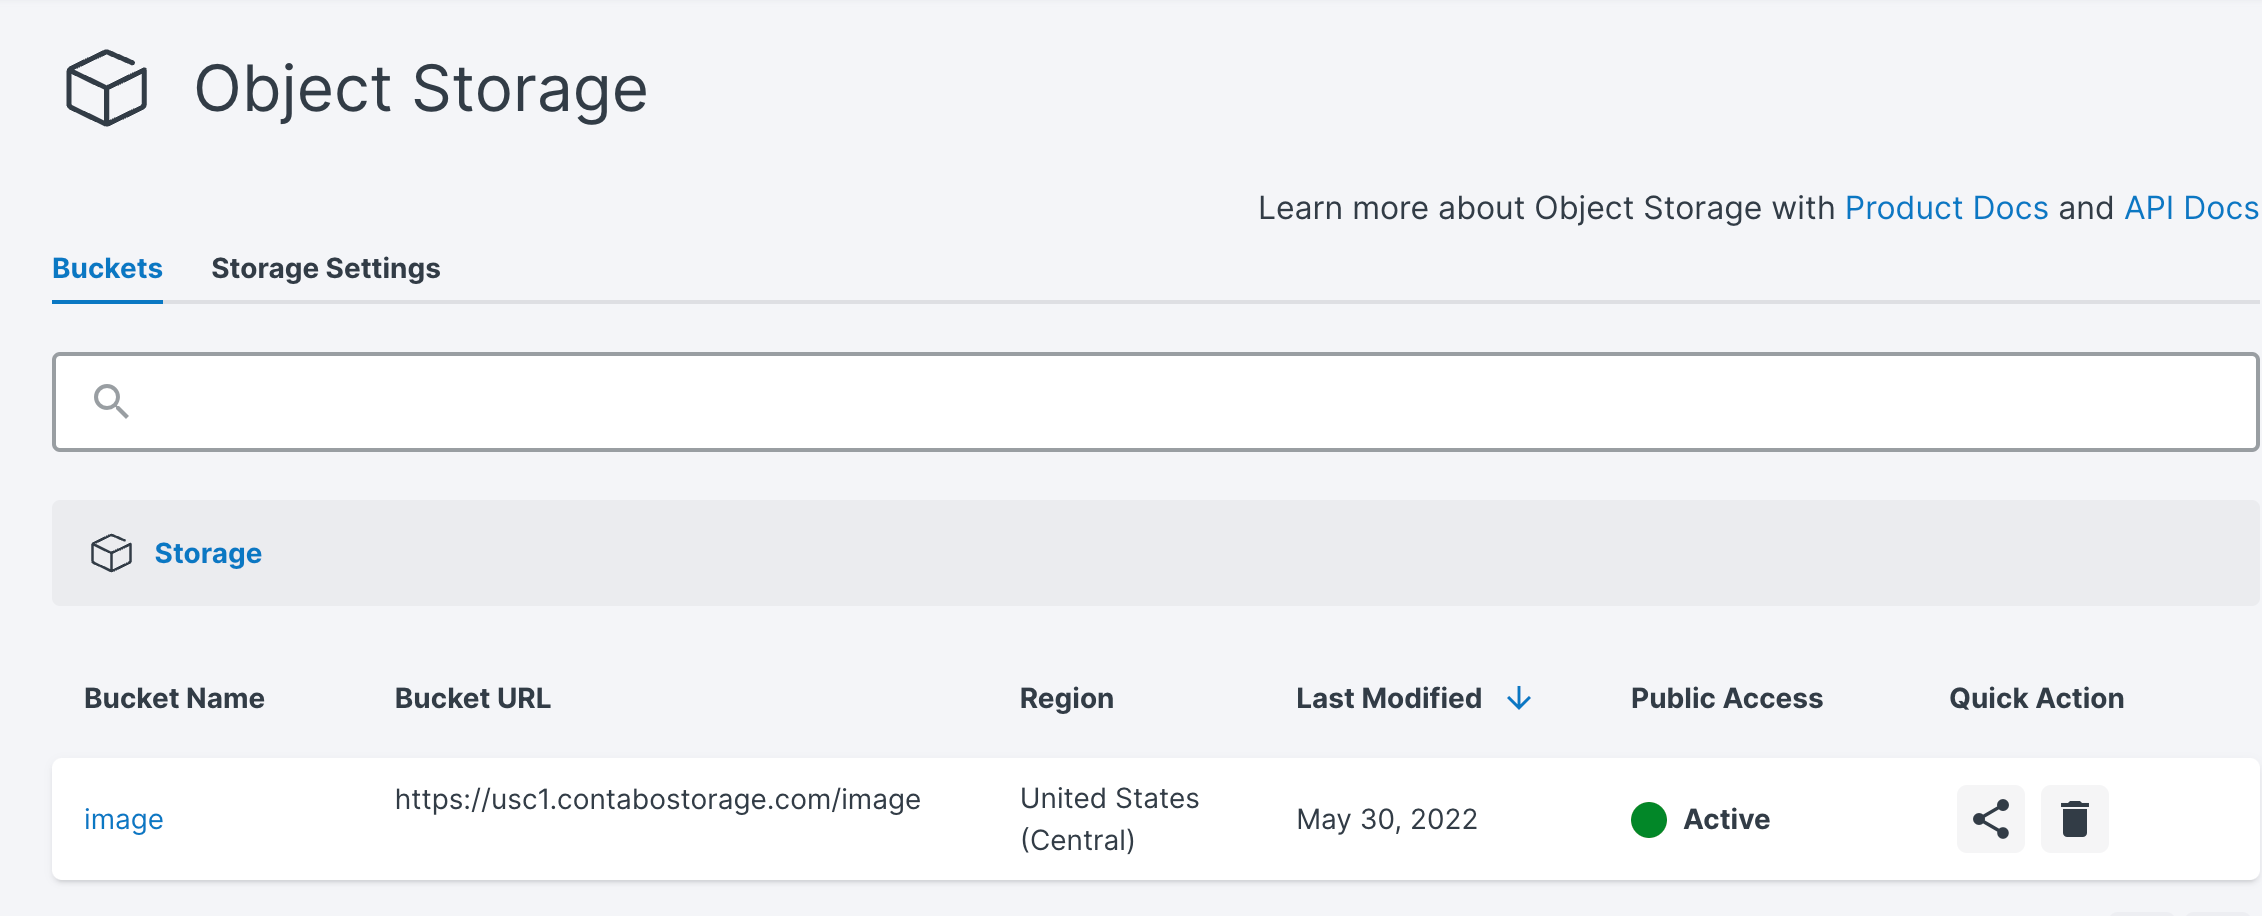
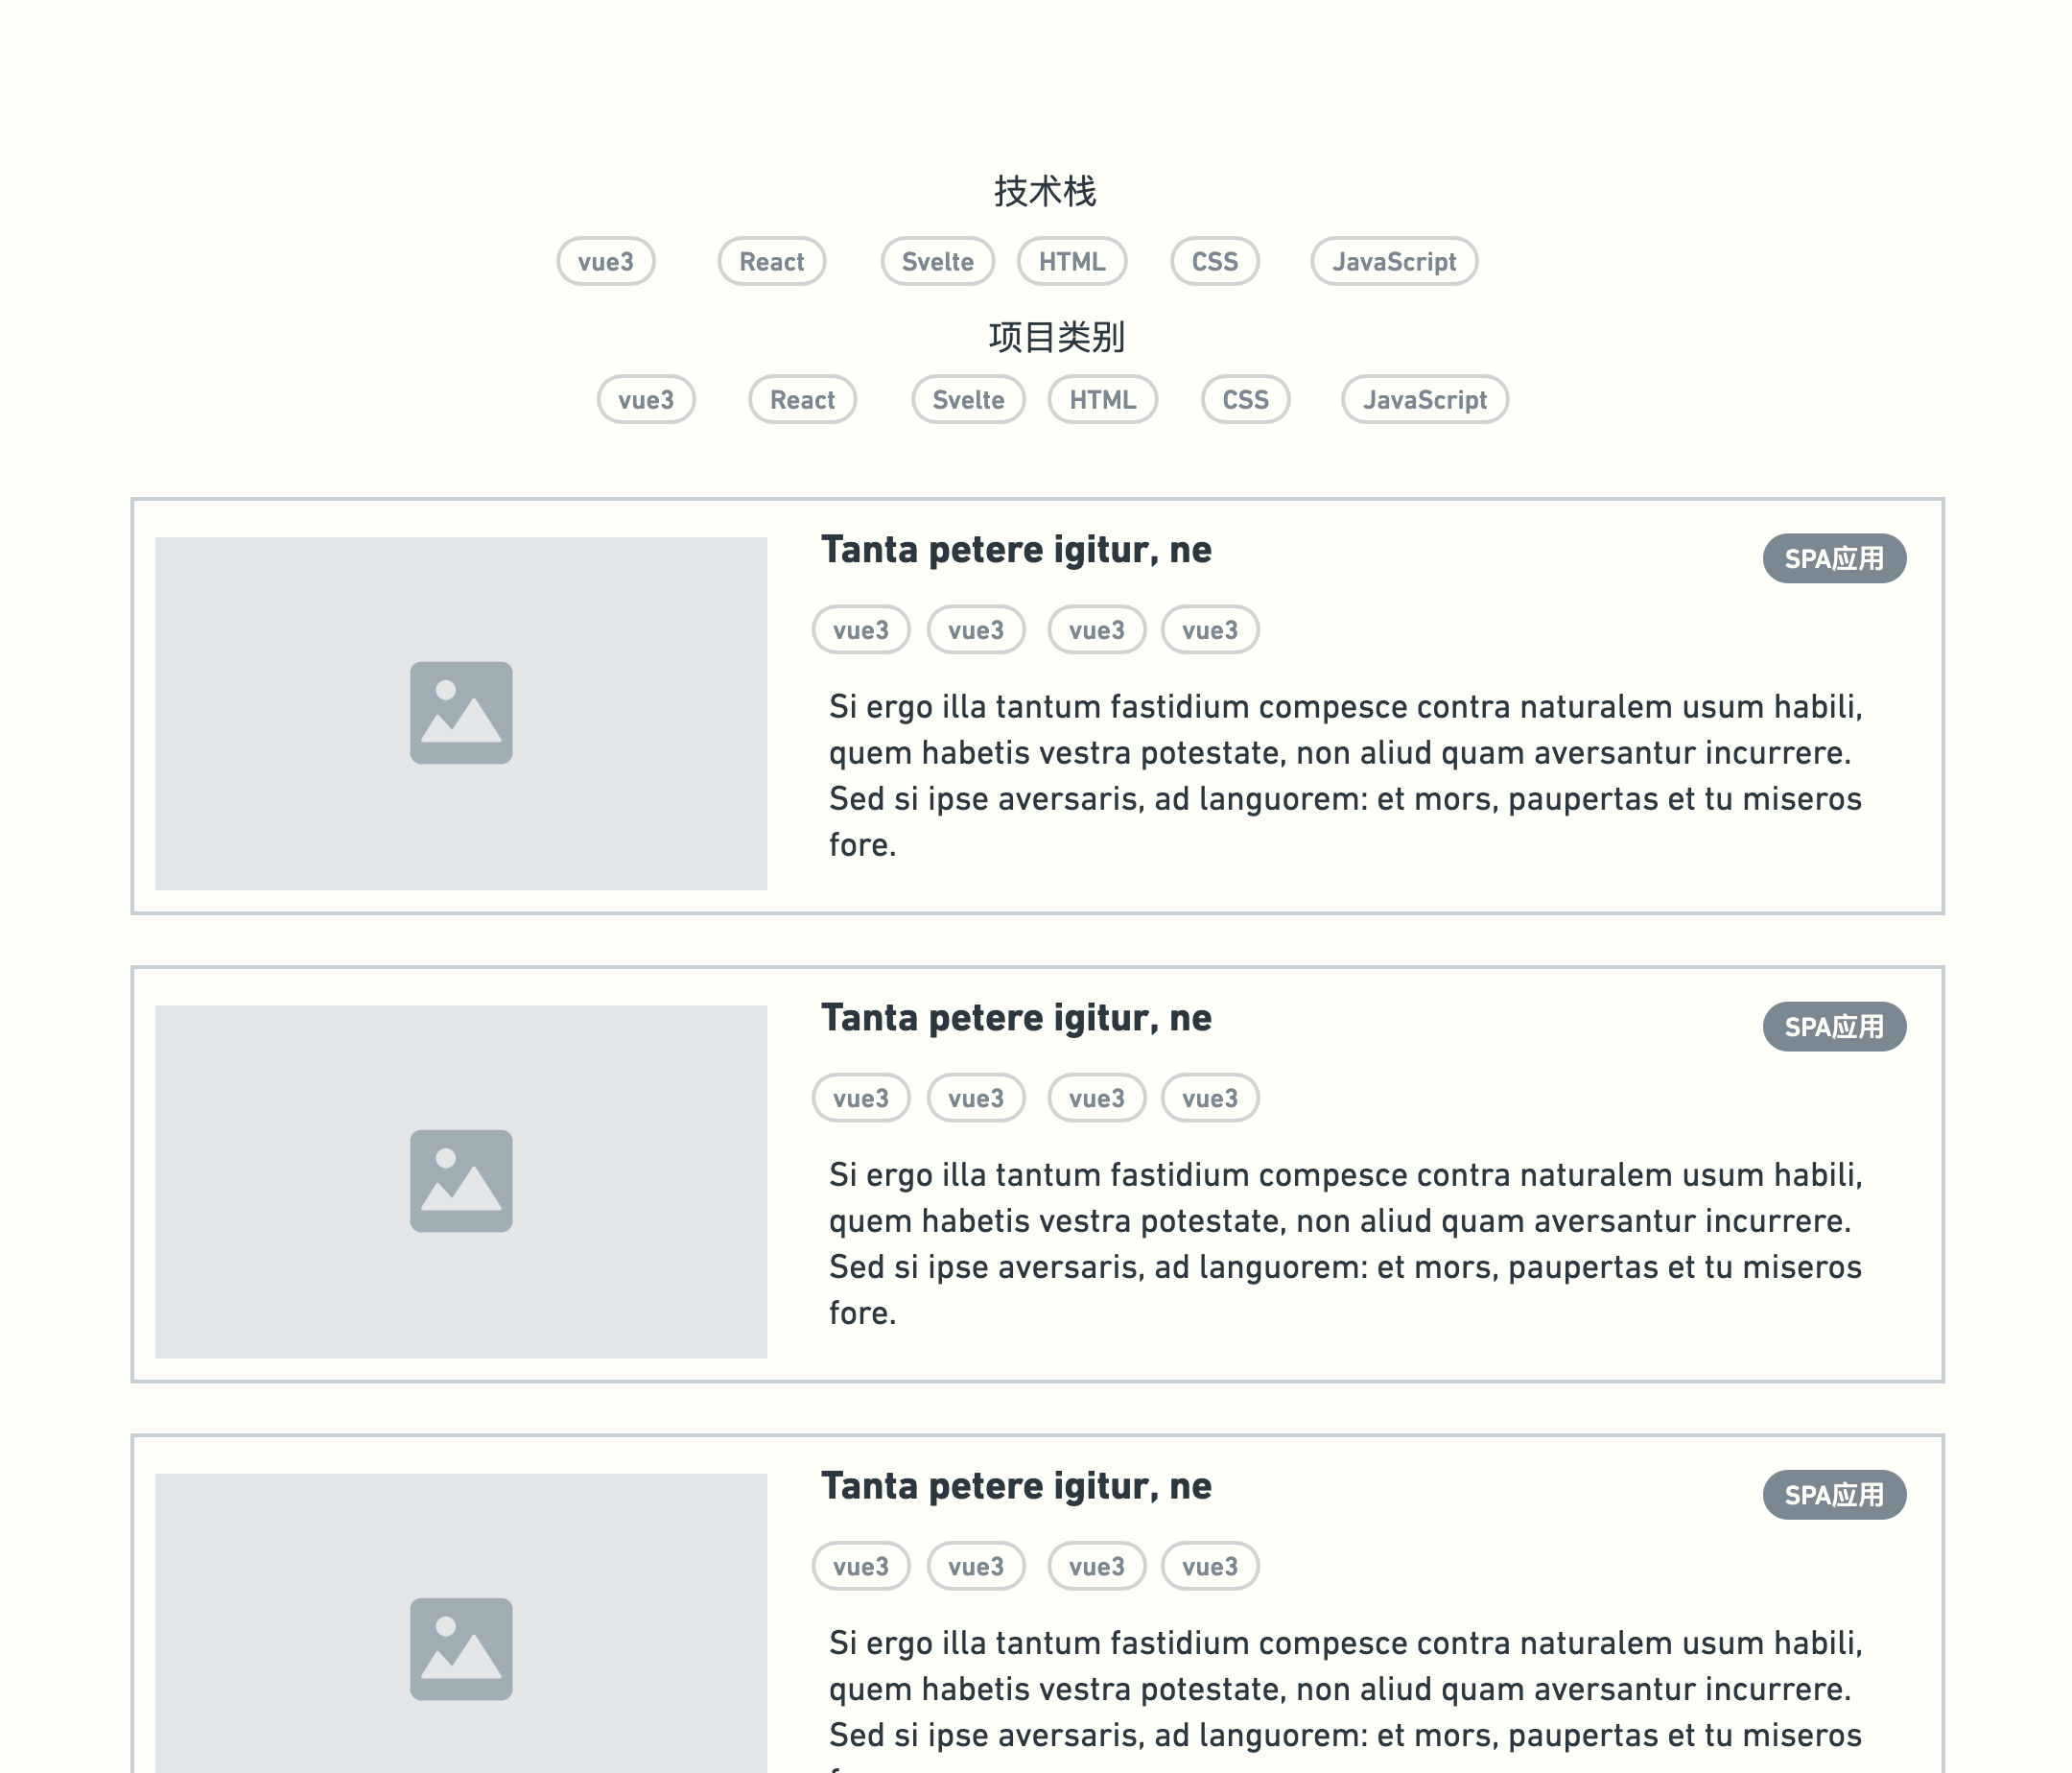
在插件里面搜s3
,然后安装第一个:
安装好后,在设置里选择打开,
打开Contabo Object Storage Panel的 Acount > Security & Access 面板,找到最下面的 S3 Object Storage Credentials
这里对应插件设置里的:
https://usc1.contabostorage.com
打开这两项:
然后文件路径对应的是 Bucket 里面存储文件的路径,具体的设置可以参照:GitHub - wayjam/picgo-plugin-s3: PicGo S3 插件
先安装这个Image auto upload Plugin
插件:
然后在 PicGo 设置里面 → 设置 Server→ 打开 Server 开关
然后 Obsidian 插件中这样设置:
PicGo Server :http://127.0.0.1:36677/upload
端口号不一定是 36677,只要一一对应就好。
设置好后,在后台保持 PicGo 开启,就可以在 Obsidian 里面粘贴一键上传图床了~
GitHub - PicGo/Awesome-PicGo: A collection of awesome projects using PicGo.
有图床备份、图片压缩、图床转移等插件,不过我都没有试过……
]]>既然有了博客,那我肯定是要写一下这个过程的。
我想要的是一个独立的 Page,而不是一个 Post 页面,最后把它放在导航栏里面。想要有以下这几个功能:
主要有这些信息的展示:
明确了需求后,参考了几个项目平台的布局,在 Whimsical 上画了原型图如下:
目前还没有做上面 Tag 的分类功能,之后可能会做吧
为了统一风格,我在博客现有框架里四处搜寻可用的组件样式,想在这基础上修改,然后我找到了作者 藍 在 Tailwind Play 上的友链组件,感觉很适合,然后就直接在这个 Tailwind Play Demo 上进行了样式修改,不过此时填写的数据都是死数据,后面再进行修改。
因为我之前没有怎么用过 Tailwind,所以是一边对照 Tailwind 文档修改的,然后 Tailwind Play 上的代码提示功能真的很新手友好,hover CSS class 的时候会显示具体的 CSS 原始参数,很直观。
最后我构建的 Demo 样式如下:Tailwind Play
整个页面的构建跟 Friend 页面很像,我分析了 Friend 页面所涉及到的代码和结构,然后一点点模仿构建 Project 页面。
首先根据需求确定传入的数据及其格式,以便后面使用 TypeScript 的提示
/src/lib/config/friends.ts
/src/lib/config/projects.ts
/src/lib/config/friends.tsts
export interfaceFriendOld {// hCard+XFNid : string // HTML idrel ?: string // XFN, contact / acquaintance / friendlink ?: string // URLhtml ?: string // HTMLtitle ?: string // 标题descr ?: string // 描述avatar ?: string // 头像name ?: string // backwards compatibility}export typeFriend = {id : string // HTML idrel ?: string // XHTML Friends Networklink ?: string // URLhtml ?: string // Custom HTMLtitle ?: string // 标题name ?: string // 人名avatar ?: string // 头像descr ?: string // 描述class ?: {avatar ?: string // 头像类名img ?: string // 图片类名}}export constfriends :Friend [] = [{id : 'id',rel : '',title : '',name : '',link : '',descr : '',avatar : ''}]
/src/lib/config/projects.tsts
export typeProject = {id : stringname ?: stringtags ?: string[]feature ?: stringdescription ?: stringimg ?: stringlink ?: string}export constprojects :Project [] = [{id : 'coach',name : 'Find a Coach',tags : ['Vue 3', 'Composition API'],feature : 'Vue3',description :'既然如何, 问题的关键究竟为何? 要想清楚,科学和人文谁更有意义,到底是一种怎么样的存在。 普列姆昌德曾经提到过,希望的灯一旦熄灭,生活刹那间变成了一片黑暗。这启发了我, 那么, 我认为, 总结的来说,',img : 'https://uneorange.oss-cn-guangzhou.aliyuncs.com/202205251801454.avif',link : 'https://seviche.cc'}]
将 CSS 复制进去,并注入数据
/src/lib/components/extra/friend.svelte
/src/lib/components/extra/project.svelte
/src/lib/components/extra/friend.sveltehtml
<script lang="ts">import type { Friend } from '$lib/config/friends'import Footer from '$lib/components/footer.svelte'export let item: unknownlet friend = item as unknown as Friend</script>{#if friend.id === 'footer'}<footer rounded="{true}" class="p-4 md:p-8" />{:else if friend.html}<a id="{friend.id}" rel="{friend.rel}" href="{friend.link}" class="h-card u-url">{@html friend.html}</a>{:else}<aid="{friend.id}"rel="{friend.rel}"href="{friend.link}"class="card bg-base-100 shadow-xl hover:shadow-2xl transition-shadow h-card u-url"><div class="absolute text-4xl font-bold opacity-5 rotate-6 leading-tight top-4">{friend.name ?? ''}{friend.title ?? ''}</div><div class="card-body p-4"><div class="flex items-center gap-4">{#if friend.avatar}<div class="avatar {friend.class?.avatar} shrink-0 w-16 mb-auto"><img class="{friend.class?.img ?? 'rounded-xl'} u-photo" src="{friend.avatar}" alt="{friend.title}" /></div>{:else}<div class="avatar {friend.class?.avatar} placeholder mb-auto"><div class="{friend.class?.img ?? 'bg-neutral-focus text-neutral-content shadow-inner rounded-xl'} w-16"><span class="text-3xl">{(friend.name ?? friend.title).charAt(0)}</span></div></div>{/if}<div class="card-title flex-col gap-0 flex-1 items-end"><span class="text-right p-name">{friend.name ?? ''}</span><span class="opacity-50 text-right">{friend.title}</span></div></div>{#if friend.descr}<div class="prose opacity-70 p-note">{friend.descr}</div>{/if}</div></a>{/if}
根据具体的页面效果修改了 Demo 中的 CSS 样式
/src/lib/components/extra/project.sveltehtml
<script lang="ts">import type { Project } from '$lib/config/projects'import Footer from '$lib/components/footer.svelte'export let item: unknownlet project = item as unknown as Projectlet tags = project.tags</script>{#if project.id === 'footer'}<footer rounded="{true}" class="max-w-4xl mx-auto p-4 md:p-8" />{:else}<aid="{project.id}"href="{project.link}"class="card mx-auto max-w-4xl bg-base-100 shadow-xl transition-shadow mb-7 h-card u-url hover:shadow-2xl"><div class="absolute text-5xl font-bold opacity-5 rotate-6 leading-tight top-2 right-0">{project.feature}</div><div class="card-body p-4"><div class="flex flex-col md:flex-row items-start gap-4"><div class="mb-auto max-w-full shrink-0 md:max-w-xs"><img class="rounded-md" src="{project.img}" alt="{project.description}" /></div><div class="card-title flex-1 flex-col items-start gap-4"><div><h2 class="p-name text-left text-2xl mb-2">{project.name}</h2><div class="mb-3 text-base font-normal">{#each tags as tag}<span class="btn btn-sm btn-ghost normal-case border-dotted border-base-content/20 border-2 my-1 mr-1">{tag}</span>{/each}</div></div><p class="text-left text-base font-normal opacity-70">{@html project.description}</p></div></div></div></a>{/if}
/urara/friends/index.svelte
/urara/projects/index.svelte
/urara/friends/index.sveltehtml
<script lang="ts">// @ts-nocheckimport Masonry from 'svelte-bricks'import { Friend, friends as allFriends } from '$lib/config/friends'import Head from '$lib/components/head.svelte'import FriendComponent from '$lib/components/extra/friend.svelte'const rnd = Math.random()const fy = (a: Friend[], r = 0, c = a.length) => {while (c) (r = (rnd * c--) | 0), ([a[c], a[r]] = [a[r], a[c]])return a}let items: { id: string }[] = [...fy(allFriends as { id: string }[]), { id: 'footer' }]let width: number, height: number</script><head /><Masonry{items}minColWidth="{384}"maxColWidth="{384}"gap="{32}"let:itemclass="mx-4 sm:mx-8 md:my-4 lg:mx-16 lg:my-8 xl:mx-32 xl:my-16"bind:widthbind:height><FriendComponent {item} /></Masonry>
Projects 页面
因为我没有用到瀑布流布局,所以删掉了一些组件和 function
/urara/projects/index.sveltehtml
<script lang="ts">import { projects as allProjects } from '$lib/config/projects'import Head from '$lib/components/head.svelte'import ProjectComponent from '$lib/components/extra/projects.svelte'let items: { id: string }[] = [...(allProjects as { id: string }[]), { id: 'footer' }]</script><head />{#each items as item}<ProjectComponent {item} />{/each}
参考 Tailwind 的响应式设计指南 ,修改了卡片flex
的方向,以及图片的宽度,以适应小尺寸屏幕。
其实有错误的话 pnpm dev
以及 pnpm build
的时候都会提醒,但我后面发现也可以用 pnpm check
来检查。过程中我好像没有遇到什么 Bug。
先看了一下 Repo 作者写的 contributing docs,了解 Contribute 的规范。
按照相应步骤做了之后,Google 了一下如何 pull request,照着 FreeCodeCamp 的这篇进行了操作:如何在 GitHub 提交第一个 pull request ,然后成功 Pull 了一个 Request,但后面发现有的文件没有改,造成了 bug,就删除了原 Request 重新 Pull。
最后终于创建成功了我的第一个 Pull request!链接:feat: ✨ add project page by Sevichecc · Pull Request #19 · importantimport/urara · GitHub
写一篇这样的博文,并发表到互联网。
好啦我知道这篇文章有点臭屁,但下次还敢……
]]>(除了 gitignore 里面的),也可以单独加
git add -A
git commit -m '一些信息,如fixed something etc'
git push origin main
等待一会儿就好了,如果不行,换个网或者关掉 VPN 看看
.gitignore
: 放不想传到 git repo 的文件/文件夹main
或master
修改代码,而是开一个 branch,确定好后再 merge命令 | 作用 |
---|---|
git config --global user.name 名字 | 设置名字 |
git config --global user.email 邮箱 | 设置邮件 |
git init | 初始化 |
git add -A | 追踪所有文件(除了 gitignore 里面的),也可以单独加 |
git commit -m | m 代表信息,后面要写 commit 相关信息 |
git status | 查看 git 状态/信息 |
git log | 查看 commit 日志,按 Q 才可以退出 |
git reset hard (commit的id) | 回到特定版本 |
git reset hard --HEAD | 返回上一次改动 (还没有 commit) |
git branch | 列出现在有的 branch,按 Q 退出 |
git branch (branch'name) | 创建新 branch |
git merge (branch'name) | 合并 branch 到 main |
git checkout (branch's name) | 切换 branch |
git remote add origin https://github.com/用户名/仓库名.git | 链接到 remote repo |
git pull | 拉更新 |
git push origin (branch'name) | push 到 remote repo |
下面是一些我看过的文章
它导出的笔记提供了导出的 API,可以轻松同步到 Obsidian / Logseq,真是平易近人呢!
我的使用例子:
我在 Obsidian 中导出的笔记:
一些基础的部分我会省略掉,详情可以看这篇文章:开源、可定制的网页批注工具——Hypothesis
在下面这些操作之前,需要先注册一个 Hypotheis 账号,并安装浏览器扩展:
Logseq 我用得不多,如果有写错的,欢迎给我提建议~
(如果打开了可以省略这个)
如果在国内连接插件市场,最好设置一下代理,不然可能装不上,具体的设置需要看一下 VPN 端口号之类的。
打开 Logseq 的插件市场,找到如下名为Hypothesis的插件:
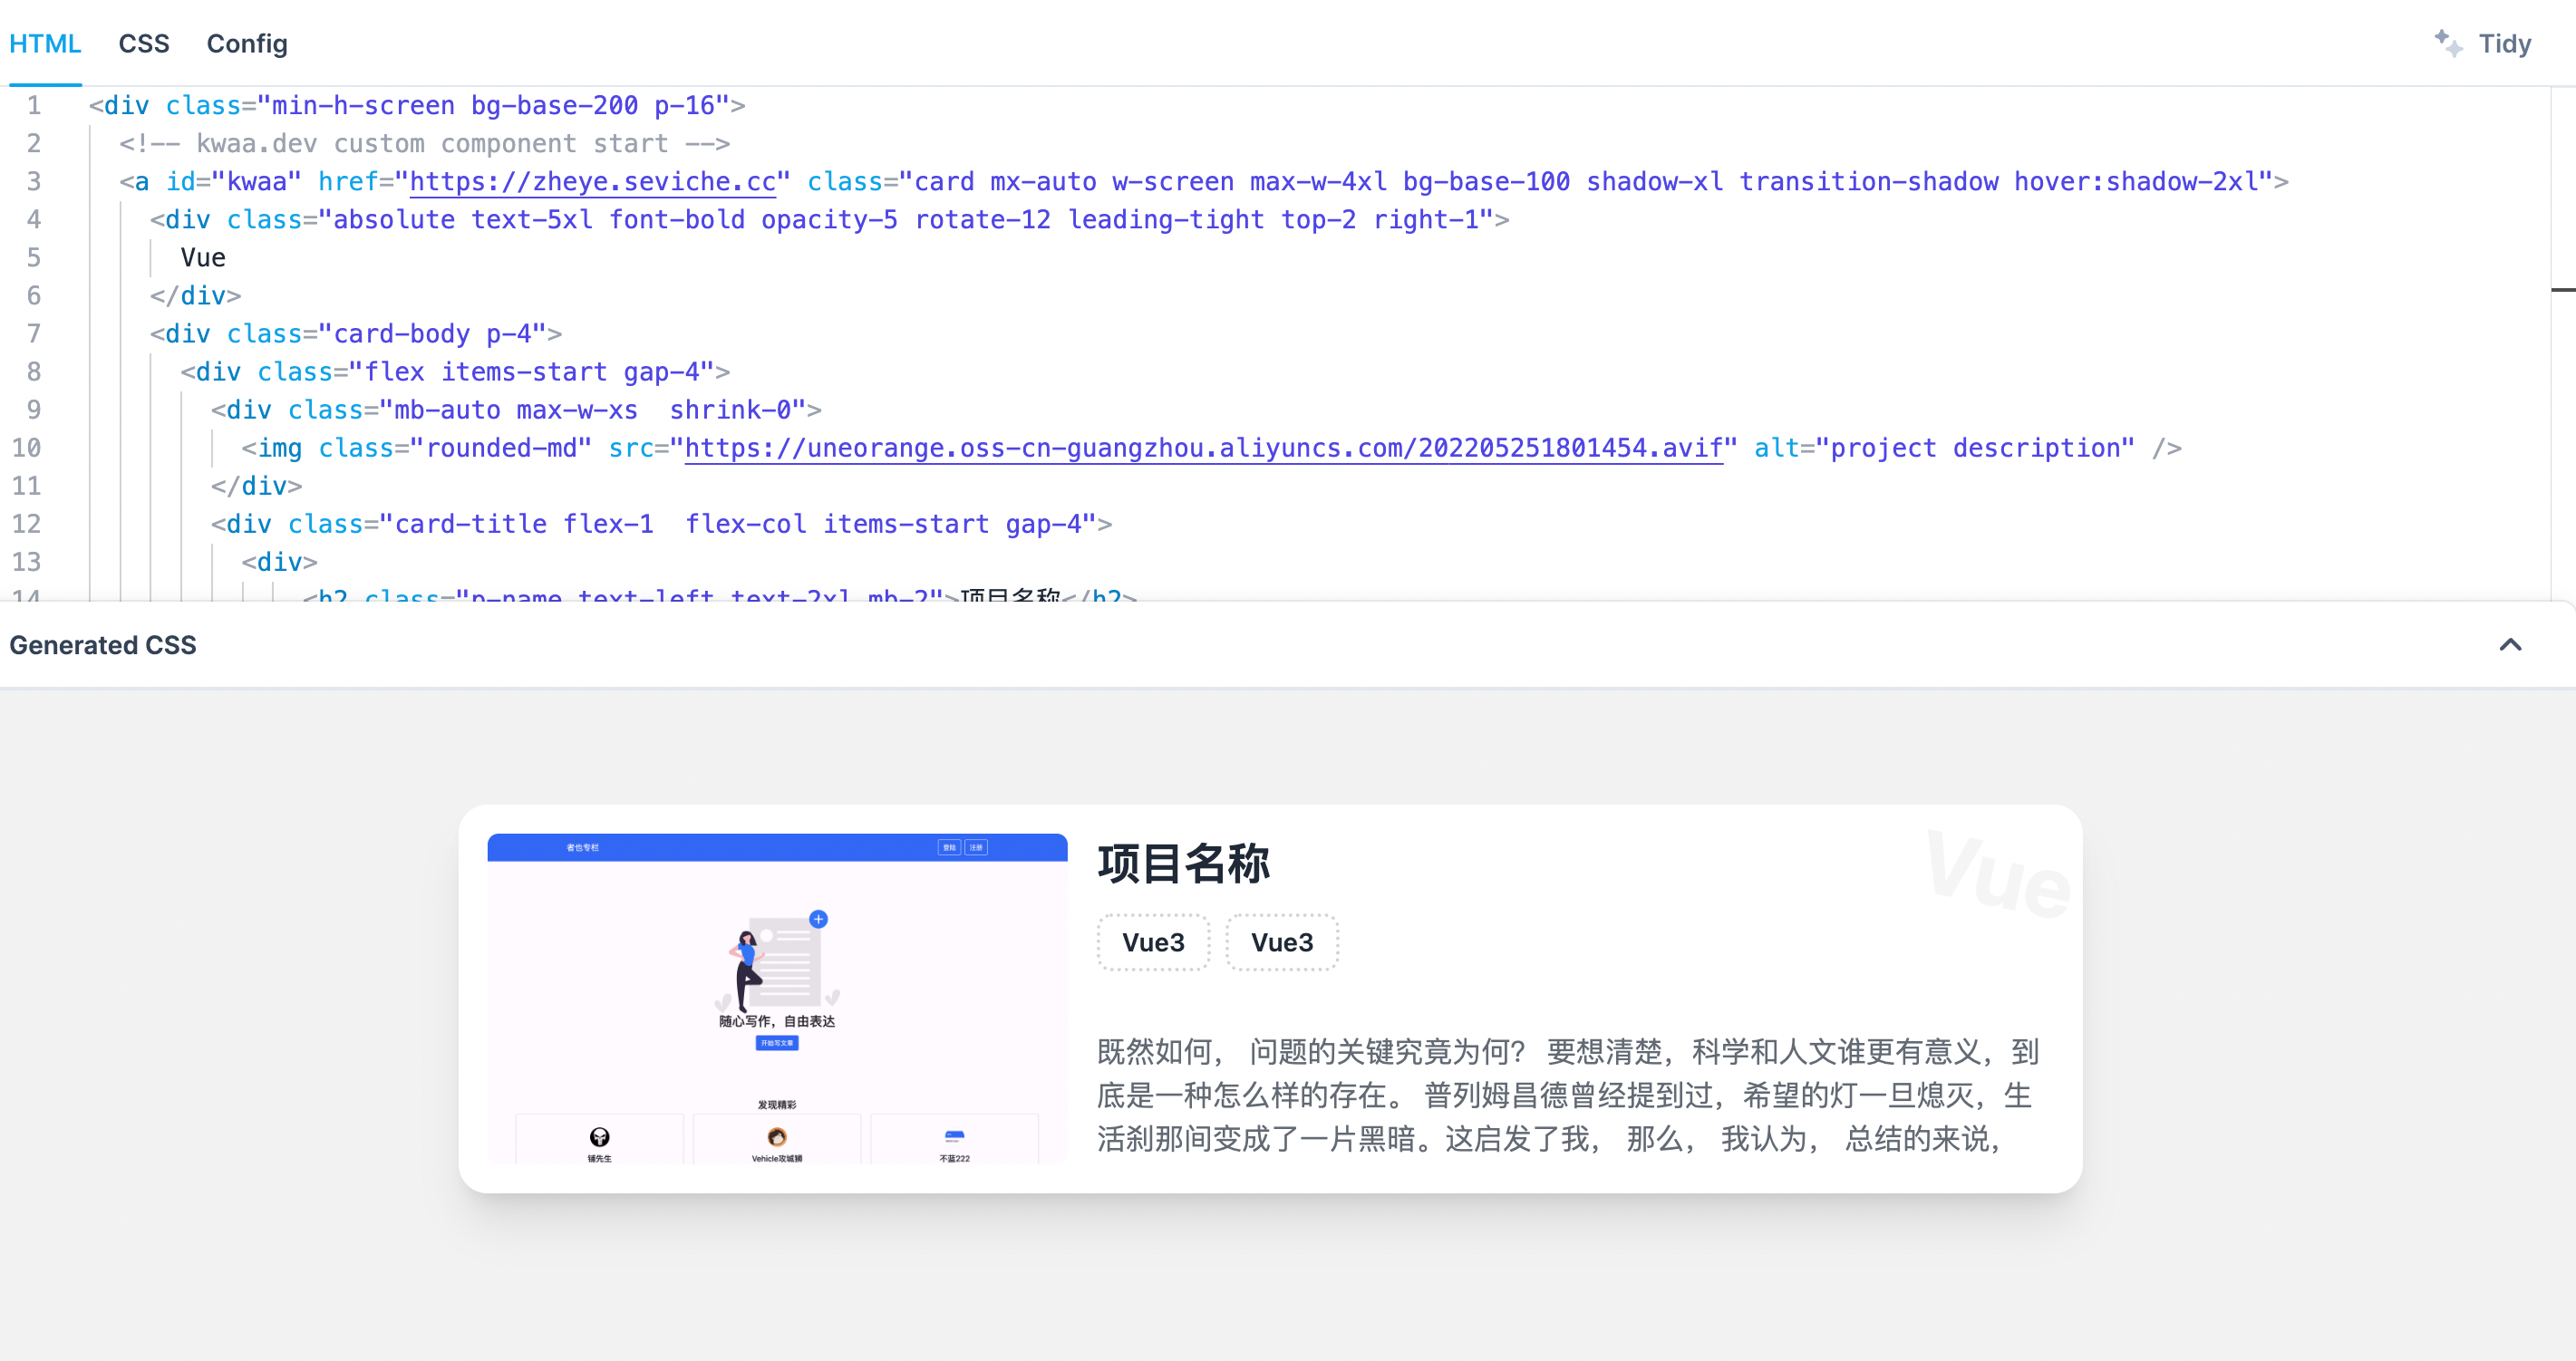
如果一直下载不了的话,可以直接在 Github 下载:logseq-hypothesis
然后在这里导入:
在这里生成一个 API Token:Regenerate your API token
复制后点击 Logseq 右上角的这个 H 的标志:
然后填入刚刚复制的 API Token 和用户名
用户名跟 Hypothesis 这里显示的一样,比如我的就是 Sevicheeee
点击 Fetch Latest Notes
会拉取最新的笔记
如果选择了指定页面,然后点Add page notes to graph
,会自动生成一篇相应的笔记,比如:
如果想修改笔记模板的话,可以在setting
中修改:
如图所示:
Github: obsidian-hypothesis-plugin
打开插件设置,点击右上角的Connect
, 输入你的 API Token 并保存,如果没有获取的话,请在这里获取:Regenerate your API token
可以在这里选择笔记保存的位置:
其中Use Domain Folders
是按域名来划分文件结构,如果没有打开的话就是默认一篇笔记一个 md 文档,如下图红框所示就是打开了这个,下面蓝色的就是没打开时的输出结构
可以在右边的文本框内设置笔记输出格式说实话,我没有怎么看懂 Orz, 然后这是我的模板:
js
{% if is_new_article %}# {{title}}## Metadata{% if author %}- Author: [{{author}}]({{authorUrl}}){% endif %}- Title: {{title}}{% if url %}- Reference: {{url}}{% endif %}- Category: #source/article🗞{% endif %}- Tags:{% if is_new_article -%}## Highlights{%- endif %}{% for highlight in highlights -%}- {{highlight.text}}{% if highlight.tags | length %} - Tags: {% for tag in highlight.tags -%}#{{tag| replace(" ", "-")}} {%- endfor %}{%- endif %}{% if highlight.annotation %} - Annotation: {{highlight.annotation}}{%- endif -%}{%- endfor -%}
效果:
点击右边这个标志就可以更新笔记了~也可以在设置里打开启动时自动抓取的设置
参考:sqlite 在 windows 下载安装,配置环境变量
首先,打开控制面板,如果找不到的话,直接搜索,例如:
然后点击系统与安全,再点击 系统
在新窗口中点击高级系统设置 -> 环境变量
如上图所示,在蓝色区域新建一个环境变量,此处填写一开始创建 sqlite 文件的路径,比如这里就是C:\sqlite
什么是命令提示符?
命令提示符是大多数 Windows 操作系统中可用的命令行解释器应用程序。
命令提示符用于执行输入的命令 。 大多数这些命令用于通过脚本和批处理文件自动执行任务,执行高级管理功能以及排除和解决某些类型的 Windows 问题。
命令提示符被正式称为Windows 命令处理器,但有时也被称为命令外壳程序或cmd 提示符 ,甚至称其为文件名cmd.exe 。——命令提示符(它是什么以及如何使用它)
我的理解就是用代码的方式操作电脑系统
如何打开命令提示符:
打开后输入sqlite3
,出现下面的文字就是安装成功了
cd
的时候按 tab 可以自动填充文件名 (VS Code 里面按 command)命令 | 功能 |
---|---|
ls (win 用 dir ) | 展示当前文件夹文件 |
cd | 改变当前文件夹(change directory) 按 tab 可以自动填充 |
cd.. | 去到上个层级的文件夹 |
clear | 清除命令行记录 |
mkdir | 创建新文件夹(make directory) |
touch (win 用 edit ) | 创建新文件(可以一次性创建多个) |
mv | 移动文件,第一个参数是要移动的文件,第二个是目的地,如 mv index.html ../ 为移动到上一层级 |
rmdir | 删除空文件夹(remove directory) |
rm -R | 删除文件夹(R-recursively) |
pwd | 当前所在位置 |
rm (win 用 del ) | 删除文件 |
copyWithin()
方法浅复制数组的一部分到同一数组中的另一个位置,并返回它,不会改变原数组的长度
—— MDN
以下部分内容来自 MDN
js
arr.copyWithin(target[, start[, end]])
0 为基底的索引,复制序列到该位置。
如果是负数,target
将从末尾开始计算。如果 target
大于等于 arr.length
,将会不发生拷贝。如果 target
在 start
之后,复制的序列将被修改以符合 arr.length
。
0 为基底的索引,开始复制元素的起始位置。
如果是负数,start
将从末尾开始计算。如果 start
被忽略,copyWithin
将会从 0 开始复制。
0 为基底的索引,开始复制元素的结束位置。
copyWithin
将会拷贝到该位置,但不包括 end
这个位置的元素。
如果是负数, end
将从末尾开始计算。如果 end
被忽略,copyWithin
方法将会一直复制至数组结尾(默认为 arr.length
)。
js
const array1 = ['a', 'b', 'c', 'd', 'e']// copy to index 0 the element at index 3console.log(array1.copyWithin(0, 3, 4))// expected output: Array ["d", "b", "c", "d", "e"]// copy to index 1 all elements from index 3 to the endconsole.log(array1.copyWithin(1, 3))// expected output: Array ["d", "d", "e", "d", "e"]
上图将 target 位置用红色的部分表示,被复制的元素为蓝色。
a = array1[0]
,所在位置是将要被替换的 target 位置。d = array1[3]
是复制的起始元素,复制结束在array1[4]
之前。复制后a
的位置被 d
所取代。b = array1[1]
,所在位置是将要被替换的 target 位置,d = array1[3]
是复制的起始元素,复制没有指定结束位置,所以一直复制到数组末尾。复制后a
的位置被 'd','e'
所取代。前段时间我所购买的 VPS 服务商 Contabo 发邮件来说,我用 VPS 攻击了其他的服务器,让我快点停止这种行为,要是不改就罚我的钱,但是我并没有在上面装什么奇怪的东西,就只装了一个聊胜于无的 WordPress,手足无措之余在 Mastodon 哀嚎了一下,得到了很多热心网友的帮助,才发现原来我一直在裸奔使用 VPS,什么安全措施都没采取:(
鉴于 VPS 上本来就没有什么东西,我决定重新初始化机子,本文是初始化的笔记,我的系统是 Ubuntu 20.04,文中提到的 ufw 是内置的,没有额外安装, 有些步骤上有所省略,最好对照着提到的参考文章看。
(再次感谢 Allen Zhong、糖喵、南狐、shrik3 等朋友的热心指导 o(≧v≦)o!)
下面这两点都是 Contabo 客服发给我的防护建议,用 Deepl 翻译了一下
最后我将 VPS 里的内容全删了,从 0 出发,下面是具体的操作步骤:
首先用 root 登陆,然后输入 adduser + 用户名 创建新用户,如添加用户jack
shell
adduser jack
接着输入两遍密码,其他信息可以按 Enter 留空
给这个用户 root 权限:
shell
sudo usermod -aG sudo jack
其他参考: 如何在 Ubuntu 上添加和删除用户 | myfreax
参考: 给 VPS 配置 SSH 密钥免密登录 - P3TERX ZONE
文中提到可以在远端 VPS 上,也可以在本地,这里我选择在本地生成。
打开终端,输入 ssh-keygen
,连续按四次 Enter (密码设置为空),如果出现了 overwrite(y/n)?
就说明之前就有生成了,你可以选择 y
重新生成一个,或者就用已有的这个
比如:
bash
root@p3ter:~# ssh-keygen # 输入命令,按 Enter 键Generating public/private rsa key pair.Enter file in which to save the key (/root/.ssh/id_rsa): # 保存位置,默认就行,按 Enter 键Enter passphrase (empty for no passphrase): # 输入密钥密码,按 Enter 键。填写后每次都会要求输入密码,留空则实现无密码登录。Enter same passphrase again: # 再次输入密钥密码,按 Enter 键Your identification has been saved in /root/.ssh/id_rsa.Your public key has been saved in /root/.ssh/id_rsa.pub.The key fingerprint is:SHA256:GYT9YqBV4gDIgzTYEWFs3oGZjp8FWXArBObfhPlPzIk root@p3terThe key's randomart image is:+---[RSA 2048]----+|*OO%+ .+o ||*=@.+++o. || *o=.=.... ||. +.B + +o. || . + E *S. || o o || . || || |+----[SHA256]-----+
出现那个神秘的矩形就是生成好了
在本地终端:
bash
ssh-copy-id -pport user@remote
user
为用户名,remote
为 IP 地址,port
为端口号。
也可以不加端口号:
bash
ssh-copy-id user@remote
然后按要求输入密码,如果是用 root 登陆的,就是用的初始密码,如果是用上面设置的新用户,那就跟之前设置的用户密码一样
登入 VPS 后,在远程终端输入:
bash
chmod 600 .ssh/authorized_keys
打开配置文件:
bash
nano /etc/ssh/sshd_config
找到下面这两行,并改成这样:
bash
PermitRootLogin noAllowUsers username #如果没有这一行就手动添加RSAAuthentication yes #这一行我找不到就没有配置PubkeyAuthentication yes
记得 username 要换成自己设置的名字,也就是上面配置的 jack
修改完按 Ctrl+o 保存,Enter 确认,Ctrl+X 退出编辑
重启 ssh 服务
bash
systemctl reload sshd
或者
bash
service sshd restart
设置好后,试试看能不能用 ssh 登陆,如果可以,再 sudo nano /etc/ssh/sshd_config
修改配置,禁用密码登陆:
bash
PasswordAuthentication no
然后改默认登陆端口1,应该什么数都可以吧,什么 8080,9080,8888,3141……
找到 Port 22
这行,在下面加你要开的口
bash
Port 22Port 8888
加完了之后重启
bash
sudo service sshd restart
打开防火墙并给你设置的端口放行
bash
sudo ufw allow 8888sudo ufw enable
sudo ufw status
查看防火墙状态,比如:
bash
Status: activeTo Action From-- ------ ----8888 ALLOW Anywhere8888 (v6) ALLOW Anywhere (v6)
然后重新连接一下 VPS,用设置好的端口登陆看看,如果没问题的话重新 sudo nano /etc/ssh/sshd_config
,注释掉 Port 22
那一行
参考:
bash
sudo apt updatesudo apt install clamav clamav-daemon -y
先停止 clamav-freshclam
服务
bash
sudo systemctl stop clamav-freshclam
执行更新:
bash
sudo freshclam
启动clamav-freshclam
服务
bash
sudo systemctl start clamav-freshclam
bash
sudo systemctl is-enabled clamav-freshclam
先关掉 clamav-freshclam 再下载
bash
sudo systemctl stop clamav-freshclamsudo freshclam
查看 clamav 的目录和文件的日期
bash
ls /var/lib/clamav/
nice
:降低 clamscan 的优先级(限制相对 cpu 时间)。
bash
sudo nice -n 15 clamscan
cpulimit
:限制绝对的 CPU 时间。安装 cpulimit
bash
sudo apt-get install cpulimit
使用 cpulimit 来限制 clamscan:
bash
cpulimit -z -e clamscan -l 20 & clamscan -ir /
bash
clamscan /home/filename.docx #扫描特定目录或文件clamscan --no-summary /home/ #扫描结束时不显示摘要clamscan -i / #打印受感染的文件clamscan --bell -i /home #警惕病毒检测clamscan -r --remove /home/USER #删除受感染的文件
安装 fail2ban 以阻止重复登录尝试
参考:准备你的机器 - Mastodon documentation
更新软件包:
bash
sudo apt updatesudo apt upgrade -y
参考:如何在 Ubuntu 20.04 上安装和配置 Fail2ban
bash
sudo apt install fail2ban
安装完后将自动启动,可以用sudo systemctl status fail2ban
查看运行状态
打开/etc/fail2ban/jail.local
:
bash
sudo nano /etc/fail2ban/jail.local
写入下面的内容,修改邮箱,如果端口改了,也要记得相应修改
text
[DEFAULT]destemail = your@email.heresendername = Fail2Ban[sshd]enabled = trueport = 22[sshd-ddos]enabled = trueport = 22
重启 fail2ban:
bash
sudo systemctl restart fail2ban
还没弄明白怎么回事,待更
参考:
]]>html
<p>I am a frontend developer with a particular interest in making things simple and automating daily tasks. I try to keep up withsecurity and best practices, and am always looking for new things to learn.</p>
css
p {color: #dcdcdc;/*缩小基准大小,也就是缩小后的字体应该是 10.2px=12px*0.85*/font-size: 12px;/* 缩小比例 10.2px/12px=0.85 */transform: scale(0.85);/*设置缩放中心*/transform-origin: 0 0;/*(1-0.85)+1,补上缩小的宽度,这里可以按视觉效果调整一点*/width: 118%;/*兼容IE*/*font-size: 10.2px;}
参考:
]]>Miniflux 文档: Integration with External Services
在 这里 创建一个 Pocket 应用,以获取 Consumer Key
我的设置如下:
在My Apps下面找到刚刚创建的应用,复制 Consumer Key:
在 Miniflux 后台,设置 → 集成 → Pocket → Pocket 用户密钥(第一栏)中 填入刚刚复制的 Consumer key
填好后,通过通过点击下面的 连接您的 Pocket 账户 自动获取 Access Token(访问密钥):
点击链接后按 授权。
这里可能会跳到 http://localhost/integration/pocket/callback
然后就无法访问页面了,解决办法很简单,把 localhost
改为你的服务器 ip 端口或者 miniflux 所在域名即可,如 http://miniflux.com/integration/pocket/callback
,按回车会跳回到 miniflux 设置页面。
出现这个提醒就连接成功了:
然后就可以点击文章页面的保存测试看看。
在 此处复制需要的 Pocket 收藏按钮样式,添加到主题的 layout 里面(具体要看不同主题的设置,wordpress 似乎有内置这功能,我不确定,有三种效果。
https://miniflux 的网址/fever
官网:Instapaper
用户名为 Instapaper 的登录邮箱,设置好更新下就可以了~
来都来了,整理一下最近看过的相关内容,因为隐私问题,长毛象上的嘟文暂时不贴(除了我自己的
通过 HTML 及 CSS 参考示例图实现页面开发,要求实现效果与示例图基本一致
https://forty-seviche.netlify.app/
耗时:4 小时(还没有做自适应等很多东西……╮( ̄ ▽  ̄"")╭
]]>通过隐藏的
input
和与之关联的 label 点击label
触发input
的checked
状态触发的,再配合使用元素状态的伪类:checked
样式就可以实现不同状态的切换,中间的过度效果还可以配合 CSS3 的transition
过度效果实现 1。
input
的name
都一样,id
不同html
<div class="tab-frame"><!--标签页标题栏--><!-- 设置一个为check --><input type="radio" name="tab" id="tab1" check /><label for="tab1">TAB1</label><input type="radio" name="tab" id="tab2" /><label for="tab2">TAB2</label><input type="radio" name="tab" id="tab3" /><label for="tab3">TAB2</label><!--Tab内容--><div class="tab-content"><p>THIS IS TAB1 CONTENT</p><p>Notice the gap between the content and tab after applying background cololr</p></div><div class="tab-content"><p>THIS IS TAB2 CONTENT</p><p>Notice the gap between the content and tab after applying background cololr</p></div><div class="tab-content"><p>THIS IS TAB3 CONTENT</p><p>Notice the gap between the content and tab after applying background cololr</p></div></div>
css
/* 隐藏input和tab内容 */.tab-frame input,.tab-content {display: none;}/* 导航栏样式:未选中时 */.tab-frame label {color: #555;padding: 10px 20px;border-bottom: 1px solid #555;cursor: pointer;float: left;}/* 导航栏样式:选中时 */.tab-frame input:checked + label {color: #0f71aa;border: 1px solid #555;border-bottom: none;border-radius: 4px 4px 0px 0px;cursor: default;}/* Tab内容样式 */.tab-frame .tab-content {color: #0f71aa;font-size: 1.5rem;font-weight: bold;padding-top: 40px;clear: left;}/* 点击的时候显示tab内容,即input checked的时候显示label*/.tab-frame input:nth-of-type(1):checked ~ .tab-content:nth-of-type(1),.tab-frame input:nth-of-type(2):checked ~ .tab-content:nth-of-type(2),.tab-frame input:nth-of-type(3):checked ~ .tab-content:nth-of-type(3) {display: block;}
来源:百度前端学院
参照 打字机效果 DEMO (opens new window),实现一个打字机效果生成器
需求说明
html
<label>请输入文本:</label><input type="text" /><button onclick="generateTypeEffect()">生成打字效果</button><h2 id="showText"></h2><script>function generateTypeEffect() {//这里实现打字机效果//将内容显示在h2中}</script>
html
<label>请输入文本:</label><input type="text" /><button onclick="generateTypeEffect()">生成打字效果</button><h2 id="showText"></h2><script>let i = 0function generateTypeEffect() {const output = document.getElementById('showText')const input = document.querySelector('input').valueif (i < input.length) {output.textContent += input[i]setTimeout(generateTypeEffect, 200, ++i)}}</script>
编码实现凯撒加密算法,根据输入的偏移量,实现对字符串的加密和解密.
恺撒加密(Caesar cipher),是一种最简单且最广为人知的替换加密技术。明文中的所有字母都在字母表上向后(或向前)按照一个固定数目进行偏移后被替换成密文。
例如,当偏移量是 3 的时候,所有的字母 A 将被替换成 D,B 变成 E,以此类推。
需求说明
string.replace
替换数字.charCodeAt()
获取字母编码/[A-Za-z]/g
选择字母html
<label>偏移:</label><input type="text" name="offset" size="5" value="3" /><br /><label>明文:<label></label><input type="text" name="plain" size="50" value="This is a test." /><br /><label>密文:</label><input type="text" name="enc" size="50" /><br /><input type="button" value="加密" onClick="encrypt()" /><input type="button" value="解密" onClick="decrypt()" /></label>
js
let offsetInput = document.querySelector('input[name=offset]')let plain = document.querySelector('input[name=plain')let enc = document.querySelector('input[name=enc]')// 加密function encrypt() {let offset = Number(offsetInput.value)function conver(s) {let charCode = s.charCodeAt(0)// 替换大写字母 A-Z:65-90if (charCode <= 90 && charCode >= 65) {return String.fromCharCode(charCode + offset < 90 ? charCode + offset : charCode - offset)} else {//替换小写字母 a-z:97-122return String.fromCharCode(charCode + offset < 122 ? charCode + offset : charCode - offset)}}enc.value = plain.value.replace(/[A-Za-z]/g, conver)// 替换大写字母 A-Z:65-90// function transUpper(s) {// let charCode = s.charCodeAt();// return String.fromCharCode(// charCode + offset <= 90 ? charCode + offset : charCode - offset// );// }// //替换小写字母 a-z:97-122// function transLower(s) {// let charCode = s.charCodeAt();// return String.fromCharCode(// charCode + offset <= 122 ? charCode + offset : charCode - offset// );// }// let encUpper = plain.replace(/[A-Z]/g, transUpper);// enc.value = encUpper.replace(/[a-z]/g, transLower);}// 解密function decrypt() {let offset = Number(offsetInput.value)function conver(s) {let charCode = s.charCodeAt(0)// 替换大写字母 A-Z:65-90if (charCode <= 90 && charCode >= 65) {return String.fromCharCode(charCode - offset < 65 ? charCode + offset : charCode - offset)} else {//替换小写字母 a-z:97-122return String.fromCharCode(charCode - offset < 97 ? charCode + offset : charCode - offset)}}plain.value = enc.value.replace(/[A-Za-z]/g, conver)}
来源:百度前端学院
js
/*去掉字符串 str 中,连续重复的地方*/function removeRepetition(str) {// do something}// 测试用例console.log(removeRepetition('aaa')) // ->aconsole.log(removeRepetition('abbba')) // ->abaconsole.log(removeRepetition('aabbaabb')) // ->ababconsole.log(removeRepetition('')) // ->console.log(removeRepetition('abc')) // ->abc
js
function removeRepetition(str) {let strArr = [...str]const result = strArr.filter((s, i, arr) => s !== arr[i + 1]).join('')return result}console.log(removeRepetition('aaa')) // ->aconsole.log(removeRepetition('abbba')) // ->abaconsole.log(removeRepetition('aabbaabb')) // ->ababconsole.log(removeRepetition('')) // ->console.log(removeRepetition('abc')) // ->abc
如果没有限定条件说是“连续重复”,就可以用 Set:
js
function removeRepetition(str) {let strArr = [...new Set(str)]return strArr.join('')}console.log(removeRepetition('aaa')) // ->aconsole.log(removeRepetition('abbba')) // ->abconsole.log(removeRepetition('aabbaabb')) // ->abconsole.log(removeRepetition('')) // ->console.log(removeRepetition('abc')) // ->abc
其实我的记笔记方法很简单,就是不断拆碎重组,方便后面查找。
上课时,先按时间顺序书写笔记,就像传统的笔记本一样,上完课后再将那一页笔记拆碎重组到知识结构中。方法论大概是 MOC?就是用索引去整理笔记结构,而不是所处文件夹的层次,这里我们先不做深入探讨。
下面以学习 JavaScript 为例子。
我近期的笔记目录页面(用 Logseq 发布):JavaScript
我把几乎所有的笔记都放在一个叫 Zone
的文件夹内,常用的会打上星标,或者移到最外层文件夹,新笔记默认放在 Zone
文件夹下。
MOC 是 Map of Contents,也就是内容地图,所以我们会从构建一张地图出发。刚开始地图不需要太完美,很精细,因为一个不识路的人是没办法认路的,何况是指路、画地图,反正后面也要调整,可以随意一点。
我刚开始创建了一个叫 JavaScript
的索引页,里面用标题列了几项比较重要的内容,比如 OOP / DOM 之类的,然后在页面最上面列了几项常用的内容:
之后会以这一页内容为目录索引,不断补充和修改,构建自己的知识结构
首先需要创建一个空白页面。我用 Obsidian 里自带的插件 ZK 卡片
创建,可以自动生成时间戳标题,这个功能可以在设置里打开:
然后点击左边功能栏就可以创建并打开了
创建好之后,把这页笔记添加到索引页中,方便后面查找:
然后就可以写课堂笔记了,如果需要在笔记中插入图片,可以使用 Image Auto Upload 这个插件,配合 PicGo 客户端,可以在 Obsidian 里上传图片到图床,非常好用,直接粘贴图片到页面就可以了,具体可以看插件描述。
记笔记的过程没什么特别的,如果提到了一些我还不了解,以后还想深入的话题,我会用 [[ ]]
先标出来, 后面整理笔记的时候看到会留意下。
做完笔记后,将笔记重组。
先打开三个窗口,布局如下:
其中课堂笔记和索引页面需要锁定,这样新打开的窗口就会一直在右下角那个地方,将在这个区域编辑笔记内容。
浏览课堂笔记大纲,看下本节课的知识点应该放在索引里的哪里,知识点之间应该是怎样的关系,在索引里用 [[]]
都列出来,简而言之就是画思维导图。我的一个比较粗糙的整理:
这样就可以比较直观地看到哪些内容整理了,哪些没有整理。
然后就可以将左边的笔记拆分整合到右边的索引中了,按住快捷键 CMD
,鼠标点击索引里的链接打开新页面,然后在右下部分复制整理。写完一个知识点后可以不用关闭窗口,按住 CMD
然后点击链接,继续在右下窗口编辑笔记。
看到索引浅色链接(没有创建页面的)都没了,就基本整理完了,可以再看看课程笔记里有没有要补充的。
然后就整理完啦!之后继续补充索引页面就好了……^_^
]]>上回说到用 自建网页书签 Flare ,今天不小心把 SSH 链接弄坏了(也就是连不上了),因为搭载的服务不多,所以把整个服务器都重装了,Flare 网页书签也炸了。
其实搭建之后我没有用过(一次都没有),平时的书签管理主要靠搜索,各个浏览器之间的书签互相导入后,直接在搜索栏搜,如果是常用的网址,我用 Chorme 扩展 eesel 来解决,它可以列出最近用过的网页,按站点分类,查找起来很方便
最近还推出了一个新功能,可以通过命令进行一下快捷操作,如创建新的 coda 文件、figma 文件等……有点像 Alfred
然后还有一个工具叫 Omni 可以做类似的事情,它还可以搜收藏夹,但不知道为什么我的 Chrome 用不了这个,所以也一直没用。
Airtable 是一个多功能的表格应用,它的表格跟 Notion 里的 Database 挺像的,不过功能更多,用来做网页收藏夹 Free Plan 完全够用。基本的操作可以看这个: 真· Airtable 3 分钟菜鸟入门 - 少数派 ,我没有什么要补充的。
从去年开始,我开始用 Airtable 整理我的一些收藏夹。原因如下:
<iframe>
代码,样式也可以调整当然这样做也有一些缺点,和其他专门做网页书签的应用不同,Airtable 只是一个「表格」,所以从表格到收藏的网页中去需要点两次,也就是需要打开条目再点一次链接。我把它定义为一个「收藏仓库」,而不是一个随用随取的「文具袋」,我会尽可能详细地描述收藏的条目,以备之后查找和辨识。
我的书签例子:
我的收藏夹示例: Airtable - About Coding
至少包含三项内容:
如果需要打开 Markdown 格式支持,需要打开 Enable rich text formatting
也可以增加 Tag 和 Categories 分类等其他内容,下面是我建的示例文件:
点击右上角的 App
→ 点击 App an app
→ 搜 Web clipper
点击 add
添加应用
然后按提示安装 Chrome 拓展,你可以直接在这里安装: Airtable web clipper
为剪切动作命名,如直接用表格名字:About Coding
然后点击 Add to Extension
, 你会看到它出现在了 Web clipper 里面,不过现在先不用管,点击左上角关掉。
在 Web clipper 的设置页面(如下),可以调整表格里面各个单元格对应的网页数据,可以按需设置
其中:
.page-description
我的设置是:
配置好后就可以开始使用了。在你需要剪切的网页,打开 Airtable web clipper,也就是先前安装的浏览器拓展,点击相应动作,比如刚才创建的 About Coding(如果这个面板有挡到页面内容,可以用鼠标拖动到别的地方)
在 Attachment 里选择附加图片的来源:
Description 里面的内容可以自己写,也可以在打开 Web clipper 之前先选中,打开后会自动填充进去,如图:
最后点击 Add record
就完成啦
实现当点击转化按钮时,将输入的十进制数字转化为二进制,并显示在 result
的 p
标签内
dec-number
为 5 ,bin-bit
为 5 ,则转化后数字为 00101
bin-bit
小于转化后的二进制本身位数,则使用原本的位数,如 dec-number
为 5 ,bin-bit
为 2 ,依然输出 101
,但同时在 console 中报个错。]]>html
<input id="dec-number" type="number" placeholder="输入一个十进制非负整数" /><input id="bin-bit" type="number" placeholder="输入转化后二进制数字位数" /><button id="trans-btn">转化为二进制</button><p id="result">运算结果</p><script>/////// Task 1const btn = document.querySelector('#trans-btn')const result = document.querySelector('#result')function dec2bin() {let decNumber = Number(document.querySelector('#dec-number').value)// 判断输入必须为一个非负整数if (decNumber < 0 || !Number.isInteger(decNumber)) {alert('请输入一个非负整数!')}// 求余let bin = []let remainderwhile (decNumber !== 0) {remainder = decNumber % 2decNumber = parseInt(decNumber / 2)bin.unshift(remainder)}let binNumber = bin.join('')////// Task2let binBit = Number(document.querySelector('#bin-bit').value)if (binNumber.length >= binBit) {binNumber = binNumber.slice(0, binBit + 1)} else {binNumber = binNumber.padStart(binBit, '0')}result.innerHTML = `运算结果:${binNumber}`}btn.addEventListener('click', dec2bin)</script>
根据用户输入的数据,判断水仙花数(三位数),水仙花数是指一个 n 位数 (n≥3),它的每个位上的数字的 n 次幂之和等于它本身。
html
<label>请输需要判断的水仙花数(三位数):</label><input type="text" /><br /><button>开始判断</button><script>function numDaffodils(num) {// 判断是否为水仙花数}</script>
需求说明
开始判断
按钮,就执行 numDaffodils
函数判断输入的数字是否为水仙花数.153=1* 1*1+5*5*5+3*3*3
, 是水仙花数,就提示 153 是水仙花数。html
<label>请输需要判断的水仙花数(三位数):</label><input type="text" /><br /><button>开始判断</button><script>const btn = document.querySelector('button')function numDaffodils() {let num = document.querySelector('input').value//输入的是字符串// console.log(typeof num); =>string// 检查是否是有效数字if (num.startsWith('0') || num.length !== 3 || isNaN(num)) alert('请输入三位有效数字')// 拆分为数组let numArr = num.split('')//判断是不是水仙花数字!const numCheck = numArr.reduce((acc, value) => acc + Math.pow(value, 3), 0)numCheck == num ? alert('是水仙花数 ✅') : alert('不是水仙花数❗️')}btn.addEventListener('click', numDaffodils)</script>
这里有一个坑:从 <input type="text">
获取输入内容1,因为 type=text
,所以输出的是 string
而不是 number
,不能直接用typeof ==='number'
判断输入的是不是数字
效果如图:
这里分成了“应用”和“书签”两个栏目,但其实都是网页链接书签,看示例文档里的设置,应用里的是使用更为频繁的链接,书签栏则是一些参考链接/外链,或许“应用”命名为“常用”,“书签”则命名为“链接”或者“其他”更好一些。我之前还以为应用是本地应用……(我的问题╮( ̄ ▽  ̄"") ╭
项目仓库:GitHub - soulteary/docker-flare
此处我将文件夹命名为 flare
bash
mkdir ~/flare && cd ~/flare
bash
git clone https://github.com/soulteary/docker-flare.gitcd docker-flare
bash
# 可以使用最新镜像docker run --rm -it -p 5005:5005 -v `pwd`/app:/app soulteary/flare# 也可以追求明确,使用固定版本docker run --rm -it -p 5005:5005 -v `pwd`/app:/app soulteary/flare:0.2.10
因为示例文件夹里面已经有一个 docker-compose.yml
文件了,所以我们不需要另外创建,如果需要修改的话可以用 nano docker-compose.yml
编辑 (如果需要设置用户登陆的话,需要在此修改)
启动容器:
bash
docker-compose up -d
这时我们可以通过 http://ip:5005
访问书签页面了。
我用的是 Royal TSX 上的 File transfer 来查看文件夹内容。
配置文件的路径如下:各个文件的功能如下:
作者贴心地内置了 @mdi/font
相关 icon,可以通过 http://ip:5005/resources/mdi-cheat-sheets/
来访问图标列表,然后通过 Ctrl /CMD+ F 来进行页面内搜索。
在书签页面,可以通过左下角的齿轮图标调整主题和其他设置,和 config.yml
里的选项几乎一致:
安装 Nginx 并打开 flare.conf
文件
bash
apt install nginxcd /etc/nginx/sites-enabled/rm rf defaultcd /etc/nginx/sites-available/nano flare.conf
flare.conf
的内容 (注意修改 example.com 为自己的域名)
server { listen 80; listen [::]:80; server_name example.com; location / { proxy_pass http://127.0.0.1:5005; }}
用 nginx -t
测试配置文件,如果最后有出现 suceessful
,那测试就成功了。
然后为这个配置文件增加一个链接
bash
cd /etc/nginx/sites-enabled/ln -s ../sites-available/flare.conf flare.conf
重启 nginx
bash
systemctl reload nginx
刚遇到一些问题,又回到了我的 Miniflux 主页^ ^,遂重启容器:
bash
cd ~/flare/docker-flaredocker-compose downdocker-compose up -d
安装证书,详情参考这篇:用 docker 安装 Halo 博客并用 Nginx 反代
bash
certbot --nginx -d example.com -d www.example.com
其他好用书签:
再次感谢云五的 WordPress 搭建教程,照葫芦画瓢套用了 Nginx 的设置。
]]>参考:
Halo 官网:Halo
建议大家先去Halo 官网主题仓库看看有没有喜欢的主题再决定要不要装,不然很可能像我一样装了之后又跑路了…… ^^
域名生效需要时间,为了避免申请 SSL 证书时屡次失败导致超过申请次数限制,最好提前添加域名解析1,我这里用的是子域名。
为域名添加一个 A 记录,指向服务器所在 IP。如 Namesile 中:
在 Ubuntu 中安装 docker2:
zsh
apt updateapt install apt-transport-https ca-certificates curl software-properties-commoncurl -fsSL https://download.docker.com/linux/ubuntu/gpg | apt-key add -add-apt-repository "deb [arch=amd64] https://download.docker.com/linux/ubuntu bionic stable"apt update
其他系统可参考:Plume | 利用 Docker-compose 搭建 Fedi 开源博客平台 – Zoe’s Dumpster.中的安装方式,或者查看官方文档。有的 VPS 在装系统的时候也可以预装 docker,如 vultr/contabo 都有,不过 docker-compose 就需要自己装(这里似乎没有用到 docker-compose。
检查是否装好,有版本就装好了:
zsh
docker -v
参考:Ubuntu20.04 开放指定端口_哈-CSDN 博客
我不太懂端口是怎么开放的,自动开放还是用了就开放。这里用的是 ufw 来设置防火墙开放端口,用 netstat 查看端口占用状况。
Debian/Ubuntu 中安装 netstat3:
zsh
apt install net-tools
检查端口占用:
bash
netstat -aptn
ufw 是 Ubuntu20.04 系统预装的 3,如未安装上,可以这样安装:
bash
sudo apt updatesudo apt install ufw
常用操作:
bash
ufw enable #打开防火墙ufw disable #关闭防火墙ufw status #查看防火墙规则ufw allow 22 #打开22端口ufw deny 22 #拒绝访问22端口
打开防火墙之前最好打开常用的端口,如 22,不然可能会连不上服务器。
参考:使用 Docker 部署 Halo | Halo Documents
创建一个文件夹存放 Halo,我这里命名为.halo,当然也可以叫其他的。
bash
mkdir ~/.halo && cd ~/.halo
bash
wget https://dl.halo.run/config/application-template.yaml -O ./application.yaml
我不会用 vim 命令,所以这里用 nano 编辑
bash
nano application.yaml
配置参考 | Halo Documents这里已经有刚下载好的配置文件了,我们可以根据自己的需要修改,Halo 数据库支持 H2 和 Mysql 数据库,因为我已经安装了一个 Wordpress 博客占用了 Mysql 数据库,虽然不知道有无影响,但为了避免出错,最后选择了按示例里的配置,使用 H2 数据库(主要还是懒得改
我这里将端口放到 8090,因为原 80 端口已经被占用,大家可以选择其他开放端口,注意修改数据库用户名和密码。
yaml
server:port: 8090# Response data gzip.compression:enabled: falsespring:datasource:# H2 database configuration.driver-class-name: org.h2.Driverurl: jdbc:h2:file:~/.halo/db/halousername: admin #数据库用户名password: 123456 #数据库密码# MySQL database configuration.# driver-class-name: com.mysql.cj.jdbc.Driver# url: jdbc:mysql://127.0.0.1:3306/halodb?characterEncoding=utf8&useSSL=false&serverTimezone=Asia/Shanghai&allowPublicKeyRetrieval=true# username: root# password: 123456# H2 database console configuration.h2:console:settings:web-allow-others: falsepath: /h2-consoleenabled: falsehalo:# Your admin client path is https://your-domain/{admin-path}admin-path: admin# memory or levelcache: memory
bash
docker pull halohub/halo:latest
bash
docker run -it -d --name halo -p 8090:8090 -v ~/.halo:/root/.halo --restart=unless-stopped halohub/halo:latest
访问 http://服务器ip:端口号
说实话,我现在还没懂 Nginx 是干嘛的,反代又是什么,但好像一般都要有,那就做一下吧。幸好 Halo 还有现成的配置4可以抄一下,结合云五的 Wordpress 搭建教程2,把里面 wordpress 的部分改为 halo 就可以了。
bash
apt install nginxcd /etc/nginx/sites-enabled/rm rf defaultcd /etc/nginx/sites-available/nano halo.conf
注意修改www.yourdomain.com
为自己的域名
upstream halo { server 127.0.0.1:8090; } server { listen 80; listen [::]:80; server_name www.yourdomain.com; client_max_body_size 1024m; location / { proxy_pass http://127.0.0.1:8090; proxy_set_header HOST $host; proxy_set_header X-Forwarded-Proto $scheme; proxy_set_header X-Real-IP $remote_addr; proxy_set_header X-Forwarded-For $proxy_add_x_forwarded_for; } }
用nginx -t
测试配置文件,如果最后有出现suceessful
,那测试就成功了。
然后为这个配置文件增加一个链接
bash
cd /etc/nginx/sites-enabled/ln -s ../sites-available/halo.conf halo.conf
bash
systemctl reload nginx
现在访问域名就可以到达 halo 博客主页了,如果不行,可以 ping 一下域名看是不是解析还没生效:如 ping exampl.com
我这里出现一个问题,是输入域名后到了我的 miniflux 主页,因为 halo.conf 里域名后缀输错了……
有 ssl 证书后,就不会被提示网站不安全了,也就是从 http->https
bash
apt install certbot python3-certbot-nginx
修改 example.com 为自己的域名:
bash
certbot --nginx -d example.com -d www.example.com
如果你不确定是否可以申请成功,或者还在修改/测试配置,可以在后面加--staging
测试,避免申请超过次数限制1
一些选项,这里最好选择 1,如果选择 2,就没办法用 http 访问域名了:
text
1: No redirect - Make no further changes to the webserver configuration.2: Redirect - Make all requests redirect to secure HTTPS access. Choose this fornew sites, or if you're confident your site works on HTTPS. You can undo thischange by editing your web server's configuration.
然后同意条款后问是否暴露邮箱时选 No2。
如下图所示,在写 JavaScript 的时候,这个东西一直出来,还是蛮烦的。
解决方法:在 setting 里搜 editor.parameterHints.enabled,取消勾
参考来源:visual studio code - How do I get rid of this popup in VSCode? - Stack Overflow
改了 VS Code 里面的字体,Obsidian 里 code block 的字体也一起变了,用了有连字符的字体,箭头变得好好看!
现在用的是 Fira Code: https://github.com/tonsky/FiraCode
VS Code 里面可以在 settings.json 里加这行打开连字符: “editor.fontLigatures”: true
字体推荐:
需要了解 Netlify 的使用方式
更新方式:再导入一次更新后的文件包
需要了解 Github 的基本使用方式和 Vercel
更新方式:复制更新后的 HTML 文件夹到相应的 Github repo 文件夹中,覆盖原来的
]]>]]>css
/*删掉tag图标*/.fa-tags {display: none;}/*左侧菜单居中*/.leftbar-menu-item {text-align: center;}/*删掉日历图标*/.fa-calendar-o {display: none;}/*说说字体统一大小*/.shuoshuo-date-date {font-size: 15px;}.shuoshuo-date-month {font-size: 15px;}/*banner字体改为思源宋体*/.banner-title.text-white {font-family: 'Noto Serif SC', serif;}/*删掉左侧搜索栏*/.card-body.text-center.leftbar-search-button {display: none;}/*删掉左侧栏站点名称*/.leftbar-banner.card-body {display: none;}/*作者相关链接居中*/.site-author-links a {text-align: center;}/*去掉页脚卡片外形,并缩减边距*/#footer.card {background: none;padding: 0;box-shadow: none !important;}html.darkmode #footer {background: none !important;}
]]>css
.gallery-item {overflow: hidden;}.gallery-item img:hover {transform: scale(1.1);}.gallery-item img {display: block;width: 100%;transition: all 0.4s;}
未定义之前:content-box
css
* {margin: 0;padding: 0;box-sizing: border-box;}
css
.author-img {float: left;}
此时图片和文本不在同一个层面上
浮动到页面右边
css
p {float: right;}
使用一个并列的空<div>
元素来清除
html
<head><h1>title</h1><h2>title</h2><div class="clear"></div></head>
css
/*清除两者*/.clear {clear: both;}/*清除左边*/.clear {clear: left;}
原理和 empty div 的方式一样,但更简单,利用 pseudo element 在 parent element 后增加一个元素
html
<head class="clearfix"><h1>title</h1><h2>title</h2></head>
css
.clearfix::after {clear: both;content: '';display: block;}
加粗字体为默认状态
css
.container {display: flex;align-items: center; /*水平居中*/justify-content: center; /*垂直居中*/}
常用:
css
.container {display: flex;align-items: stretch;justify-content: flex-start;}
css
.items {align-self: flex-start;}
数字越大越靠后
数字越大占比越大
item’s width
flex:1
=
css
flex-grow: 1;flex-shrink: 1;flex-basis: 0%;
css
.container {display: grid;grid-template-columns: 250px 200px; /*两列*/grid-template-rows: 200px 200px; /*两行*/}
通常不定义 rows
用 gap 而不是 margin:
css
.container {/*gap:20px;*/columns-gap: 30px;row-gap: 20px;}
when the content is smaller than the grid
css
justify-content: center;align-content: center;
css
.items: {grid-column: 2/3; /*当前后数值相差只有1位时,可省去后面的数字*/grid-row: 2/3;/*占几个列/行时*/grid-column: 1/3;grid-row: 1/3;/*或者*/grid-column: 1 / span 3;/*自动填充剩余空间*/grid-column: 1/-1;}
css
.container {align-items: center;justify-items: center;}
css
.item {align-self: end;}
1fr
:自动填充剩余空间css
.container {grid-template-columns: 2fr 1fr 1fr 1fr;}/*shorthand*/.container {grid-template-columns: repeat(4, 1fr);}
所定义的空间被用完后多出来的列
]]>html
<button class="btn helper">Text</button>
css
.helper {margin-right: 1.6rem;}
如果设置 border 数值为负,周边空间则会收到影响,但用 box-shadow 就不会:
所以可以这样设置:
box-shadow: inset 0 0 0 3px #fff;
如设一个上为 2 列和下为 3 列的栅格布局:
css
.grid {display: grid;gap: 1.2rem;}.grid--2--cols {grid-template-columns: repeat(2, 1fr);}.grid--3--cols {grid-template-columns: repeat(3, 1fr);}
]]>html
<section class="grid grid--2--cols"><div>Text1</div><div>Text2</div></section><section class="grid grid--3--cols"><div>Text1</div><div>Text2</div><div>Text3</div></section>
1rem=16px
改变 rem 为 10px:
css
html {font-size: 10px;}
这种方法会让用户不能改变页面字体大小,不建议用
设置为用户浏览器字体的大小比例。
]]>
html{/* 10px/16px =62.5%*/font-size:62.5%;}
这份翻译还存在一些问题,部分专有词汇还没统一翻译,但大概看看还是可以的。
相关内容:
]]>知道企业与用户双方对产品的期许和目标,有助于促进用户体验各方面战略的确立和制定
此处的关键词是“明确”
要想在太具体和太宽泛之间取得一个平衡,我们就应该避免在尚未充分了解问题之前就试图得出结论。所以需要调研
对于任何一个网站,它需要明确描述的基础目标之一就是品牌识别( brand identity)品牌识別——可以是概念系统,也可以是情绪反应它之所以重要是因为它无法不被用户注意。在用户与产品交互的同时,企业的品牌形象就不可避免地在用户的脑海中形成了
即一些可追踪的指标,如印象数、转化率、日活等在产品上线以后用来显示它是否满足了我们自己的目标和用户的需求。好的成功标准不仅影响项目各阶段的决策,也为衡量用户体验工作价值提供了具体的依据。
- 设定成功标准需要注意什么?对驱动用户体验决策而言有意义的成功标准,一定是可以明确地与用户行为绑定的标准,而这些用户行为也一定是可以通过设计来影响的行为。不是所有的成功标准必须直接由网站获得。你也可以衡量对网站的间接影响任何断章取义的标准都可能造成误导:请务必后退一步,看看除了网站之外发生了什么事,以确定你了解到事情的全貌。
将用户分成更小的群组(或细分用户群)每一群用户都是由具有某些共同关键特征的用户所组成。
经验或专业程度上的不同就形成了我们细分用户群的基本维度
- 人口统计学 demographic)
- 性别、年龄、教育水平、婚烟状况、收入等。
- 这些人口统计的数据概况可以相当粗略(男性:18~49 岁) 也可以非常具体(未婚、女性、大学毕业、25~34 岁、年薪 5 万美元)。
- 消费心态档案 psychographic profile描述用户对于这个世界,尤其是与你的产品有关的某个事物的观点和看法的心理分析方法。
创建细分用户群只是一种用于“揭示用户最终需求的手段”。你真正只需要得到的是和你发现的“用户需求数目”样多的细分用户群。
很明显,我们无法提供一种方案可以同时满足这两种用户的需求。此时,我们要么选择针对单一用户群设计而排除其他用户群,要么为执行相同任务的不同用户群提供不同的方式。
问卷调査、用户访谈,或焦点小组) 最适合用于收集用户的普遍观点与感知。用户测试或现场调査)则更适用于理解具体的用户行为以及用户在和产品交互时的表现。
现场调查是指一整套完整、有郊全面的方法,用于了解在日常生活情境中的用户行为(因而得来此名)又叫行为考古
任务分析的概念是认为每个用户与产品的交互行为都发生在执行某一任务的环境中。有时任务非常具体(譬如买电影票),而有时任务比较宽泛( 如学习国际商务章程)
所谓可用性的最终目标,都是寻找令产品更容易使用的途径
对于由信息动的产品,卡片排序法( card sorting)用于探索用户如何分类或组织各种信息元素方法给用户一沓索引卡片,每一张卡片附有信息元素的名字、描述,一张图像或内容的类型。然后用户根据小组或类别,依照自己感到最自然的方式将卡片排列出来。分析几位用户的卡片排列结果,就可以帮助我们了解用户对产品信息的看法常用于信息架构
产品目标和用户需求经常被定义在一个正式的战略文档 ( strategy document)或愿景文档( vision document)中。这文档不仅仅是列出目标清单一一它提供不同目标之间的关系分析,并且说明这些目标要如何融入更大的企业环境中去。这些目标和对它们的分析经常由决策者、普通员工,和用户自己的直接意见来支持。这些意见生动地说明了项目中的战略制定问题。用户需求有时被记录在一个独立的用户调研报告中(将所有信息集中在一个地方有某些好处)。
课程:Build Responsive Real-World Websites with HTML and CSS
html
<p style="color:blue">text</p>
最好不用
放在<head>
里面的<style>
,如:
html
<head><style>h1 {color: blue;}</style></head>
style.css
<head>
里用<link>
引用,如:html
<head><link href="style.css" ref="stylesheet" /></head>
关于<link>
,可参考:MDN
css
footer p {font-family: sans;}article header p {color: blue;}
css
h1,h2,h3 {color: blue;}
定义特定元素样式的两种方式:CSS ID、class attributes
给每个元素一个 id,仅能用一次,尽量不要用
在 HTML 中:
html
<p id="author">text</p>
在 CSS 中:
css
#author {font-family: sans;}
能无限复用
在 HTML 中:
html
<p class="author">text</p>
在 CSS 中:
css
.author {font-family: sans;}
能无限复用
在 HTML 中:
html
<p class="author">text</p>
在 CSS 中:
css
.author {font-family: sans;}
css
* {color: #1098ab;}
<body>
里的通常只应用于文本元素(text)font-family
, font-size
, font-weight
, font-style
, color
, line-height
, letter-spacing
, text-align
, text-transform
, text-shadow
, list-style
, etc.!important
css
foot p {color: green !important;}
(r,g,b,alpha)
(255,255,255)
(0,0,0)
#00ffff
#off
当需要透明度的时候才用 rgb 颜色,一般用 hex用来指定特定元素
css
li:first-child {font-weight: bold;}li:last-child {font-style: italic;}
css
li:nth-child(odd) {font-style: italic;}li:nth-child(even) {font-style: italic;}li:nth-child(3) {font-style: italic;}
如下所示,当 HTML 中<p>
并不是<article>
里面的第一个元素时,不生效。
即当母元素(parent element)里有多种元素时(child elements),不宜使用伪类(pseudo class),可以在列中使用,如<li>
html
<article><head></head><p></p></article>
css
article p:fist-child {font-family: sans;}
四个状态都应定义,并按顺序排列
不进行交互的预览下
css
a:link {color: #1098ad;}
点击后
css
a:visited {color: #777;}
悬停时
css
a:hover {color: orangered;font-weight: bold;text-decoration: underline dotted orangered;}
点击时(通常和 hover 同时出现
css
a:active {background-color: black;font-style: italic;}
any pseudo elements is actually an inline element
在 HTML 中并不真实存在,但仍可在 CSS 中选择,如行内第一个字符:在 HTML 中并不真实存在,但仍可在 CSS 中选择,如行内第一个字符:
css
h1::first-letter {font-style: normal;}
段内第一行:
css
p::first-line {color: red;}
在同一 parent element 里,下面最临近的元素
如 h3 标题下的 p:
css
h3 + p::first-line {color: red;}
content
css
h2::after {content: 'TOP';font-size: 16px;font-weight: bold;color: black;padding: 5px 15px;display: inline-block;position: absolute;top: -10px;right: -25px;background-color: #ffe70e;}h2 {position: relative;}
css
h2::before {}
img 其实是 inline-block box
内边距
css
padding: 上下 左右;
css
* {margin: 0;padding: 0;}
不要用 body
外边距
relative
use the <div>
element to create a container class, then set the margin-left
and margin-right
to auto
css
.container {width: 800px;margin: 0 auto;}
/*需要注释的内容*/
CMD+/
(mac) Control+/
(win)cmd+i
方法:
工具:HTML 校对器:Markup Validation Service
代码比对:Diffchecker
HyperTextMarkupLanguageHTML 元素参考 - HTML(超文本标记语言) | MDN
以<p>Hello!</p>
为例子:
<p>
Hello!
</p>
html
<!DOCTYPE html><html><head lang="语言代码"><meta charset="UTF-8" /><title>这是标题的位置,head里面的东西都看不见(一般来说)</title></head><body><h1>一级标题</h1></body></html>
attributes | |
---|---|
src | sources |
alt* | alternative text (describe what the image are ) good for SEO/blind people |
width | 宽度 |
height | 高度 |
href | 超链接 # 表示回到页首 |
target | 在哪个窗口打开_blank 新窗口 _self 旧窗口 _top 顶部 _parent 父级窗口,如果有窗口层级的话 |
head | 在页面中不可见的元素,如页面标题、link to css files…… |
main | 文章的主要内容(HTML5 中新增) |
body | 页面的主要内容 |
section | 区块(semeantic HTMl |
h1 | 标题,一个页面只能有一个 h1 |
p | 段落 |
span | 行内文本 |
<!— —> | 注释 |
b | 加粗,和<strong> 不同,它没有语意,是过时的表述 |
strong | 加粗,表示是页面中重要的元素 |
i | 斜体,过时的表述,应用<em> |
em | 斜体,emphasize |
ol | 1. order list 数字排序 |
ul | . unorder list |
li | list item 列 ,用在 ol/ul 里面 |
img | 图片 特殊类型,不需要包含内容,需要 attributes( src/alt/width/height) |
meta | data about data meta charset=”UTF-8” |
a | anchor 超链接(attribute:href) |
header | 页头(container |
nav | 导航 ( container |
menu | 菜单,web application 常用 |
article | 内容(container |
footer | 页脚(container |
div | 无意义内容区块 |
br/ | 断行 |
aside | 次级信息/额外信息 |
figure | 常用于 feature cards/coding list…… |
figcaption | 图片脚注(只能在 figure 里面用) |
form | 表单 |
input | 输入框 |
label | 表单输入标题(也许 |
table | 表格 |
thead | 表头 |
tbody | 表体 |
th | 表头单元格 |
tr | table row |
td | table data |
address | 地址 |
s | 删除 |
blockquote | 引言 |
<button>
和< a>
的区别:特殊符号速查表
<div>
/ <b>
html
<div class="image" role="img" arial-label="description about the image"></div>
笔记:相当于结构层是信息架构,框架层是信息架构所决定的布局。 地图和坐标?
特性和功能就构成了网站的范围层( scope)
上下层之间不是互相隔断的让任何一个层面中的工作都不能在其下层面的工作完成之前结束
网站既不能干脆地分类到应用程序,也不能分类到信息资源
用户体验并不是指一件产品本身是如何工作的
用户体验是指“产品如何与外界发生联系并发挥作用”,也就是人们如何“接触”和“使用”它。
用户体验设计通常要解决的是应用环境的综合问题
“设计一个用户体验良好的产品”作为明确的目标,意味着不仅仅是功能成外观那么简单。
产品越复杂,确定如何向用户提供良好的使用体验就越困难。在使用产品的过程中,每一个新增的特性、功能或步骤, 都增加了导致用户体验失败的机会
不管用户访问的是什么类型的网站,它都是一个“自助式”的产品。没有可以事先阅读的说明书、没有任何操作培训或讨论会、没有客户服务代表来帮助用户了解这个网站。
用户所能依靠的只有自己的智慧和经验,来独自面对这个网站的信息一一那么这个网站的主要目标之,就是尽可能有效地传达那些信息
商机、竞争优势
提供优质的用户体验是一个重要的、可持续的竞争优势一一不仅仅对网站是这样, 对所有类型的产品和服务也是如此。
用户体验形成了客户对企业的整体印象,界定了企业和争对手的差异,并且决定定了客户是否还会再次光顾
衡量用户体验效果的指标
转化率通过跟踪有百分之多少的用户被你“转化”到了下一个步骤,就能衡量你的网站在达到“商业目的”方面的效率有多高
任何在用户体验上所做的努力,目的都是为了提高效率。
创建吸引人的、高效的用户体验的方法称为“以用户为中心的设计(user- centered design)”。
]]>在开发产品的每一个步骤中,都要把用户列入考虑范围。
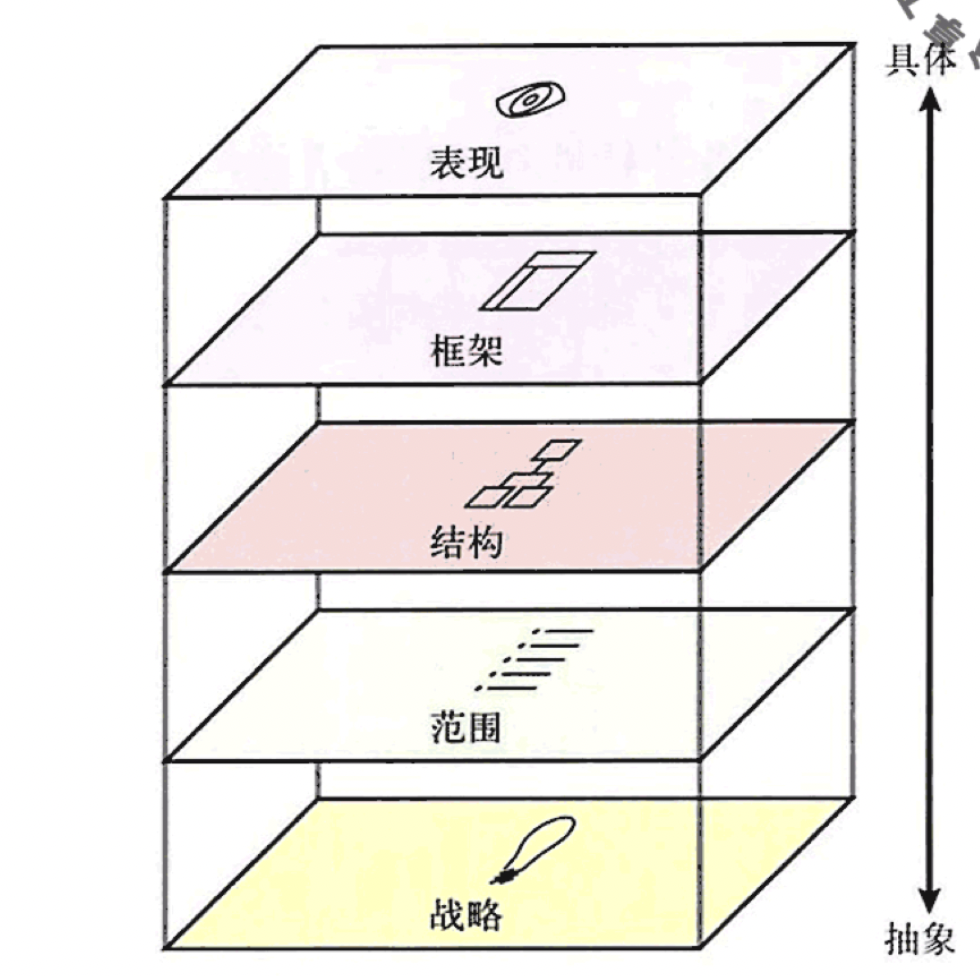
涵盖功能的广度,整合所含的功能(大概有什么)
对一些特征进行深入的建模(多层级)
表明用户场景,痛点是怎么产生的(场景)
Wizard of Oz
Proof of Concept Video
Metaphor Development
“用户使用界面来完成任务 ”
通过理解用户以及他们要完成的任务 以便设计出最好的界面(interface)
前提是,最好的界面 只能在我们了解用户和他们想要完成的任务之后才能被设计出
一种创新的开发用来满足一些需求。
开发一个比现在更能满足用户需求的界面(基于设计的问题空间)
使用屏幕实践将设计基础概念化
能用 useful
目标
改善用户完成目标任务的能力
方法
回顾第一阶段获得的数据 并且鉴别出用户的需求
显性需求
隐形需求
好用 usable
目标
以功能性和在第一阶段所发现的非功能性的需求为基础,使用户更加有效高效和满意 地完成任务,从而改善他们的用户体验
方法
回顾第一阶段的数据,确定设计可替代品中功能性和非功能性的需求
功能性需求
——面向用户的
系统应该完成的,这些基于用户所期望的系统功能
非功能性需求
——面向商家的
和系统开发有关的限制。它们也可以被看作质量特性( 这些特性包含了许多或后端功能,比如安全性,可执行性,可维护性 但是他们也包括了前端功能货可用特性,像布局、流程或者甚至是语言本地化需求)
小组讨论
界面类型
设计流程的第一步
了解用户当前是如何完成任务的
需求收集的目标是什么?
理解问题域
问题域(problem space)包含什么?
需求收集的陷井
设计师可能会直接开始设计可供选择的设计品,尽管他们尚未完全了解任务,用户以及用户如何实现任务 换句话说,他们急于直奔主题了 他们在没有取得用户数据的基础上就开始设计了
设计是一个系统性的数据驱动的过程
设计师通常结合使用两种数据,这种方法称为 混合方法(Mixed method approach)
1.主要 Primary
主要利益相关者是直接使用设计的人员。这些是设计者最常与之互动的用户,他们被称为最终用户
2.二级 Secondary
不直接使用设计,但可以间接地使用,因为他们从中可得到某种输出
3.三级 Tertiary
可能根本不使用设计 ,但直接受设计的影响, 无论是消极还是积极的方式
考虑二级和三级利益相关者,也可以帮助我们创造具有创新性的设计,并为我们的客户提供竞争优势。从这个意义上讲了解利益相关者会带来更好的用户体验设计
是在用户自己的环境中,观察用户的行为,不需要询问用户何时何地以及怎样完成既定任务的 设计师会亲自到用户完成任务的地点,并观察他们的行为。
定性、定量
数据收集受设计师主观影响。
设计师所收集到的数据,局限于他们个人的收集方式和理解方式。无法核实设计师做出的 假设正确与否
停留表面,看不到深层原因。
我们并不知道为什么 用户采取这样的方式完成任务
需要注意用户隐私、匿名化
基于收集到的数据,进行下一步调研,如问卷、焦点小组等,使问题域更聚焦,探寻真正的问题所在,解释用户行为的原因
Closed-ended questions
Open-ended questions
目的是获取用户简短的回答,包括他们的观点、偏好、态度等
用户
设计团队
1. 主持人
2. 记录员
3. 媒介记录员(可选)
流程
定性
定量
目的是深度收集用户信息
定性>定量
需要知道用户将会继续说什么,以及 何时控制不再提供价值的对话。 采访者的技能在保持融洽关系方面也很重要, 这种关系应该是既灵活又平衡的。 它使用户舒适, 足以提供诚实的意见 但不能太舒适 而导致用户想用采访者的反应来取悦她。
据收集策略达到极点时,访谈最有用。
这意味着当问题得到很好的理解时, 设计人员在需求收集流程中处于关键位置, 需要的是用户最终的澄清或见解。
假设:已对定性和对定量数据进行了适当的分析
Descriptive statistics
描述性统计允许我们总结定量信息 这包括数据集的范围、平均值和中值
User characteristics table
特征表以简单的形式提供了我们所有数据的快速总结,包括定量数据和定性数据
场景
场景使得我们能了解用户如何使用系统。
场景提供了定性和定量数据的描述。
基本案例场景
帮助理解 用户的活动以及系统的要求。
1.用户的目标
2. 用户意向
3.系统的责任
分层任务分析
最常见的任务分析技术。 使我们考虑用户当前如何完成任务。关键点是可观察的行为。
当前 UI 评估
1.确定用户任务
对于每个 UI 对应的每个 UI ,你想要确定任务或者用户使用的目的是什么
2. 测定任务完成时间
要客观的测定所需时间去 响应这个客户提交的任务
在这个例子中 我选择了一些点击,它会让我使用这个应用程序,或者网站,或者通过终端完成任务。
3. 评估操作
4. 改进方法
Resources for Requirement Gathering
这是一门在 Coursera 上的 UX 课程,共有五个星期的内容,讲了 UX 的基本概念和实际操作流程,主要侧重用户研究方面,也讲了很多和设计心理学有关的内容,很适合 UX 入门。
我将按照课程内容的划分,分别发布五个 weeks 的笔记,这是第一篇。
原笔记是在 Notion 上写的,我喜欢用 Notion 里面的 toggle 效果,用“提问”-“答案”的形式来启发思考,但是博客这里用折叠文本比较麻烦,所以直接列出来了
User Experience design is design that is user centered。The goal is to design artifacts that allow the users to meet their needs in the most effective efficient and satisfying manner。
以用户为中心的设计。目标是轻松高效地满足用户的需求。
“用户使用界面来完成任务”
通过理解用户以及他们要完成的任务,以便设计出最好的界面 (interface)
这里的“用户”是指使用一些技术来达到目的的个体
有输入、输出、系统,于此同时,每个输入都会导致一个期望的输出:个人使用界面的能力与个人特征、群体、社会有关
设计“能用”并且“好用”的界面
“实用性”指的是有效、高效并且让用户觉得满意的。
如果用户能够理解怎样的输入 (Input) 会带来所需的输出 (Output) 那么这个界面就是实用的
指一个物理对象与人之间的关系
(无论是动物还是人类,甚至机器和机器人,他们之间发生的任何交互作用)
是指可以感知到的事物的实际属性,主要是那些决定事物如何被使用的基本属性 (看看你的智能手机,我们会看到很多种功能,例如按键,可以感知到可以被按。)
能告诉人们正确操作方式的任何可感知的标记或声音。
示能决定可能进行哪些操作,意符则点名操作的位置。
一些让你知道系统正在处理你的要求的方式
反馈需要将用户信息发送回来其中包括哪些系统输入的信息已发生它跟我们沟通操作结果
注意礼貌、着装
1 - 介绍
2 - 交流
3 - 结束
产品设计会受公司商业竞争压力的影响,这很可能会让设计偏离初衷,使市场产品变得同质化。设计受竞争压力影响的一个表现就是“功能蔓延”,它指的是为产品增加更多功能的倾向。
面对竞争压力,好的策略是“有所为,有所不为”,专心于已经占据优势的地方,让强者更强。然后聚焦于市场和宣传,大力推广已有的优势。不要盲目跟随潮流,增加无用功能。其中最重要的是关注真正在使用产品的用户的需求。
科技是巨大的变革动力,技术的发展改变了人们做事的方式,但人们的基本需求没有改变。
那些对生活有重大影响的创新,从概念到上市通常需要数十年,而且有很多的创新在上市之前就已经失败。这是因为这些创新会影响到现有的产品,会产生冲突和矛盾,用户适应新的产品也需要时间,而时间的拉长则会消耗预算和资源。“从概念到成功的产品,好点子需要旷日持久地跨越漫漫长途。”
两种都需要
新技术的出现,让书籍、视频、音频等交互媒体的制作更加简单,这让入门变得简单,让人们更容易分享、获得信息,但这也会带来信息的泛滥,高技术水平的信息内容仍需要专业的制作。
设计应承担社会责任。作者批判了产品的废止制度,还提到可以采取订阅的方式可持续发展。
设计思维的关键是要解决真正的、根本的问题。可以通过“五个为什么”等方法去确定问题。“以人为本的设计”则是可以应用于解决问题的原则之一,它强调采用满足用户需求和能力的恰当方式去解决问题,这主要是通过四个步骤:观察->创意->打样和测试。
描述了设计的两个阶段:找到正确的问题,和满足用户需求
可以将以人为本的设计原则嵌入到双钻模型中,于是有“以人为本的设计流程
有很多激发创意的方法,核心的原则是:
奥兹向导”(Wizard of Oz):
汇集小部分目标用户进行原型测试,作者一般一次单独测试 5 个人,有测试结果后改进方案,接着选择另外五个人再次测试。
另外一些提到的概念:A/B 测试、以活动为中心的设计、关键点评审
实践双钻模式和以人为本的设计理念时,会遇到很多现实的冲突。比较好的解决方法是组建跨部门的联合团队,并正视挑战,精心规划设计流程。
提到了现在设计过程中常遇到的一些问题,比如有多个互相冲突的需求、缺少团队沟通的设计改动等。还提到了包容性设计/通用设计/无障碍设计的概念和意义。
复杂跟混乱是不一样的,复杂是“内容多,但有条理”,混乱是“内容多,但没条理”。驯服复杂性最重要的原则之一,是建立一个良好的概念模型。
建立统一的标准可以提升产品的易用性,降低人们的学习成本。但建立标准是困难的,在技术没有完善之前建立标准,会让标准容易过时,而过迟建立标准,则很难达成一致。
在需要设计限制的产品,比如安全系统、危险设备等,需要故意制造一些使用上的困难。但这并不意味着完全放弃产品的易用性,设计需要基于具体的任务来分析,在需要限制的地方反向利用优良设计的原则,在不需要限制的地方仍然遵循原则。
设计是个非凡的学科
本章主要讨论的是“无意识的犯错”
原文又称:记忆失效性失误
在复杂的情况下,太多的信息就是问题所在:信息,既支持决策,也会排斥它
社会和习俗压力影响大,但却难观测。好的方法是“奖励安全“、培训等等
永远不要低估社会压力对个人行为的影响力量,它可能促使原本理智的人们去做他们即使知道是错误或可能危险的事情。
社会压力不断出现。它们通常很难被记录下来,因为大多数人和组织都不愿承认这些因素,所以即使在事故调查中发现有社会压力的因素,其结果也往往隐匿不见,得不到公众的仔细监督
我们需要不同的培训;我们需要奖励安全,并将其置于经济压力之上
检查清单是个功能强大的工具,经过验证,它可以增加行为的准确性和减少差错,特别是失误和记忆失效
减少差错的唯一方法就是直面差错,承认差错存在,并为减少差错而作出改变。三个案例:
来源于汽车生产系统
主要是讲如何降低人们报告差错时的心理负担
区别:
人们常常忽略单一的异常情况,并试图为其辩解。但他们的辩解是基于过去经验的,可能已不适用于现状,这些“简单处理”的辩解会让他们错失挽救错误的良机。
- 了解差错的根本原因,通过设计以尽量减少这些诱因。
- 进行合理性检验。检查操作行为是否能够通过“一般性常识”的测试
- 设计出可以“撤销”操作的功能——“返回”以前操作,或者如果操作不能“返回”,则增加该操作的难度。
- 让人们易于发现一定会出的差错,以便容易纠正。
- 不要把操作看成是一种差错;相反,帮助操作者正确地完成动作。应该将操作认为近似于预期目的。
电子系统可以更方便的定位和确认不合理的操作,但用户并不一定能即时发现错误,在用户进行不合常规的操作时,给用户提醒、确认。
如:大额转账金额确认
防范失误最好的办法是对正在实施的动作的特性,提供可以感受到的反馈,越是灵敏的反馈越能体现新的结果和状态,再伴之以能够撤销差错的机制
我们应该好好思考系统,思考所有可能导致人为失误,进而酿成事故的交互因素,然后,策划出从总体上改进系统,使之更加可靠的方案。
良好的设计还是难以防范人们故意犯错,差错并不全都因为设计
原因:
当自动化系统发生故障时,经常没有警告,人需要时间去注意问题、评估分析、解决问题。
能够执行那些枯燥乏味、令人厌烦的工作,但是不能做太复杂的工作。
“人为差错”,往往只是一种人类特性与技术需求不相符的行动
范式(schemas):知识结构,由一般规则和信息组成,主要用于诠释状况,指导人们的行为
确定两类基本问题:
通过对实际任务的细致观察,进行设计过程,从而设计出与实际任务最贴切的方法
基于对实际任务的细致观察,进行的设计过程
强制功能
一种物理约束,是较强约束的极端情况
需要用钥匙才可以开车
汽车的声音是重要的意符
原因:
复杂的密码增加了人们记忆的难度,于是人们采用简单粗暴的方式来记下密码,这反而让密码不安全了。更好的方式是使用多种标识符。
外界知识是帮助记忆的有力工具,关键是要在合适的场合、时间
仅仅指记住在未来某个时间要从事的一些活动这个记忆任务。(记住未来的某一件事)
指规划能力,想象未来的能力
理想的提醒方法应兼顾两个层面
查找低效、初次使用时易用性高->设计可优化信息查找效率
查找高效、初次使用时易用性低(需要学习)->设计可构建合理概念模型,简化学习过程
映射是结合外部世界与头脑里知识的最佳案例
作用于控制与被控制对象之间的,显而易见的映射关系,
当人们使用物品时,会面对两个心理鸿沟:执行的鸿沟、评估的鸿沟
执行动作-> 评估结果(解释)
大部分行动不需要按顺序经历所有阶段,事件行动之间相互影响,可能会有很多行动分支
日常行动中许多是机会主义的行动,没有明确的目标
反复思索,追问背后的真实原因,如 5w
三个层次:本能、行为、反思
高层次的反思认知可以触发低层次的情绪。低层次的情绪会引发更高层次的反思认知。
是什么:完全沉浸在行动中的情感
会如何:人们会忽略外部时间和空间,有身临其境的感觉
特点
人们喜欢为事情建立因果关系
即一种正面思考的并且自我感觉良好的文化
系统差错被归因为人为差错
人擅长灵活的工作和创造,机器擅长准确的工作。
有助于回答执行类(做)的信息->如何做?
有助于理解发生了什么的信息->发生了什么?
可见性、反馈、概念模型、示能、意符、映射、约束
]]>以下在 flomo 中总结的内容
是指设计师提供给用户的适用信息组合,如(说明书、操作说明视频等)
是一种沟通中介,设计师通过“系统映像”给用户传递产品预设的心理模型,并期望用户基于此建立一致的心理模型。
产品的复杂性增加,更难学难用。作者认为最好的方式是建立统一的标准。
设计需要跨学科合作,设计管理很重要,需要兼顾平衡多方目标
]]>An unrecognized fundamental human truth that reveals the inner nature of things
一个未被承认的人类基本真理,揭示了事物的内在本质
A new way of viewing the world that causes us to reexamine existing conventions and challenge the status quo.
一种看待世界的新方式,使我们重新审视现有的惯例并挑战现状
A penetrating observation about human behavior thaWhat Is Insight- The 5 Principles of Insight Definitiont results in seeing consumers from a fresh perspective.
对人类行为的深入观察,导致从一个全新的角度看待消费者。
A discovery about the underlying motivations that drive people’s actions.
对驱动人们行动的潜在动机的发现。
洞察(Insight)让我们去思考人们为什么做事,是什么阻碍了人们做事情,它更深入问题根源,而不是停留在表面
A simple observation of how people behave in a given situation, what they think, what they feel, but most importantly explain what they are doing and trying to achieve
一个关于人们在给定的情境内如何想、如何做、如何感受的观察陈述。重要的是要说明他们在做什么以及想做什么。
understanding the barriers that are stopping consumers from achieving what they want to achieve with a given product, service or experience
了解消费者通过特定产品、服务或体验实现其愿望时遇到的障碍。
An insight statement is a discovery of understanding and the identification of unmet needs to explain why something is happening the way it is
洞察力声明是对理解的发现和对未满足需求的识别,以解释为什么事情会以这样的方式发生.
You must know the reason a consumer is behaving in a particular way, and why it is happening if you are to develop a product or service that can in some way augment the behavior or change it.
你必须知道消费者以特定方式行事的原因,以及为什么会发生这种情况,如果你要开发一种产品或服务,以某种方式增强这种行为或改变它的话。
Discovering the underlying motivations that drive people’s actions
发现推动人们行动的潜在动机
End-users of a product or service are motivated to change by the tensions that exist in their lives.
产品或服务的终端用户被他们生活中存在的紧张关系所激励而改变
Look for tensions in four key areas: the physiological, the emotional, the cognitive and the environmental to inform your insight statements.
寻找四个关键领域的紧张关系:生理的、情感的、认知的和环境的,
It is important to describe the desired end-state or situation the consumer is seeking.
描述消费者所追求的理想的最终状态或情况是很重要的
The key here is not to define a solution but clearly convey how the consumer would like the world to look and feel, what the ideal experience should be.
此处的关键在于不需要定义一个清晰的解决方案,而需要清楚地传达消费者希望世界看起来和感觉如何,理想的体验应该是什么
An excellent way to articulate this is to start with the statement “I wish there was,
一个很好的表达方式是以 “我希望有 “开始
Think of insight definition as a three sentence journey that takes the reader through the consumer’s situation, frustration, and future desires.
将洞察定义视为一个三句话的旅程,带领读者了解消费者的情况、挫折和未来的愿望。
Having pictures around that instantly remind me of special moments and people, makes me feel good.”
“身边有照片,能让我立即想起特别的时刻和人物,让我感觉很好。”
“But I find that pictures from my digital camera often stay hidden on my devices because I never have time to print them.”
“但是我发现我的数码相机里的照片经常被藏在我的设备里,因为我从来没有时间去打印它们。”
“I wish there was a way to enjoy them everyday without having to actively play them on my TV or computer.”
“我希望有一种方法可以每天欣赏它们,而不必在电视或电脑上主动播放它们。”
需要把 insight(洞察)转变为 HMW(我们如何?)
例如:
“我们可能如何每天享受我们的记忆,而不必花时间在设备上主动播放它们?”